Friday, March 23, 2012

Recipe Swap - Mint Chocolate Chip Cookies

Want to see what other Secret Recipe Club recipes were made during the swap? Here is the link to the Secret Recipe Club Recipe Swap Part 2 Roundup


The SRC-style Recipe Swap was so popular last time that I decided to make it a regular theme. This go-round I ended up with my good friend Jaida's blog, Sweet Beginnings. Jaida actually reached out to me because of the recipe swaps, which she had seen on my blog. She wanted to start a blog of her own and we found ourselves emailing and chatting on a regular basis. That's one of the things I love about the blogging community - I've met so many great people through my blog. One day I'll make it out to Texas or she'll make it out to PA and we'll actually get to meet in person.


As much as I love being able to choose whatever recipe I want for the SRC-style swap, sometimes having to make that decision can be difficult. Jaida's blog is full of delicious recipes I want to try and narrowing it down was hard. As you'll see in Tuesday's post, I couldn't pick just one thing so I opted to make one savory and one sweet recipe. I recently won a McCormick giveaway on Chocolate Moosey, so I decided to finally bake these Mint Chocolate Chip Cookies I've been drooling over for months. Like Jaida, mint chocolate chip is my favorite ice cream flavor. I've always loved it and 8 out of 10 times that's the flavor I'll pick if we're having ice cream. I couldn't wait to try it in cookie form.


Now we all know I don't bake, so this was a big deal for me. And I decided to bake these on a Wednesday night, which just goes to show how easy they are to make. I started at 7:50pm and had all the cookies baked and cooling by 8:35pm. That's impressive for me. I didn't even need to bust out the KitchenAid stand mixer; I just used my trusty hand mixer and it did a great job. What impressed me the most about this recipe was that the cookies didn't spread in the oven. That's always my biggest complaint when I make cookies. I like a moist, chewy, puffy cookie, not a crispy, thin cookie. These were perfect.

Since the recipe makes approximately 36 cookies I baked them in batches. And as you can see, my cookies aren't green. Sadly, I don't own food coloring (remember, I don't normally bake). I think the green color is fun and definitely alerts folks to the minty flavor, but it isn't necessary for a tasty cookie. I tried one after they'd been cooling for a few minutes and I had to physically restrain myself from eating another. This is why I don't bake, people. The results are just too tempting.

Thanks for a wonderful recipe, Jaida!

Mint Chocolate Chip Cookies
Sweet Beginnings

1 cup sugar
1 cup butter
1 teaspoon vanilla
1/4 teaspoon mint extract
8-10 drops green food coloring
1 egg
2 1/3 cups flour
1 teaspoon baking powder
1 bag (12 oz) semi-sweet chocolate chips

Preheat oven to 350 degrees.

Beat together butter and sugar on low speed (using a hand or stand mixer) until fluffy. Stir in vanilla, food coloring, and egg; mix well. Sift together flour and baking powder in a small bowl and slowly add to the sugar mixture, combining well after each addition. Once combined, stir in chocolate chips using a wooden spoon.

Drop heaping tablespoons onto a foil-lined baking sheet about 2 inches apart. Bake 7-9 minutes until just set. Remove to cooling rack.

Makes approximately 36 cookies
Pin It!

Wednesday, March 21, 2012

Ravioli with Bacon Mushroom Cream Sauce

Lately I've been trying to use up things I have in the freezer and pantry, modifying recipes to make them work with what I already have on hand instead of buying new ingredients. It's going to be a long project since we have a ton of things stored in not just the freezer but the pantry and garage.

This recipe started out as Tortellini & Pancetta in Mushroom Walnut Sauce on my friend Melissa's blog, was modified into Tortellini & Pancetta in a Mushroom Cream Sauce on my friend Carrie's blog and ended up as Ravioli with Bacon Pesto Mushroom Cream Sauce on my friend Cassie's blog. I modified it further by leaving out the pesto because I didn't have any in the freezer and didn't want to buy it.


This was surprisingly light for including heavy cream. I added some chicken stock to stretch the sauce and cut the calories. I will definitely try it with pesto over the summer when my basil plant gets out of control, but this was delicious without it. A simple, light, easy dinner.

Ravioli with Bacon Mushroom Cream Sauce
Modified from Cassie Craves

1 package frozen cheese ravioli
4 strips bacon, chopped
1 tablespoon butter
1 small onion, finely chopped
8 ounces sliced white mushrooms
2 cloves garlic, minced
1 cup heavy cream
1/2 cup chicken broth
Salt and pepper to taste
Parmesan or Romano cheese for serving

Cook the bacon in a large, high-sided skillet over medium-high heat until crisp. Remove to paper towels to drain. Drain all but one tablespoon of bacon grease from pan.

Add butter to reserved bacon grease. When melted, add onion and mushrooms and cook until onions are translucent and mushrooms are browned. Season with salt and pepper. Add garlic; cook and stir for 30 seconds. Reduce heat to medium and add heavy cream and chicken broth, stirring occasionally until sauce begins to thicken.

While sauce is thickening, cook ravioli according to package directions.

Add cooked bacon back to the pan. Taste sauce for seasoning and adjust as needed. Add sauce to cooked ravioli, stirring very gently to combine. Sprinkle each serving with shredded parmesan or Romano cheese.
Pin It!

Monday, March 19, 2012

Buffalo Chicken Wraps

Oh buffalo chicken, how I love you. Let's see, I've made traditional wings, buffalo chicken chili, buffalo chicken tenders, buffalo chicken mac and cheese, buffalo chicken tacos, buffalo chicken quesadillas, buffalo chicken burgers, buffalo chicken sandwiches, and buffalo chicken pizza.

Wow, I've made a lot of variations on buffalo chicken, haven't I? Sheesh.

As much as I love buffalo chicken I'd never made it into a wrap before. Then a craving for buffalo chicken hit and since it was Friday we went out for dinner. I ordered a buffalo chicken wrap and it was a disgrace. The chicken was breaded, which meant it was mostly breading and very little chicken. It was also mostly filler. I vowed right then and there to find a great version to make at home. My friend Jaida recently turned me on to Bev Cooks and I remembered seeing her post a recipe for Buffalo Chicken Wraps.


I made a few modifications, mainly deleting the hardboiled eggs and bacon because I don't think they belong in a buffalo chicken wrap. Just a personal preference, so feel free to add them back in. I also left out the cayenne in the marinade because Frank's is spicy enough for me on its own and used blue cheese dressing in place of making my own with ranch and blue cheese crumbles. I watched a few YouTube videos about rolling wraps and finally perfected my technique. Go me!

These were absolutely delicious. I already knew we loved buffalo chicken but everything worked so well together. These wraps were simple to make, especially if you cook the chicken ahead of time and chop up all the other ingredients. I made another wrap for lunch the next day and it took all of 5 minutes to heat the tortilla and chicken and then wrap everything up.

If you love buffalo chicken you need to make these. Soon.


Buffalo Chicken Wraps
Modified from Bev Cooks

1 tablespoon butter, melted
1 pinch freshly ground pepper
1 pinch coarse salt
1/2 cup Frank’s hot sauce, divided
1 pound chicken tenders
2 cups shredded romaine lettuce
1 roma tomato, diced
1/4 cup blue cheese dressing
2-3 scallions, finely chopped
1 cup shredded cheddar cheese
4 large flour tortillas

Combine the butter, black pepper, salt and 1/4 cup Frank’s in a bowl. Whisk to combine. Add the chicken and toss to coat. Cover and marinate for however long you want to. An hour or more.

Heat an indoor grill over medium-high and coat with cooking spray. Add the chicken tenders and grill until cooked through with nice grill marks on both sides, about 8 minutes total. Remove from grill and roughly chop.

Heat up the tortillas in the microwave. Layer some chicken in the center, followed by romaine, tomato, blue cheese dressing, scallions, cheddar, and a few more good glugs of Frank’s. Mix up the filling with a spoon or your fingers so the dressing evenly coats all of the ingredients. Roll up the wrap and tuck in the corners (I suggest searching YouTube for a video as seeing someone do it is the best way to learn).
Pin It!

Sunday, March 18, 2012

Weekly Menu - Week of March 18, 2012


I feel like the weeks are flying by since I started my new job. This is both good and bad. Good because spring officially arrives this week and we're enjoying daylight later into the evening. Bad because Baby Girl is growing by leaps and bounds and I need her to slow down!

I'm really excited for this week's menu. The best part is that my shopping list is relatively short because I'm using up ingredients from the fridge, freezer and pantry.

Sunday - Burgers and shrimp on the grill, Potato Bundles and caprese salad: I had something else planned initially but the weather is so gorgeous we decided to grill instead.

Monday - Ravioli with broccoli in a garlic cream sauce, garlic bread: I needed to use up the broccoli I bought for the meal I'd originally planned for Sunday. I'm going to wing the sauce.

Tuesday - Hoagies

Wednesday - Lunch and dinner are both SRC swap meals (one for the official SRC and one for the swaps I host).

Thursday - Weeknight Spaghetti and Meatballs, garlic bread, salad: SP's special request from the latest issue of Cook's Country.

Friday - Out to dinner
Pin It!

Friday, March 16, 2012

Make Ahead Scrambled Eggs

When I saw that I'd been accepted for the FoodBuzz Activia Brunch I knew I needed to finally try these Make Ahead Scrambled Eggs I'd seen on Melissa's blog a few months ago. Not only did they look delicious, but how awesome is it to be able to make scrambled eggs ahead of time?


These exceeded my expectations. They were absolutely fantastic. I cut the recipe by 1/3 (using a dozen eggs and cutting the rest of the ingredients according) and only had one serving left, which I enjoyed for breakfast the next day. SP thought the eggs were a little runny from the sour cream and half & half, but I like my eggs that way so I wasn't bothered. The tang from the sour cream was a great touch and the fresh tomato on top was excellent.

Make these for your next brunch (or lunch, dinner, whatever) and you won't be disappointed!

Make-Ahead Scrambled Eggs
I Was Born to Cook

18 eggs
3/4 cup half & half
2 tablespoons butter
1 1/2 cups light sour cream
2 cups shredded cheddar cheese
salt and pepper to taste
sliced tomato

Beat eggs and half & half together in a large bowl. Heat butter in large skillet over medium heat. Add eggs and cook, stirring frequently but gently, until set but not completely cooked.

Remove pan from heat and add sour cream. Spread eggs into a greased 9x13 pan, then add cheese (leaving about 1/2 cup), salt and pepper. Stir, then spread evenly. Top with remaining cheese. Cover tightly and refrigerate.

When ready to bake, heat oven to 350. Uncover and add tomato slices on top. Warm through for about 25-30 minutes. You could also set the temp lower and bake them longer.
Pin It!

Thursday, March 15, 2012

FoodBuzz Tastemaker: Activia Yogurt

Recently I was chosen by FoodBuzz to host a brunch featuring Activia's new Harvest Picks Yogurt. I received coupons for free yogurt and was tasked with hosting a brunch to complement the yogurt. I was very excited for this promotion because I absolutely love brunch and it's been awhile since I cooked a big meal for company.


My supermarket carries three flavors of the Harvest Picks - strawberry, peach and cherry. I bought each flavor so my guests and I could try the different varieties. I also got fresh fruit (strawberries, bananas and blueberries), as well as granola, to mix in.


We all decided the yogurt would work well as a sweet treat at the end of the meal, which also featured Make Ahead Scrambled Eggs (recipe coming soon), hash browns, bagels with cream cheese and lox, and bacon. I figured the healthy properties of the yogurt and fruit counteract the bacon and I only had one piece.


I opted to try the strawberry yogurt mixed with granola and additional strawberries and blueberries:


I'd never had Activia before and I enjoyed the Harvest Picks. We have quite a few leftover so we'll be eating more throughout the coming weeks. I looked around the Activia website and saw that Activia contains the live probiotic culture Bifidus Regularis® (Bifidobacterium lactis DN-173 010) to help naturally regulate your digestive system when consumed daily for two weeks as part of a balanced diet and healthy lifestyle. I'm sure many of you have seen the commercials featuring Jamie Lee Curtis. Check out the website for more information about Activia.

Disclosure: I have partnered with Dannon to help promote Activia Harvest Picks Yogurt. I have been compensated for my time commitment to review Activia Harvest Picks Yogurt. However, my opinions are entirely my own and I have not been paid to publish positive comments.
Pin It!

Wednesday, March 14, 2012

Recipe Swap Roundup - Pasta Part 2

I love pasta. It's such a versatile ingredient, a blank slate for which there are endless possibilities. I know many others share my love so I figured we would revisit pasta as the theme for this recipe swap. It was another large turnout, which just goes to show you that people love pasta and can't get enough of it.

These are some seriously yummy-sounding pasta dishes. I dare you to scroll through this roundup and not find at least one dish you want to make.

Ally's Penne with Arugula in a Tomato Cream Sauce was a big hit at her house:


The Cooking Nurse was able to sneak eggplant past her husband with her Sicilian Eggplant Sauce:


The Cookaholic Wife was a little hesitant about the poached egg in her Pasta with Poached Eggs and Peas, but she enjoyed the sauce:


Jenna loved how well the balsamic vinegar married with the cream in her Chicken with a Balsamic, Mushroom Cream Sauce:


Dawn stepped in to help when one of the other swappers was unable to make her recipe for Tortellini with Creamy Tomato Sauce:


Melissa loves pasta and really enjoyed her Alfredo Stuffed Shells with Chicken & Artichokes, even if she had a mishap with making it ahead of time:


Heather lucked out and got a recipe for Crock-Pot Macaroni and Cheese that she had bookmarked to make:


Nicole enjoyed her recipe for Creamy Chicken and Artichoke Pasta and it came in at under $2 per serving:


Paige, a newcomer to the swap who also happens to be a friend of mine from high school, made Salmon Pesto Pasta:


Ammie had my recipe for Fettucine Carbonara with Bleu Cheese, Asparagus and Artichokes, which is rich and delicious:


Jaida isn't a fan of peppers and onions so she left those out of her Sausage Cacciatore, which was still delicious:


Carrie is another pasta lover and her Penne with Pistou really hit the spot:


Coleen loves non-red sauce versions of pasta dishes so she enjoyed the cheesy, fatty goodness of her White Cheese Chicken Lasagna:


Jey doesn't eat much pasta and loved how different her Spinach Artichoke Lasagna Rolls were from the ordinary recipes she's seen:


Lishie had fun making her Homemade Mushroom, Arugula, & Ricotta Ravioli with Garlic Basil Olive Oil:


Leanne loved the flavor combination in her Orecchiette with Roasted Tomatoes,Garlic and Spinach:


Nicole's Basil Shrimp with Feta and Orzo was a perfect light and simple dish:


My Pasta with Salsa Cruda was a wonderful taste of summer in a bowl:


Ashley loved the flavors in her Italian Baked Pastina with Grilled Chicken:


Melissa's Lemon Parsley Linguine was simple and light, the perfect side dish for a variety of proteins:


Christina, a newcomer to the swaps, was thrilled with her Mexican Stuffed Shells, a dish her whole family loved:


Kristina thought her Gnocchi Mac N Cheese was simply awesome:

Pin It!

Tuesday, March 13, 2012

Roasted Brussels Sprouts with Mushrooms and Cream

One of the perks of blogging is receiving freebies. Recently I was contacted by Ocean Mist Farms out in CA with an offer of free Brussels sprouts. Even though SP and I are not exactly fans of the little sprouts, I couldn't pass up a chance to try some fresh from the farm. Imagine my shock and delight when a huge box arrived at my house one afternoon and inside was all this:


This amounted to approximately 5 pounds of Brussels sprouts. Yikes! Thank goodness I was able to Google freezing techniques and process most of these for future use. I wouldn't want all this to go to waste. See below for freezing directions.


I used about 1 1/2 pounds of sprouts to make a dish I've had printed out since Thanksgiving - Roasted Brussels Sprouts with Mushrooms and Cream. Since we weren't fans of the sprouts roasted by themselves, I figured the addition of mushrooms and heavy cream would only make them more palatable.


I can't say this dish changed our minds about Brussels sprouts but it was certainly good. Will I find myself craving sprouts anytime soon, probably not. But this is still a tasty dish. Unfortunately I couldn't find chanterelles at my supermarket, but I hear they would make this dish even better. Regular button mushrooms were fine in a pinch.

Roasted Brussel Sprouts with Chanterelles and Cream
Oishii

1-1/2 lb. Brussels sprouts, trimmed and halved lengthwise
5 tablespoons olive oil
Kosher salt
3 tablespoons unsalted butter
3/4 lb. wild mushrooms, such as chanterelles or hedgehogs, halved if small or cut into 1-inch wedges
1 large shallot, thinly sliced
1/4 cup dry white wine
1 cup heavy cream
Freshly ground black pepper

Position a rack in the center of the oven and heat the oven to 450°F.

Put the Brussels sprouts on a rimmed baking sheet, and drizzle with 3 tablespoons of the olive oil; toss to coat. Spread the Brussels sprouts in an even layer and season generously with salt. Roast until tender and browned, about 25 minutes. Remove from the oven and set aside.

Heat a 12-inch skillet over high heat. When the pan is hot, add 1 tablespoon of the olive oil and 2 tablespoons of the butter. When the butter has melted, add the mushrooms in an even layer, and cook, stirring occasionally, until the mushrooms are golden-brown and tender and the mushroom liquid (if any) has evaporated, 5 to 8 minutes. Season to taste with salt and transfer to a plate.

Set the skillet over medium-high heat and add the remaining 1 tablespoon olive oil and 1 tablespoon butter. When the butter has melted, add the shallot, season with a pinch of salt, and cook, stirring occasionally, until tender and golden, 3 to 4 minutes. Add the wine and cook until reduced by half, about 1 minute. Return the mushrooms to the pan and add the Brussels sprouts and cream. Stir in a few grinds of pepper and continue to cook, stirring occasionally, until the cream thickens and coats the vegetables nicely, 3 to 4 minutes. Season to taste with salt and pepper. Serve immediately.

How to Freeze Brussels Sprouts

1. Select green, firm and compact heads. Examine heads carefully to make sure they are free from insects. Trim, removing coarse outer leaves.

2. Wash thoroughly in cool water, then sort into small, medium and large sizes.

3. Bring a large pot of water to a brisk boil. Blanch small heads 3 minutes, medium heads 4 minutes and large heads 5 minutes. Cool promptly in ice water.

4. Drain and package in Ziploc or vacuum bags, excluding as much air as possible. Seal and freeze.

Disclaimer: The Brussels sprouts featured in this post were provided to me free of charge by Ocean Mist Farms. I was not compensated for writing this post and all views expressed are my own.
Pin It!

Monday, March 12, 2012

Thai Red Curry Chicken Noodle Soup

As soon as Ashley submitted this recipe for Slow Cooker Thai Chicken Noodle Soup for the recent soup recipe swap I was smitten. I love Thai soup and this sounded delicious. As always, I was hesitant to use my crockpot since I've never made anything in there that's come out right, but I wanted to make this soup and since I'm home all day I figured I could keep an eye on it.


As you can see from the recipe below, I ended up modifying this heavily after making it per the original recipe. I will say this - Baby Girl absolutely loved this soup in it's original form, complete with the squirt of lime juice. She gobbled up a bowl and was asking for more.

However, I felt like something was missing. I added red curry paste to the ingredient list because it definitely needed those spices to make a more complex soup. I also decreased the amount of chicken, rice noodles and bean sprouts. I felt like they overwhelmed the soup, which I preferred with more broth and less "filling." Unfortunately my cilantro had gone bad by the time I got around to making this soup, which was a shame because I know that flavor would have gone well with the soup.

All in all this soup has serious potential. Oh and how did the crockpot work out, you might be wondering. The answer is I think I've given up on it. The chicken was overcooked and since the cooking time is so minimal I think this would have worked better on the stovetop. Directions have been modified below.

Thai Red Curry Chicken Noodle Soup
Modified from Cheesecurd in Paradise

2 frozen or thawed chicken breast halves
3 or 4 cloves garlic, minced
2 tablespoons freshly minced ginger
2 (13.5 oz) cans coconut milk
4 cups chicken broth
3 tablespoons soy sauce
2 heaping tablespoons red curry paste
2 oz thin rice noodles
1 large red bell pepper, diced
1 cup fresh beans sprouts
2 jalapenos, finely sliced
2 limes
Cilantro for garnish
Coarse salt and freshly ground pepper

In a large Dutch oven, add the chicken, garlic, ginger, coconut milk, soy sauce, red curry paste, a pinch of salt and freshly ground pepper. Bring to a simmer (do not boil). Stir occasionally for an hour.

Using tongs, remove chicken from pot and shred with two forks. Return to pot. Add the rice noodles, bell pepper and sprouts. Cook 30 more minutes. Taste and add more salt and pepper if needed.

Serve each bowl garnished with sliced jalapeno, a good handful of cilantro and some gigantic squirts of lime.
Pin It!

Sunday, March 11, 2012

Weekly Menu - Week of March 11, 2012


We're almost halfway through March. I can't believe it. Today we advance the clocks forward and finally get to enjoy some extended daylight in the evenings. I can't wait! Bring on the natural light for taking pictures, a chance to take Baby Girl outside to play and warmer temps. Can you tell I'm excited?

Sunday - Swedish Meatballs with Egg Noodles and steamed broccoli: Baby Girl went nuts for these meatballs the last time I made them so back on the menu they go.

Monday - Buffalo Chicken Wraps, chips: I love a good Buffalo chicken anything. I'm finally going to try to perfect my wrapping technique. I foresee a few YouTube videos on my future.

Tuesday - Hoagies after exercise class

Wednesday - Ravioli with Bacon and Mushroom Sauce, garlic bread and salad: We have a ton of cheese ravioli in the freezer, some leftover mushrooms and who doesn't love bacon? I'm leaving out the pesto because I don't want to buy it.

Thursday - Fish sandwiches with lettuce, tomato and jalapeno-ranch dressing, fries: I'm hoping to use coupons I got from FoodBuzz for the fish and the fries.

Friday - out to dinner
Pin It!

Friday, March 09, 2012

Recipe Swap - Pasta with Salsa Cruda

Want to see what other Pasta recipes were made during the swap? Here is the link to the Pasta Recipe Swap Part 2 Roundup

I need to come clean about something.

I love pasta. Love it. Love with a capital L.

Why am I telling you this? Well, because I'm the one who picks the themes for the recipe swaps, that's why. And since I absolutely love pasta I decided we needed to revisit it as a theme.

I lucked out and received Farefalle with Salsa Cruda from Allison over at The Imitation Chef. Allison has participated in a few swaps and I was excited to see what this recipe had in store for me. Imagine my delight when I realized it was similar to my all-time favorite pasta dish, Pasta Caprese, with the addition of proscuitto, which I knew would make SP very happy.


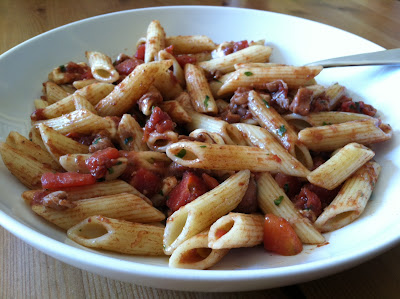
Unfortunately tomatoes aren't in season right now so I opted to make this with canned diced tomatoes instead. One great thing about this recipe is that you aren't cooking the sauce, so it would be perfect for the summer months when you don't want to be slaving in a hot kitchen. The ingredients sit together in a bowl, getting more and more flavorful as they marry together. I mixed everything up (sans the mozzarella) before I went to pick up Baby Girl from daycare and when we got home the whole house smelled like tomatoes, basil and garlic. Win!


I may or may not have eaten copious amounts of the proscuitto before cooking it. I prefer it uncooked and would probably skip it when making this again, but it was a nice addition. The pine nuts, though, cannot be skipped. They were a wonderful crunch with the gooey cheese and toothsome pasta. I love fresh mozzarella and it's also necessary here. Baby Girl helped me mix this up and then inhaled two bowls of it, picking around the proscuitto and cheese. Silly girl, that's the best part!

As you'd expect, this is even better the next day. I served it just slightly warm, not bubbling hot, and it was perfect. Thank you for a fantastic recipe that will definitely be gracing my table many times this summer, Allison!

Pasta with Salsa Cruda
The Imitation Chef

1 lb penne or other medium-sized pasta
1 1/2 lb tomatoes cored and coarsely chopped (I used 2 14.5-oz cans diced tomatoes, UNdrained)
2 cloves garlic, minced
1/2 cup basil, slivered
1/2 cup olive oil
3 tablespoons balsamic vinegar
1/2 teaspoon red pepper flakes (I omitted)
1/2 lb fresh mozzarella cheese, cubed
1/4 cup pine nuts
2 oz prosciutto,, thinly sliced and chopped
Salt and pepper

Put a large pot of water on to boil for pasta.

In a large bowl, combine the tomatoes, garlic, basil, oil, balsamic vinegar and red pepper flakes, if using. Stir well and let stand at room temperature for about 15 minutes to blend the flavors. Stir the mozzarella into the tomato mixture and let stand for 10 minutes longer.

Meanwhile, in a small, dry frying pan over medium high heat, toast the pine nuts, stirring often, until fragrant and pale gold, 1-2 minutes. Transfer to a plate and set aside. In the same pan, fry up the prosciutto with a teaspoon of olive oil.

After the pasta has cooked until al dente, drain well and add to the salsa, along with the prosciutto. Toss to combine and slightly soften the cheese. Season to taste with salt and pepper and add pine nuts. Serve the pasta warm.
Pin It!

Thursday, March 08, 2012

Chicken with Eggplant in Garlic Sauce

I saw this recipe for Spicy Eggplant on Kate's blog, but I wanted it to be more like a dish we enjoy whenever we get Chinese food with my mom (with chicken) or with my aunt (vegetarian), so I combined elements from the Chicken and Broccoli Stir Fry I made recently.


Eggplant is a vegetable I absolutely love in things like eggplant parmesan, eggplant panini or eggplant rollatini, but am not really a fan of in Asian dishes. I'm assuming the Chinese dishes we've had use Japanese eggplant, which is not what I used here. As a result, we weren't enamored by this dish. The chicken aspect was good but the eggplant was just not enjoyable for us. I modified the recipe below to call for Japanese eggplants but I think they'd work better.


It was still a good stir-fry but I think we'll stick with other vegetables.

Chicken with Eggplant in Garlic Sauce
aToHC Original, with help from Kate's Recipe Box and Alosha's Kitchen

1 pound boneless, skinless chicken breasts or thighs, cut into bite-sized pieces
6 cloves garlic, grated or minced divided
1 1/2-inch piece peeled fresh ginger, grated or minced, divided
2 tablespoons soy sauce
2 tablespoons sugar
1/2 tablespoon + 1 1/2 tablespoons cornstarch
1/2 tablespoon + 1/4 teaspoon Kosher salt
2 tablespoons xiaoxing wine (or dry sherry)
1 tablespoon Sriracha sauce (chile sauce)
1 tablespoons dark sesame oil
About 1/2 cup water
2 Japanese eggplants, peeled and cut into 1-inch cubes
1 medium onion, thinly sliced
6 tablespoons vegetable oil, divided
2 tablespoons oyster sauce
Ground black pepper to taste
3 scallions, thinly sliced on an angle (for garnish)

In a plastic food storage bag, toss the chicken with half the garlic and ginger, soy sauce, sugar, 1/2 tablespoon cornstarch, 1/2 tablespoon Kosher salt, xiaoxing wine, Sriracha and sesame oil. Marinate for at least 15 minutes. Mix the remaining 1 1/2 tablespoons cornstarch with 1/2 cup water and set aside.

Heat 2 tablespoons of oil in a large skillet or wok over medium-high heat until almost smoking. Add the chicken mixture. Stir-fry (stir, stir, stir at this point!) until the chicken is brown and cooked through, 4 to 5 minutes. Remove to a plate. Add 2 more tablespoons of oil, add the eggplant and stir the eggplant cubes until they begin to brown, 3 to 5 minutes. Remove the eggplant with a slotted spoon, and set aside.

Heat 2 more tablespoons of oil in the skillet over medium-high heat, and cook and stir the onions just until they begin to soften, about 30 seconds. Stir in the rest of the garlic and ginger.

Return the chicken and eggplant to the skillet, lower the heat, and allow the vegetables and sauce to simmer until the eggplant is tender and almost all the liquid has been absorbed, about 5 minutes. Add the oyster sauce, stir, then add in the reserved cornstarch/water mixture and bring to a boil to thicken. Serve over rice, with the chopped scallions and extra chile sauce on the side.
Pin It!

Wednesday, March 07, 2012

Buttermilk Roast Chicken

Do you know how inexpensive chicken legs are? I had no idea. SP bought a club pack that was almost 4 1/2 pounds for about $4. That's 99 cents per pound, folks. Chicken breasts are at least $2.99/pound on sale, so this is a huge savings. My only problem is I'm not a huge fan of dark meat. I know it's more flavorful and easier to cook since it can handle being overcooked in a way white meat can't, but I'm still not sold. Even so, I figured I'd give dark meat a whirl with this recipe for Buttermilk Roast Chicken.


The key to this recipe is marinating the chicken for at least 24 hours. The flavor really soaked into the meat, although the end result was a tad salty for my tastes. And boy was the meat juicy. Delicious.


Even so, this recipe needed a little oomph. The flavor was there, but SP thought these legs would have been perfect with some time on the grill, both for added flavor and for texture. The skin on the legs was pale and rubbery instead of crispy. I've modified the directions below. If you can't grill, I'd recommend either broiling the legs once they're cooked or cooking them longer to crispy up the skin a bit.

Buttermilk Roast Chicken
Modified from Smitten Kitchen

2 cups buttermilk
5 garlic cloves, peeled and smashed
1 1/2 tablespoons kosher salt
1 tablespoon granulated sugar
1 1/2 teaspoons paprika, plus extra for sprinkling
Lots of freshly ground black pepper
2 1/2 to 3 pounds chicken parts
Drizzle of olive oil
Flaked or coarse sea salt
BBQ sauce, optional

Whisk buttermilk with garlic, salt, sugar, paprika and lots of freshly ground black pepper in a bowl. Place chicken parts in a gallon-sized freezer bag (or lidded container) and pour buttermilk brine over them, then swish it around so that all parts are covered. Refrigerate for 24 and up to 48 hours.

When ready to roast, preheat oven to 425 degrees. Line a baking dish with foil. Remove chicken from buttermilk brine and arrange in dish. Drizzle lightly with olive oil, then sprinkle with additional paprika and sea salt to taste. Roast for 30 minutes (for legs; approximately 35 to 40 for breasts), until brown and a bit scorched in spots.

Remove the legs from the oven and preheat a grill. If you don't have a grill, preheat your broiler or simply turn the oven up to 475 degrees. If grilling, remove the legs from the baking pan and grill until the skin is crispy. You can add BBQ sauce if you like, just brush onto each leg. If broiling or leaving in the oven, look for the skin to crisp up. Again, BBQ sauce is optional.

Pin It!

Tuesday, March 06, 2012

Ravioli Primavera

I'm starting to gear up for spring and summer dishes and nothing says warm weather like primavera, which means "in the style of spring" in Italian. I saw this recipe for Tortellini Primavera on Jenna's blog and immediately put it on the weekly menu. It has everything I love about a pasta dish with minimal effort. But then plans changed and I didn't get around to making it. I still had the ingredients on hand so when I needed a fast dinner for one (SP wasn't that hungry) over the weekend I whipped it up in no time flat.


I subbed the tortellini for cheese ravioli since we have three bags in the freezer (Baby Girl loves her ravioli). This was so simple and delicious I relished every bite.

Ravioli Primavera
Adapted from Annie's Eats, as seen on Jenna's Cooking Journey

2 tablespoons butter
1 cup mushrooms, chopped
1/2 cup chopped onion
1 garlic clove, minced
10 oz. frozen chopped spinach, thawed and drained
8 oz. cream cheese
1 tomato, chopped
1/4 cup milk
1/4 cup parmesan cheese
1 teaspoon Italian seasoning
salt and pepper, to taste
Family-size cheese ravioli, cooked and drained

Heat butter in a skillet. Add mushrooms, onion and garlic and saute. Add all remaining ingredients except ravioli. Heat until all have melted together and are well blended. Cook until the mixture just begins to boil, stirring occasionally. Stir in ravioli.

Pin It!

Monday, March 05, 2012

Weekly Menu - Week of March 4, 2012


Yay for March!! I'm SO excited for Spring. Spring and Fall are my favorite seasons and I can't wait to shed winter coats for t-shirts. I'm also looking forward to being able to grill, for it staying light later in the evening (daylight savings time is next weekend...woohoo!)

This week's menu is a combination of winter and spring/summer dishes and I'm very excited about each and every one of them.

Sunday - Buttermilk Roast Chicken, mashed potatoes, Roasted Brussels Sprouts with Mushrooms and Cream: I can't believe how cheap chicken legs are. I also got a ton of Brussels sprouts from a farm that I needed to use, and this recipe sounds delicious.

Monday - Farfalle with Salsa Cruda: I can't wait for this taste of summer.

Tuesday - Date night! My exercise class is cancelled this week and I can't wait to spend some quality time with SP.

Wednesday - Grilled Chicken and Pineapple Quesadillas: We have a late appointment so these will be perfect to throw together before we leave the house.

Thursday - Orange and Rosemary Pork Tenderloin, mashed potatoes, broccoli: I've been thinking about this pork dish since the last time I made it. Yum!

Friday: Out for dinner: Now that I'm working from home by Friday I just need to get out and be with people. Plus we're out of pizza dough.
Pin It!

Sunday, March 04, 2012

Cuban Sandwiches for Krystal's Virtual Baby Shower

When Joelen asked me if I wanted to be part of a virtual baby shower for Krystal over at Mrs. Regueiro's Plate, of course my answer was yes. Krystal and her husband, Eric, are expecting a baby (nicknamed Cookie) in early May. Krystal is a member of the cooking board I frequent and has participated in some of the recipe swaps I organize. When I found out she was pregnant I was thrilled for them. Just from conversations Krystal and I have had online I know she's going to be a great mom. They are Team Green, which means they don't know if it's a boy or a girl, but I think it's a girl. I can't wait to find out!


Instead of the usual baby shower fare, Joelen asked us to pay homage to Krystal's Filipino background and Eric's Cuban background by making either a Filipino or Cuban inspired dish. It didn't have to be authentic, just inspired from either of these cuisines. Since I started a new job recently I didn't have too much time to find something new to make, so I decided to revisit an old favorite - the Cuban sandwich. I've made these Cuban sandwiches before many times, although I still haven't tried roasting my own pork, which I imagine would make these sandwiches incredible. Still, my supermarket's roast pork is amazing and these sandwiches are utterly delicious.


If this was for an in-person baby shower (which usually involves finger food) I'd buy small dinner or slider rolls for the sandwiches, making them more bite-size.

Be sure to stop over to Krystal's blog to wish her well, and check out Joelen's blog for a roundup of all the delicious dishes prepared for the virtual shower.

Cuban Sandwiches
Modified from Cook's Country

4 potato sandwich rolls
4 tablespoons mayonnaise
1 teaspoon yellow mustard
2 cloves garlic (small cloves), grated or minced
1/3 cup dill or hamburger pickle rounds
1/3 cup jarred banana pepper rings
1/4 pound thinly sliced baked ham, preferably Virginia or Black Forest
1/2 pound cold roast pork, sliced thin
8 slices thinly sliced Swiss cheese
3 tablespoons unsalted butter, melted

Split rolls in half. Combine mayo, mustard and garlic in a small bowl (can be done ahead of time, which allows the flavors to marry. Keep refrigerated). Spread rolls with mayonnaise mixture, then layer pickles, peppers, ham, roast pork, and cheese onto bottom half, finishing with cheese on top. Set tops of rolls in place and press down to flatten sandwiches.

Heat large nonstick skillet over medium-low heat for 4 minutes. Meanwhile, heat large pot or Dutch oven over medium-low heat for 4 minutes. Brush tops of sandwiches with melted butter and place in skillet buttered side down. Brush bottoms of rolls with remaining butter and use preheated pot to compress sandwiches for 15 to 20 seconds. Cook (keeping pot on sandwiches but not pressing down) until first side is golden brown, 3 to 5 minutes. Remove pot, flip sandwiches over, replace pot on top of sandwiches, and cook until golden brown, 3 to 4 minutes. Cut in half and serve immediately.
Pin It!