Showing posts with label ATK. Show all posts

Saturday, October 05, 2019

Roast Chicken with Warm Bread Salad and Crispy Potatoes

After years of cooking, I'm rarely intimidated by anything in the kitchen. But I'll admit to being a wee bit nervous before I spatchcocked this chicken. It ended up being a piece of cake and now I can't imagine roasting a chicken any other way. Crispy skin, moist meat...what's not to like!

To blog

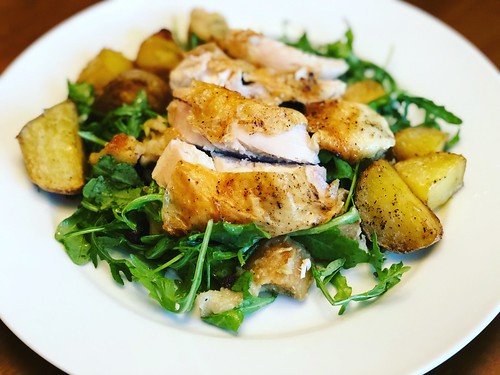
The original recipe calls for letting the chicken sit with salt overnight. I forgot to do that and it turned out delicious so I'm going to go ahead and say skip that step. I also added potatoes to the roasting pan so they could soak up some of the chicken fat while they cooked. It was an excellent idea, if I do say so myself. A version of this meal will likely be a weekly staple in our house as the weather continues to get cooler. In fact, I'm making it again tonight!

Roast Chicken with Warm Bread Salad and Crispy Potatoes
Modified from America's Test Kitchen from Cook's Illustrated

1 (6-7-pound) roasting chicken, giblets discarded
Kosher salt and pepper
4 (1-inch-thick) slices country-style bread (8 ounces), bottom crust removed, cut into pieces
2-3 medium Yukon gold potatoes, scrubbed and cut into bite-size pieces
1/2 cup chicken broth
8 tablespoons plus 2 teaspoons extra-virgin olive oil
2 tablespoons white wine vinegar
1 teaspoon Dijon mustard
3 scallions, sliced thin
2 tablespoons dried currants
5 ounces (5 cups) baby arugula

Place chicken, breast side down, on cutting board. Using kitchen shears, cut through bones on either side of backbone; discard backbone. Do not trim off any excess fat or skin. Flip chicken over and press on breastbone to flatten. Brush 2 teaspoons oil over chicken skin and sprinkle with salt and pepper. Tuck wings behind back and turn legs so drumsticks face inward toward breasts.

Adjust oven rack to middle position and heat oven to 475 degrees. Spray 12-inch stainless steel skillet with vegetable oil spray. Toss bread and potatoes with broth and 4 tablespoons oil until pieces are evenly moistened. Arrange in skillet in single layer. Place the chicken on top of the bread and potatoes.

Roast chicken until skin is deep golden brown and thickest part of breast registers 160 degrees and thighs register 175 degrees, 45 to 50 minutes, rotating skillet halfway through roasting. (I can't find roasting chickens smaller than 6 lbs, so I roasted mine for 70 minutes).

While chicken roasts, whisk vinegar, mustard, salt, and pepper together in small bowl. Slowly whisk in remaining 1/4 cup oil. Stir in scallions and currants and set aside. Place arugula in large bowl.

Transfer chicken to carving board and let rest, uncovered, for 15 minutes. While the chicken is resting, put the pan with the bread and potatoes back in the oven to stay warm and keep crisping (the oven should be off but the residual heat will do the trick).

Carve chicken and whisk any accumulated juices into vinaigrette. Add bread, potatoes, and vinaigrette to arugula and toss to evenly coat. Transfer salad to serving platter and serve with chicken.
Pin It!

Wednesday, April 23, 2014

Pasta alla Norcina

Baby Girl loves to watch cooking shows on TV. I'll admit, the first time she told me she wanted to watch Lidia I shed a tear. When we aren't crazy busy with other activities we'll spend some quiet time Saturday afternoon watching cooking on PBS. That's pretty much how I developed my love of cooking so she's in good company.

One afternoon recently we were watching America's Test Kitchen and they made this recipe for Pasta alla Norcina. It had everything we love in one dish - pasta, mushrooms and sausage, with a touch of heavy cream thrown in to gild the lily. I immediately found the recipe online and printed it off.

Untitled

This was my first time making orecchiette for Baby Girl and she couldn't get enough. She was eating the plain pasta right out of the colander after I drained it. SP told me I could make this once a week and he'd be happy. It may seem a little time consuming with all the steps (it wouldn't be an ATK recipe without all those steps) but the result is well worth it. And it really doesn't take that long to put together.

I doubled the recipe (printed below) so we'd have enough for leftovers the next day. This makes a lot - I'd say 6-8 servings if you have a veggie on the side - so the original recipe would probably work fine for a family of 4 without leftovers.

Pasta alla Norcina
From America's Test Kitchen

Kosher salt and pepper
1/4 teaspoon baking soda
8 ounces ground pork
2 garlic cloves, minced
1 teaspoon minced fresh rosemary
Pinch ground nutmeg
8 ounces cremini mushrooms, trimmed
10 teaspoons vegetable oil
2/3 cup heavy cream
1 lb orecchiette
1/2 cup dry white wine
2 ounces Pecorino Romano cheese, grated
2 tablespoons minced fresh parsley
3 teaspoons lemon juice

Grease a small dinner plate with vegetable oil spray. Dissolve 1 1/2 teaspoons salt and the baking soda in 4 teaspoons water in a medium bowl. Add the pork and fold gently to combine; let stand for 10 minutes.

Add 1 teaspoon garlic, 1/2 teaspoon rosemary, nutmeg, and 1 teaspoon pepper to pork and stir and smear with a rubber spatula until well combined and tacky, 10 to 15 seconds. Transfer pork mixture to the greased plate and form into a 6-inch patty.

Pulse the mushrooms in a food processor until finely chopped, 10 to 12 pulses.

Heat 4 teaspoons oil in 10-inch skillet over medium-high heat until just smoking. Add the sausage patty and cook without moving it until the bottom is browned, 1 to 2 minutes. Flip and continue to cook until the second side is well browned, 1 to 2 minutes longer (very center of patty will be raw). Remove pan from heat, transfer sausage to cutting board, and roughly chop. Transfer sausage to bowl and add cream; set aside.

Cook pasta, drain and reserve 1 1/2 cups cooking water.

While pasta cooks, return now-empty skillet to medium heat. Add 4 teaspoons oil, mushrooms, and pinch salt; cook, stirring frequently, until mushrooms are browned, 3 to 5 minutes. Stir in remaining 2 teaspoon oils, remaining garlic, remaining 1/2 teaspoon rosemary, and ½ teaspoon pepper; cook until fragrant. Stir in wine, scraping up any browned bits, and cook until completely evaporated. Stir in sausage and 1/3 cup reserved cooking water and simmer until meat is no longer pink, 1 to 3 minutes. Remove pan from heat and stir in Pecorino until smooth.

Add sauce, parsley, and lemon juice to pasta and toss well to coat. Before serving, adjust consistency with remaining reserved cooking water as needed and season with salt and pepper to taste.
Pin It!

Tuesday, January 20, 2009

Pan Pizza

The days are blurring together lately so in the interest of full disclosure I have no idea when I made these pepperoni and black olive pan pizzas:


They were quite delicious, as always. I love the crispy crust and how easy they are. I can prep the whole thing before SP even leaves work and then just pop them in the oven when he's about 20 minutes from home.

Pin It!

Wednesday, January 14, 2009

Skillet Beef Stroganoff

Another quick weeknight meal and a family favorite, Skillet Beef Stroganoff:


While the egg noodles were simmering away in the skillet I thought I'd snap a quick picture:


I do love one-pot meals.
Pin It!

Friday, November 28, 2008

Penne alla Vodka and Garlic Bread

Whenever we've made penne alla vodka we always use Lidia's recipe. But while I was watching ATK over the weekend I saw them make penne alla vodka and decided to give it a try.


I really liked that they kept some of the tomatoes whole instead of pureed and I liked that there wasn't too much cream. I don't think SP was a fan because the vodka flavor wasn't very pronounced, but I thought it was fantastic. I also made some garlic bread topped with a little grated Pecorino cheese:


Penne alla Vodka
America Test Kitchen

1 (28 ounce) can whole tomatoes, drained, liquid reserved
2 tablespoons olive oil
1/2 small onion, minced (about 1/4 cup)
1 tablespoon tomato paste
2 medium cloves garlic, minced
1/4-1/2 teaspoon hot red pepper flakes
Table salt
1/3 cup vodka
1/2 cup heavy cream
1 pound penne pasta
2 tablespoons minced fresh basil leaves
Grated Parmesan cheese, for serving

Puree half of tomatoes in food processor until smooth. Dice remaining tomatoes into 1/2-inch pieces, discarding cores. Combine pureed and diced tomatoes in liquid measuring cup (you should have about 1 2/3 cups). Add reserved liquid to equal 2 cups.

Heat oil in large saucepan over medium heat until shimmering. Add onion and tomato paste and cook, stirring occasionally, until onions are light golden around edges, about 3 minutes. Add garlic and pepper flakes; cook, stirring constantly, until fragrant, about 30 seconds.

Stir in tomatoes and 1/2 teaspoon salt. Remove pan from heat and add vodka. Return pan to medium-high heat and simmer briskly until alcohol flavor is cooked off, 8 to 10 minutes; stir frequently and lower heat to medium if simmering becomes too vigorous. Stir in cream and cook until hot, about 1 minute.

Meanwhile, bring 4 quarts water to boil in large Dutch oven over high heat. Add 1 tablespoon salt and pasta. Cook until just shy of al dente, then drain pasta, reserving 1/4 cup cooking water, and transfer pasta back to Dutch oven. Add sauce to pasta and toss over medium heat until pasta absorbs some of sauce, 1 to 2 minutes, adding reserved cooking water if sauce is too thick. Stir in basil and adjust seasoning with salt. Divide among pasta bowls and serve immediately, passing Parmesan separately.
Pin It!

Tuesday, November 04, 2008

Deep-Dish Pepperoni Pizza

Today is Election Day in the United States. SP and I love staying up late to watch the returns (probably a hold-over from our days as reporters), so we wanted a fun meal for dinner. I recently saw an episode of ATK where they made deep-dish pizza in pie pans that I'd been meaning to try.


This was a really easy meal to make. I buy my own dough (which was probably the reason the pizza wasn't very deep) but it really cut down the prep time. Microwaving the pepperoni first was a huge plus - there was hardly any grease on the pizza. And the oil in the pan gave the crust a fantastic, crispy crust.


Next time I make these I'm going to try mushroom, per SP's request. We devoured a whole pan and could have kept eating.


Deep Dish Pepperoni Pan Pizza
America's Test Kitchen

Dough
1/2 cup olive oil
3/4 cup skim milk plus 2 additional tablespoons, warmed to 110 degrees
2 teaspoons sugar
2 1/3 cups all-purpose flour , plus extra for counter
1 package instant yeast
1/2 teaspoon table salt

Topping
1 (3.5-ounce) package sliced pepperoni
1 1/3 cups pizza sauce
3 cups shredded mozzarella cheese

To make the dough: Adjust oven rack to lowest position and heat oven to 200 degrees. When oven reaches 200 degrees, turn it off. Lightly grease large bowl with cooking spray. Coat each of two 9-inch cake pans with 2 tablespoons oil.

Mix milk, sugar, and remaining 2 tablespoons oil in measuring cup. Mix flour, yeast, and salt in standing mixer fitted with dough hook. Turn machine to low and slowly add milk mixture. After dough comes together, increase speed to medium-low and mix until dough is shiny and smooth, about 5 minutes. Turn dough onto lightly floured counter, gently shape into ball, and place in greased bowl. Cover with plastic wrap and place in warm oven until doubled in size, about 30 minutes.

Transfer dough to lightly floured counter, divide in half, and lightly roll each half into ball. Roll and shape each ball into 9-inch round and press into oiled pan. Cover with plastic wrap and set in warm spot until puffy, about 20 minutes. Meanwhile, heat oven to 400 degrees.

While dough rises, put half the pepperoni in a single layer on a microwave-safe plate lined with 3 paper towels. Cover with 3 more paper towels and microwave on high for 30-45 seconds. Repeat with new paper towels and remaining pepperoni.

Remove plastic wrap from dough. Ladle 2/3 cup sauce on each round, leaving 1/2-inch border around edges. Sprinkle each with 1 1/2 cups cheese and top with pepperoni. Bake until cheese is melted and pepperoni is browning around edges, about 20 minutes. Remove from oven; let pizzas rest in pans for 1 minute. Using spatula, transfer pizzas to cutting board and cut each into 8 wedges.
Pin It!

Monday, October 13, 2008

Skillet Beef Stroganoff

We love this recipe for Skillet Beef Stroganoff, so it was a natural choice when I realized we had a ton of ground beef in the freezer.


Forgive me if this wasn't the best version of this meal. I didn't know it at the time (or didn't want to admit it) but I was coming down with a wicked head cold. I forgot to chop some parsley to garnish and the dish was a little watery, but the flavors were still good. I tried to bump up the amount of egg noodles so I increased the amount of liquid.
Pin It!

Thursday, September 04, 2008

Chicken Marsala

As you might have noticed by now SP loves mushrooms, so it's not surprising that one of his favorite meals is Chicken Marsala. He's been having a tough time lately so I wanted to make a nice meal for him. We had all the ingredients on hand and I was able to pick up some fresh green beans at the farmers market this afternoon.


It isn't often that I'm so enamored by a dish while it's still in the pan that I take a photo of it, but this just looked so gorgeous:


And it looked just as gorgeous on the plate, with that luscious sauce coating the chicken:


I knew this was going to be a tasty meal, but we were both blown away by the wonderful flavors. I always know a meal is a winner when SP keeps talking about it as we're cleaning up. Even now he keeps turning to me and saying how good it was.

Chicken Marsala
America's Test Kitchen

4 boneless, skinless chicken breasts
1 cup flour
salt and pepper
2 tablespoon oil
2 ½ oz. (about 3 slices) pancetta, cut into 1 by 1/8 in. pieces (I used bacon)
8 oz. white mushrooms, sliced
1 clove garlic, minced
1 teaspoon tomato paste
1 ½ cups Marsala (I used equal parts sherry and madeira)
1 ½ tablespoon lemon juice
4 tablespoons unsalted butter, cut into 4 pieces
2 tablespoons minced fresh parsley

Pat the chicken breasts dry. Place flour in a shallow baking dish or pie plate. Season both sides of chicken with salt and pepper. Coat both side of each piece of chicken with flour. Meanwhile, heat the oil in a large skillet over medium-high heat until shimmering. Place the floured chicken in a single layer in the skillet and cook until golden brown, about 5 minutes per side. Transfer chicken to a plate and return the skillet to low heat and add the pancetta. Sauté, stirring occasionally and scraping the pan bottom with a wooden spoon to loosen the browned bits, until the pancetta is browned and crisp, about 4 minutes. With a slotted spoon, transfer the pancetta to paper towels to drain.

Add the mushrooms to the pan and increase the heat to medium-high. Sauté, stirring occasionally and scraping pan bottom, until the mushrooms begin to brown, about 8 minutes. Add the garlic, tomato paste, and cooked pancetta and cook, stirring constantly, until the tomato paste begins to brown. Off the heat, add the Marsala.

Return the pan to high heat and simmer vigorously, scraping browned bits from the pan bottom, until the sauce is slightly syrupy and reduced, about 5 minutes. Off the heat, add the lemon juice. Whisk in the butter, one tablespoon at a time, until incorporated. Stir in the parsley and season with salt and pepper to taste. Add the chicken back to the pan and coat with the sauce.
Pin It!

Monday, September 01, 2008

Burger Bar and Onion Rings

When I made the Chicken Cobb Burger I got a comment from Dan recommending making small burgers so you can experiment with different toppings. The idea stuck with me and when we were trying to think of something for dinner tonight a Burger Bar sounded like a great idea.


We thought onion rings would be a good compliment to the burgers and we'd recently seen an episode of ATK where they made oven-fried onion rings. The recipe was pretty straight-forward and once I got everything together took hardly any time at all. Here are the rings ready to be put in the oven:


The toppings for the burger bar:


... including (from the top going clockwise) Swiss cheese, cooked mushrooms, American cheese, blue cheese, caramelized onions, sliced jalapenos, jalapeno cheese and bacon. The onion rings cooked for about 15 minutes in the oven and got nice and crispy and golden-brown:


We cooked the burgers on the grill with a nice, hot fire so they got a good sear. After topping them with the cheese to melt, I put on the rest of the toppings inside.


We had four different kinds of burgers, including my take on the Spicy Baconator from Wendy's with jalapeno cheese, sliced fresh jalapenos and slices of crispy bacon:


... blue cheese and caramelized onions:


... mushroom and Swiss:


... and a good, old-fashioned American cheeseburger:


Of the four kinds I tried a cheeseburger, adding a little mayo and ketchup:


... and one of the knockoff Spicy Baconators:


The burgers were amazingly good. I loved the different toppings and it was a lot of fun to try different flavor combinations. Unfortunately the onion rings got a tad cold while I took my photos. Next time I'll leave them in the oven until we're just about to eat so they're nice and crispy and hot.

Oven-Fried Onion Rings
ATK

1/2 cup all-purpose flour
1 large egg , at room temperature
1/2 cup buttermilk , at room temperature
1/4 teaspoon cayenne pepper
Table salt and ground black pepper
30 Saltine crackers
4 cups kettle-cooked potato chips , crumbled into smaller pieces
2 large yellow onions , cut evenly into 1/2-inch-thick rounds
6 tablespoons vegetable oil

1. Adjust oven racks to lower-middle and upper-middle positions and heat oven to 450 degrees. Place 1/4 cup flour in shallow baking dish. Beat egg and buttermilk together in medium bowl. Whisk remaining 1/4 cup flour, cayenne, 1/2 teaspoon salt, and 1/4 teaspoon pepper into buttermilk mixture. Pulse saltines and chips together in food processor until finely ground and place in separate shallow baking dish.

2. Pull apart the rings in each round, discarding any that are less than 2 inches in diameter. Working one at a time, dredge each onion ring in flour, shaking off excess. Dip in buttermilk mixture, allowing excess to drip back into bowl, then drop into crumb coating, turning ring to coat evenly. Transfer to large plate and repeat with remaining onion rings.

3. Pour 3 tablespoons oil onto each of two rimmed baking sheets. Place in oven and heat until just smoking, about 8 minutes. Carefully tilt heated sheets to coat evenly with oil, then arrange onion rings on sheets. Bake, flipping onion rings over and switching and rotating position of baking sheets halfway through baking, until golden brown on both sides, about 15 minutes. Transfer onion rings to plates lined with paper towels to drain briefly. Serve immediately.

MAKE AHEAD
Oven-Fried Onion Rings can be breaded in advance and refrigerated for up to an hour. Let them sit at room temperature for 30 minutes before baking; if baked straight from the fridge, the onions will not soften properly and will remain crunchy.
Pin It!

Monday, August 18, 2008

Skillet Beef Stroganoff

I had originally planned to make this dish on Thursday, but SP wasn't feeling well so we opted for the comfort of takeout Chinese food instead. We were disappointed about putting off Pizza Friday, but since I'd already defrosted the ground beef I had to change plans. The result was well worth it - this was an outstanding meal.


I saw this recipe on a recent episode of ATK and had been itching to make it ever since. Not only were the flavors outstanding, the creaminess was perfect and the best part - it was a one-pot meal, which made for easy cleanup. SP loved it so much he asked for seconds and had to restrain himself from thirds. This will be my go-to recipe from now on.

The only modification I made was using ground beef instead of the sirloin because that's what we had on hand (not to mention I'm not a fan of chunks of steak in pasta dishes). It worked beautifully and actually cut the cooking time by 30 minutes because I didn't have to simmer the beef until it was tender.

Skillet Beef Stroganoff
America's Test Kitchen Easy Skillet Suppers

1 1/2 pounds sirloin steak tips, pounded and cut thin across the grain (I used ground beef)
Salt and pepper
4 tablespoons vegetable oil
10 ounces white mushrooms, sliced thin
1 onion, chopped fine
2 tablespoons all-purpose flour
1 1/2 cups chicken broth
1 1/2 cups beef broth
1/3 cup brandy
1/3 pound wide egg noodles (3 cups)
2/3 cup sour cream
2 teaspoons lemon juice

1. Pat beef dry with paper towels and season with salt and pepper. Heat 1 tablespoon oil in large skillet over medium-high heat until just smoking. Cook half of beef until well browned, 3 to 4 minutes per side. Transfer to medium bowl and repeat with 1 tablespoon more oil and remaining beef. (I just browned all the ground beef in a skillet and then removed to a bowl).

2. Heat remaining 2 tablespoons oil in now-empty skillet until shimmering. Cook mushrooms, onion, and 1/2 teaspoon salt until liquid from mushrooms has evaporated, about 8 minutes. Stir in flour and cook for 30 seconds, then add both broths and the brandy, and return beef and accumulated juices to pan. Bring to simmer, cover, and cook over low heat until beef is tender, 30 to 35 minutes. (Once I added the ground beef I continued right on to the next step).

3. Stir noodles into beef mixture, cover, and cook, stirring occasionally, until noodles are tender, 10 to 12 minutes. Off heat, stir in sour cream and lemon juice. Season with salt and pepper.
Pin It!

Tuesday, April 08, 2008

Skillet Chicken and Rice with Peas and Scallion

This recipe for Skillet Chicken and Rice with Peas and Scallion was something I saw on America's Test Kitchen awhile back. I kept meaning to make it but it was alway preempted by another dish. It finally made its way into the rotation this week and man am I glad it did. This is a fantastic one-pot meal (which is always nice).


I love creamy rice dishes and this had just the right sauce-to-rice ratio. Unfortunately I only had 1 cup of rice and the recipe called for 1 1/2 cups, but I just decreased the liquid by a cup and it worked out fine. SP said there was too much chicken (I was shocked that my carnivore said that), but I think that's because there was less rice then there should have been. I loved the peas (another huge thanks to Alosha for turning me on to C&W frozen vegetables) and the freshness of the scallions. Definitely something we'll be making again.


Skillet Chicken and Rice with Peas and Scallion
Recipe from America's Test Kitchen

4 boneless skinless chicken breasts
1/2 cup unbleached all-purpose flour
2 tablespoons vegetable oil
2 tablespoons unsalted butter
1 medium onion, minced
3 medium cloves garlic, minced
1/8 teaspoon red pepper flakes
1 1/2 cups long-grain rice
1/2 cup dry white wine (vermouth)
4 1/2 cups low-sodium chicken broth
1 cup frozen peas
5 scallions, sliced thin
2 tablespoons fresh lemon juice

1. Pat the chicken dry with paper towels and season with salt and pepper. Dredge the chicken in flour to coat and shake off any excess. Heat the oil in a 12-inch nonstick skillet over medium-high heat until just smoking. Brown the chicken well on one side, about 5 minutes. Transfer the chicken to a plate and set aside.

2. Off the heat, add the butter to the skillet, and swirl to melt. Add the onion and 1/2 teaspoon salt, and return to medium-high heat until softened, 2 to 5 minutes. Stir in the garlic and pepper flakes and cook until fragrant, about 30 seconds. Stir in the rice thoroughly and let toast for about 30 seconds.

3. Stir in the wine and let the rice absorb it completely, about 1 minute. Stir in the broth, scraping up any browned bits. Nestle the chicken into the rice, browned side facing up, including any accumulated juices. Cover and cook over medium heat until the thickest part of the chicken registers 160 degrees on an instant-read thermometer, about 10 minutes.

4. Transfer the chicken to a clean plate. Gently brush off and discard any rice clinging to the chicken, then tent the chicken with foil and set aside. Return the skillet of rice to medium-low heat, cover, and continue to cook, stirring occasionally, until the liquid is absorbed and the rice is tender, 8 to 12 minutes longer.

5. Off the heat, sprinkle the peas over the rice, cover, and let warm through, about 2 minutes. Add the scallions and lemon juice to the rice. Season with salt and pepper to taste and serve with the chicken and lemon wedges.
Pin It!