Wednesday, August 30, 2006

In need of comfort food

It's been a strange week. The dreary, rainy weather coupled with a few lackluster dinners (which resulted in lackluster lunches the following day) has left me craving something comforting, something familiar. SP was traveling for work today so he couldn't cook and I just didn't feel like making the steak I had planned for dinner. I ran through a mental checklist of meals that might make me smile when a light flickered on. Spaghetti Carbonara.


I only had one medium-sized onion but a ton of shallots, so I added three huge shallots to the sliced onion and, honestly, I couldn't taste a difference. They're both onions, afterall. The meal, which I rounded out with some of the leftover salad greens (plus the chicken for SP) from last night's chicken Caesar, really hit the spot. Of course now I'm stuffed to the gills and in need of a long walk to help me digest, but I'm very happy nonetheless.
Pin It!

Tuesday, August 29, 2006

Catch-All Dinner


Dinner tonight was less than inspiring. I was planning to jazz up the same chicken Caesar salad I made last week by adding chopped cooked bacon, but I forgot that we had frozen the last package of bacon we bought, so that wasn't happening. The only difference between this version and the last one I made was the addition of shaved Pecorino cheese. I wasn't really in the mood for salad for dinner as it was, but then as I was putting the dressing on (Ken's creamy Caesar), the bottle burped and issued forth a wave of dressing that soaked the lettuce to the core.


I figured I would hedge my bets and make something to go along with my plate of salad dressing. In the freezer I found some frozen pizzas that SP likes to take to work on those days when we didn't have enough food left over. I nuked the Supreme pizza on the special "pizza crisping tray" and dinner was served.

This was one of those times when I wish I just had a bowl of cereal instead.
Pin It!

Monday, August 28, 2006

Sticky Chicken


Tonight I made my buddy D's recipe for Sticky Chicken. She and her wife had raved about the recipe when D made it last week, so I gave it a whirl. All I can say is WOW! The sauce is super simple (only 4 ingredients) but the flavor is amazing. Tangy, tart, salty, sweet...it hits all the taste buds. I served the chicken with white rice and steamed broccoli with cheddar cheese (the broccoli I always make with pierogies). Just as I suspected, the broccoli was nowhere near as good as it is when I pair it with the pierogies. I must make a mental note to pick up another bag of pierogies from the wholesale club.

Since I'm a sauce fiend, I was happy to see how much sauce this recipe made. I could eat just the sauce with some white rice and be very happy. In fact, there was only a small piece of chicken left for lunch tomorrow, so most of my lunch is rice, sauce and broccoli. I'm already looking forward to it!

Thanks, D!

Sticky Chicken
Serves 4

1 cut-up chicken, 2 1/2 to 3 lbs (I used 4 boneless, skinless chicken breasts)
1/4 cup honey
1/4 cup lemon juice (about 1 lemon)
1/4 cup soy sauce
3/4 cup ketchup

Preheat oven to 375.

Wash and dry chicken and cut off any excess fat. Place chicken in a 9" x 13" baking pan that has been sprayed with nonstick vegetable oil. Combine all the remaining ingredients and pour over the chicken. Bake, covered, for 30 minutes (I cooked the boneless breasts for 15 minutes) and then uncover and bake for an additional 40 minutes (I did 20), basting halfway through.
Pin It!

Sunday, August 27, 2006

Breakfast Sandwich


Today just felt like a breakfast sandwich kind of day. I made mine with two fried eggs, two slices of bacon and a thick slice of tomato leftover from last night's dinner all piled high on a toasted English muffin.
Pin It!

Company's Coming


On Saturday C and M came over for dinner. The heat, coupled with how busy we've been lately, meant dinner needed to be low impact. I also wanted to make sure it was a relatively healthy meal since our guests are trying to eat better in preparation for their wedding next month. After much deliberation, I opted for chicken sandwiches. I grilled chicken breasts seasoned with salt, pepper and some lemon juice and arranged a platter with sliced fresh mozzarella, roasted red pepper strips, thinly sliced red onion, Romaine lettuce, thick slices of tomato and a cilantro-lemon mayo. We all assembled our own sandwiches on crusty rolls so C and M could have as much or as little as they wanted. I also put out some cheddar and sour cream and sour cream and onion chips, as well as the Terra chips (those root vegetable chips you usually find in specialty supermarkets) that C brought.


I also put out some bruschetta for us to nosh on before dinner. I just cut a baguette into rounds and toasted them before adding the bruschetta, which had a slight kick to it that surprised (and delighted) us all. Fudge ripple ice cream cones rounded out the meal.
Pin It!

Saturday, August 26, 2006

Manicotti Madness


Last night was all about making an easy dinner. We had manicotti in the freezer and I had frozen the leftover spaghetti sauce and meatballs from Sunday dinner two weeks ago. I made a quick salad using hearts of Romaine, some grated Pecorino cheese and some Ken's Caesar vinaigrette. I also made some of my cheesey garlic bread. Super simple and very satisfying.
Pin It!

Friday, August 25, 2006

Taco Night


After the success of the fried corn tortillas last week, SP requested we have tacos again this week. Ground beef was on sale at the supermarket and I certainly had plenty of tortillas left over. I cooked the ground beef Wednesday night so we just had to heat it up on Thursday, fry the tortillas and prepare the fixings.

For my taco meat I use a recipe from Gourmet Magazine. It is super simple to season ground beef for tacos without relying on those taco seasoning packets, which contain an obscene amount of salt. All you need is freshly minced garlic, ground cumin, chili powder, tomato paste, salt and pepper. The best part - when you season the meat yourself, you can control the amount of salt, which makes the whole meal a bit healthier (and means you can eat more tacos!)

To a large skillet add a few tablespoons of olive oil and heat over medium-high heat. Add a large onion that's been finely chopped, a few cloves of minced garlic, 2 teaspoons of ground cumin and 2 teaspoons of chili powder. Cook until the onion is soft (about 3 minutes) and then add one package of ground beef (about 1 1/4 pounds). Cook, breaking up the meat, until the meat is no longer pink. Add 2 tablespoons of tomato paste, salt and pepper and cook until the meat is fully cooked. Taste and adjust the seasonings.


I fried the tortillas in a few inches of vegetable oil just like I did last time, but this time I made sure I got the oil hot enough before I added the tortilla. I also tried using tongs instead of two forks, which didn't work as well. This batch was perfectly cooked - nice and brown and extra crispy. I still have to work on the shape of the taco shells, but at least I've got the actual cooking method figured out.

We served our tacos with shredded Romaine lettuce, sour cream, shredded cheddar cheese and Tapatio (as per The Anti Chef's recommendation). I would have liked some salsa, but we didn't have any on hand.


And the best part of taco night - leftovers for lunch the next day. Since I was home I opted to make three tacos instead of a taco salad. This time I used the forks and I think these shells were almost perfect.
Pin It!

Tuesday, August 22, 2006

Pasta with Bacon, Arugula and Tomato


Sometimes I buy things at the store intending to use them for one purpose, but then plans change and I no longer want to make the original dish. Such was the case with a bag of baby arugula I bought last week. We were going to have chicken stuffed with arugula and some kind of cheese, but then we had occasion to celebrate with dinner out and the arugula remained in the fridge. Since arugula is fragile to begin with, I knew this bag wouldn't last long and so pasta with bacon, arugula and tomato was born.

I diced a few slices of bacon (okay...it was more like 6 slices) and cooked it over medium heat until it just started to crisp around the edges. I pureed a large can of whole peeled tomatoes and added them to the pot. A little less than half a pint of heavy cream went in next, followed by the baby arugula. I cooked a pound of rotelle in boiling salted water and when that was done I added it to the sauce and cooked both together (a very important step). Some grated cheese finished the dish. I also made a quick salad with hearts of Romaine, some grated cheese and bottled Caesar vinaigrette.
Pin It!

Monday, August 21, 2006

Chinese Food

Pork Egg Foo Yung. Chicken with Mixed Vegetables. An egg roll. Bar-B-Que Spareribs. Crispy noodles with duck sauce.

No, I didn't cook tonight. And neither did SP. But man, did we enjoy our dinner. Greasy Chinese food that has left me gulping down water like it's going out of style paired with an excellent action/suspense movie. After a long day of driving and a weekend away from home, this was just what the doctor ordered.


My plate, from left to right, chicken with mixed vegetables, an egg roll and pork egg foo yung with gravy. I eat my egg rolls with a mixture of that fluorescent pink duck sauce and spicy mustard.


I had to take a picture of the crispy noodles. Most Chinese restaurants cheap out and serve those thin brown noodles that taste like cardboard. These, on the other hand, are light, airy, crispy and greasy. We always fight over them in our house.

UPDATE: Am I alone in thinking roast pork egg foo yung is utterly amazing? There is just something about the combination of fluffy egg, chunks of roast pork, sweet onion and that rich, brown gravy that leaves me paralyzed with happiness.
Pin It!

Sunday, August 20, 2006

To Grandmother's House We Go

My mom and I went to visit my grandmother this weekend. Every morning at Grandma's starts with a hearty breakfast - scrambled eggs, sausage links, red potatoes cooked with onion and thick slices of Jersey tomato sprinkled with salt and pepper.


We also went to visit my aunt, uncle and cousin while we were in town. My aunt knows how much I love her sandwich ring, so she made one for lunch.


Savory Sandwich Ring

2 packages (11 oz each) refrigerated French bread dough
3 garlic cloves, pressed
1/2 teaspoon each: dried oregano and dried basil
8 ounces thinly sliced deli meat such as salami, turkey, ham or roast beef
4 ounces thinly sliced cheese such as Muenster, Swiss or American
2 cups chopped lettuce
6 tablespoons Italian dressing, divided
1 medium onion, thinly sliced
1 medium green bell pepper, thinly sliced
1 medium tomato, thinly sliced

Preheat oven to 350 degrees. Place dough seam side down on 15" round baking stone. Join ends of dough together to form a large ring. Cut six to eight diagonal slashes on top of the dough; lightly spray with vegetable oil. Press garlic over dough and spread evenly. Sprinkle with herbs and bake 26-30 minutes or until deep golden brown. Remove from baking stone and cool completely.

To assemble: cut bread in half horizontally. Arrange meat and cheese evenly over bottom half of bread. Top with lettuce, drizzle with 2 tablespoons Italian dressing. Top with onion, bell pepper and tomato and brush cut side of bread with remaining dressing. Replace top half, cut into wedges and serve.

This was a low-key weekend, so we cooked dinner at home on Saturday. My grandmother has been making latkes (or potato pancakes) for years and since I've been craving them recently, I asked her to show me how she makes them.


First we assembled all the ingredients: large red potatoes (any potato will work fine), flour, eggs, salt, baking soda and minced onion. Like a Chinese stir-fry, latkes are something you need to fry and then eat quickly. A cold latke just isn't very tasty.

Peel the potatoes (2 large ones makes 20-30 small pancakes. We used 4 large ones and had 42 small pancakes), cut them into small cubes and put the cubes in ice water. Put half the potatoes in the blender with one egg. Blend and add a 1/2 teaspoon of salt and a pinch of baking soda. Blend again and then put into a large bowl. Repeat with the remaining potatoes and add those to the bowl. Add 3 heaping tablespoons of flour and about 3 tablespoons of minced onion (or however much you like) and stir to combine.

My grandmother used to make these using a box grater but now, for convenience sake, she uses the blender. The resulting pancake doesn't have the same texture as the old ones, but the flavor is still there. You could make this recipe using the grater, but instead of cubing the potatoes, you'd grate them over the large holes of the box grater and then mix in the rest of the ingredients.

The resulting mixture looks like a bit like gruel. Not so appetizing, but trust me on this one, OK?


Heat about a 1/2 inch of vegetable oil in a large non-stick skillet. Add the batter in heaping spoonfuls and fry until the edges start to turn golden brown. Flip them over so they brown on the other side and then drain them on a papertowel-lined plate.


I like to eat my latkes with sour cream and applesauce. The tang of the sour cream is a nice balance to the sweetness of the latke and the tart applesauce.

Pin It!

Thursday, August 17, 2006

Kicked Up Pork Chops


Tonight was SP's night to make dinner. We had some leftover pork chops in the freezer, so he scoured the Internet, eventually settling on Emeril's Kicked Up Pork Chops with Roasted Garlic Mashed Potatoes. Green beans were on sale this week, so they rounded out the meal.

The chops are soaked in milk and spices before being baked in the oven, which we think was what made them so incredibly moist. The spice factor was a little lacking for my taste, but SP was very happy with the way they turned out. He said you could really taste the flavor of the meat. The spice snuck up at the end of each bite; I just wish it had been a more powerful kick.

For the potatoes, SP roasted a whole head of garlic and added it to regular mashed potatoes. The garlic flavor was very mellow and smooth and the potatoes were rich and creamy from (sshhhhh) a whole stick of butter. For the beans he just steamed them until they were still slightly crisp and then gave them a nice coat of butter, salt and pepper.

In a related note: I really need to get my hands on some plain white dishes. Those ugly blue stalks of wheat are really making me crazy. SP inherited this set from a friend and we've been putting off buying new ones because we could never agree on a pattern we both liked. Once I started this blog, though, I decided plain white was the only way to go since it really makes the colors of the food pop. SP had been a fan of plain white all along, so now we just have to find time to get to the store.
Pin It!

Wednesday, August 16, 2006

Hail Caesar!


Tonight's dinner was another meal made simpler by all that cooking I did on Sunday. I had seasoned chicken breasts with salt and pepper, cooked them and then cut them into bite-sized pieces. When I got home from work, all I had to do was chop three hearts of Romaine, add the cooked chicken and make the croutons. For the croutons I took half a French baguette, cut it in half lengthwise and then cut it in half lengthwise again. I cut each half into bite-sized pieces that were then tossed in a bowl with some olive oil, salt and pepper, turned out onto the toaster oven baking sheet and popped in the oven at 400 degrees until they were golden brown and crispy. Voila! Homemade croutons.

I cheated with the dressing - it was Ken's. I wanted to make my own creamy Caesar, but this was supposed to be an easy weekday meal. Next time this will be a weekend meal so I can attempt my own dressing. I'm sure it will elevate this meal to unknown heights.

Pin It!

Tasty Tacos


My pal D (a.k.a The Anti Chef) made tacos last week. The best part - she fried her own taco shells using corn tortillas. Being me, I thought, "Wow! That is totally amazing. I have to try this!" Surprisingly enough, it's actually a pretty simple thing to do, albeit time-consuming. The reward at the end, however, is well worth it. I decided Monday would be taco night, so to move things along on Sunday I coated strips of chicken with cumin, chili powder and garlic powder and then cooked them over high heat. That way all we had to do on Monday was reheat the chicken and assemble our fixings - lettuce, salsa, sour cream, shredded cheddar cheese and another D favorite: Tapatio. SP cooked some arroz amarillo and heated up some refried beans while I fried the tortillas and we had ourselves a Mexican fiesta.

A quick how-to for the shells:


In a small omelet pan, heat about a half inch of vegetable oil over medium-high heat. Carefully slide in a corn tortilla and using two forks turn over the tortilla, allowing it to cook evenly on both sides. Once it starts to cook, lift up one side of the tortilla to form the shell. Continue holding up the side so the tortilla doesn't flop over, then flip the shell so the other side has a chance in the hot oil. Keep flip-flopping until the tortilla becomes golden brown and crispy.

This was my first go at making my own taco shells and I was too impatient, resulting in slightly chewy shells. Next time I'll leave them in a bit longer so they can get nice and crispy.
Pin It!

Monday, August 14, 2006

Update on the Muffins

I finally had a muffin (well, let's be honest, it was two) for breakfast this morning. All I can say is wow. I wasn't sure what to expect since the recipe I used called for brown sugar instead of white and only the egg whites, not whole eggs - I think it was (gasp) a low-fat recipe. But never fear, the extra half cup of chocolate chips I added really put them over the top. They don't look like they have a lot of chips in them when they're whole, but once you bite into them you can see all the chocolately goodness.

Definitely a HUGE thumbs up!
Pin It!

Sunday, August 13, 2006

Sunday Dinner


I haven't done Sunday dinner in awhile and now I remember why. Not that I don't love having my family over, but it's exhausting to cook such a big meal. I'm beat!

I made spaghetti and meatballs using Lidia's recipe, which basically calls for meatloaf mix, bread crumbs, cheese, parsley, garlic, eggs, salt and pepper all mashed together, formed into meatballs, coated with flour, fried in vegetable oil and then cooked in tomato sauce. I made a simple sauce using some diced carrot, garlic and onion (I would have used celery had we had some), sauteed in some olive oil. Then I added whole peeled tomatoes that I had processed into crushed tomatoes. I threw in some fresh basil leaves and a few dried bay leaves and let it simmer for a few hours.


I also made garlic bread with cheese using mozzarella, cheddar and Pecorino. I had made garlic and parsley butter earlier by mashing some softened butter with garlic paste and some minced parsley. I spread the butter over both halves of a French baguette and then topped the halves with a mixture of all three cheeses. A quick run under the broiler melted the cheese.


My mother-in-law brought an antipasto from the local pizza parlor that included chopped Romaine, hot peppers, olives, diced ham, pepperoni, provolone cheese, fresh mozzarella and tomato. We ate the antipasto as an appetizer before the big meal.


I also made some homemade pita chips to serve with hummus. I made the chips by taking pita pockets and cutting them in half to separate the layers. I brushed the rough sides with some olive oil and cut them into triangles. I put the pieces onto the toaster oven baking sheet and sprinkled kosher salt on top. They baked at 350 degrees until the pita became crispy.


I also served a regular salad with dinner - just your basic chopped salad with Romaine, minced red onion, shredded carrot, grape tomatoes and diced red pepper. We dressed it with balsamic vinegar and olive oil.
Pin It!

Prepping for the Week


I just spent the past 4 hours prepping food for the week. In the above photo, starting from the upper left and going clockwise, is a bag of cleaned and trimmed green beans to go with a pork chop dinner SP is making on Wednesday, chicken seasoned with salt and pepper and sauteed for the chicken Caesar salad we're having on Tuesday, cooked green and red peppers and onions for taco night on Monday and the chicken that will go in the tacos, seasoned with cumin, chili powder and garlic powder and seared over high heat.

In addition to all this, I prepared garlic and parsley butter that I smeared over a loaf of French baguette and grated three kinds of cheeses (mozzarella, Pecorino and cheddar) that will become garlic bread with cheese. I also made meatballs and sauce for tonight's spaghetti and meatballs dinner. Lastly, I chopped three hearts of Romaine, minced red onion, shredded a carrot, diced a red pepper and halved some grapes tomatoes for the salad. My mother-in-law is bringing some antipasto and we'll have the banana chocolate chip muffins I made yesterday for dessert.

I'm exhausted.
Pin It!

Saturday, August 12, 2006

Banana Chocolate Chip Muffins


Do you ever have this problem - you buy a huge bunch of bananas at the store and by the end of the week you've eaten maybe one? You find yourself standing in your kitchen staring at a bunch of bananas that are quickly becoming overripe. You're sick of smoothies, so what do you do?

I usually solve this problem by making banana bread. But, to be honest, I'm getting a little tired of the same old same old. So when I found myself with a bunch of ripe bananas this morning, I decided to make banana muffins. Not a far cry from banana bread, but different nonetheless, especially since I tried a new recipe.

I've been perusing a number of food blogs lately as I embark on my own blogging journey and this week I came across Debbie's banana and chocolate chip muffins. I figured, what the heck, and gave her recipe a try. The muffins are still cooling so I don't know what they taste like yet, but they certainly smell divine.

Banana Chocolate Chip Muffins
Adapted from Moosewood Restaurant Book of Desserts

Makes 12 muffins (I got 17)

½ cup vegetable oil
1 cup packed brown sugar (less, if bananas are extremely ripe)
4 egg whites
3 large ripe bananas (about 3 cups mashed)
2 cups unbleached white flour
1 teaspoon baking powder
1 teaspoon baking soda
½ teaspoon salt
1 Tablespoon pure vanilla extract
½ cup chocolate chips (I used a full cup since it didn't look like enough chips)

Preheat oven to 350. Oil or spray muffin tins, or use paper liners.

In a large bowl, with an electric mixer or by hand, beat the oil, sugar, egg whites, and mashed bananas until well blended. Sift the flour, baking powder, baking soda, and salt into the bowl. Fold the dry ingredients into the wet with quick strokes. Be careful not to overmix. Fold in the vanilla and the chocolate chips.

Spoon the batter into the prepared muffin tin and bake for 20 minutes, or until a toothpick inserted in the center of a muffin comes out clean. Turn the muffins out of the tin and cool on a rack.
Pin It!

A Hearty Breakfast


A lazy Saturday morning is a rarity for us. Errands and other weekend goings-on usually take up most of the day. So when I realized we had nowhere to be until 6 p.m., I decided to make breakfast. And I'm not talking cereal.

First I peeled four small potatoes and cut them into cubes. Then I cut half a green pepper and half a small onion into similar-sized cubes and put everything into a non-stick pan with some vegetable oil. Once the potatoes, peppers and onion started getting some nice brown color, I covered the pan to let the steam finish cooking the potatoes.

Meanwhile, I took four slices of bacon and put it on the baking sheet that came with our toaster oven. The sheet was covered with a double layer of foil to make cleanup easier. Ever since I saw Ina Garten make bacon in the oven, it's the only way I'll cook it. In a skillet, the bacon doesn't cook evenly. But in an oven, with the heat coming from all sides instead of just the bottom, the bacon cooks perfectly every time. And since the toaster oven tray holds four pieces, it's perfect for 2 servings. I set the toaster to 350 degrees and let the oven do the work.

I also diced some grape tomatoes from my parent's box o'veggies and mixed them in a bowl with some salt and pepper.

For the eggs, I decided to mix in some leftovers from the fridge. We had some deli ham, so I diced that along with a small hunk of cheddar and mixed it with the leftover egg yolk from last night, plus 5 other eggs. That turned out to be a lot of eggs, but lucky for me SP is a hungry man. I cooked the eggs in a non-stick skillet over low heat so they remained creamy.

With a glass of OJ, we had ourselves a mighty fine breakfast.

Pin It!

Friday, August 11, 2006

Succulent Shrimp


Sweet. Juicy. Succulent.

How else to describe the beauty that is the shrimp?

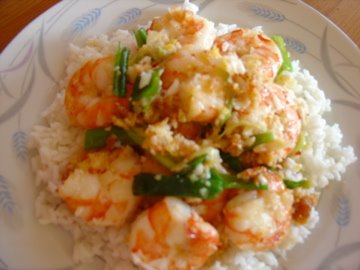
Tonight I made what was supposed to be last night's dinner - Ginger, Scallion and Garlic Shrimp from Rachael Ray's new magazine, Everyday with Rachael Ray. I made this dish a few weeks ago and fell in love with its simplicity and its taste. As you can see from the recipe below, the dish calls for a huge chunk of ginger and 6 (count 'em, 6) cloves of garlic. With ingredients like that, you're bound to get great flavor. When you add in the onion-y goodness of scallions and the kick of the red pepper flakes you've got a real winner.

I served the shrimp over plain white rice that I cooked according to the package directions, only I use 1/4 cup less water then they call for. My bag of rice says to use 2 cups of water for 1 cup of rice, so I use 1 3/4 cups of water, which makes the rice a bit more fluffy.

Now you might be thinking, "Shrimp is too expensive for weeknight cooking. I only cook shrimp for special occasions." Well let me share a little secret with you - you don't have to buy fresh shrimp at the seafood counter anymore. Frozen shrimp are just as good. And cheaper, in most cases. In fact, those "fresh" shrimp that you've been buying at the supermarket were probably frozen at one point (unless you're lucky enough to live near a fresh fish market and can get shrimp that were caught that day). There is no way they can transport unfrozen shrimp to your supermarket. They would go bad before they even got into the case. If you read the price placards closely, most say the shrimp was "previously frozen." If it doesn't say that, chances are you'll have to pay top dollar for them to rush the shrimp to the market.

I used to be like you, only buying shrimp for an anniversary dinner or when we were having really special company. Then one day SP and I were perusing the frozen foods section of our local wholesale club and we spotted 2-pound bags of raw, peeled and deveined frozen shrimp. And not the tiny ones either, the 16-20 count. It was like a beacon of light from above.

We bought a bag and I used them to make shrimp scampi. Let me tell you, I couldn't taste a difference between them and the ones I'd been buying for years at the fish counter. In fact, the bags of frozen shrimp are a lot easier to deal with because you can portion out as much as you want, defrost them in the fridge overnight (or, if you decide to make shrimp at the last minute, you can just run them under cold water to defrost them) and then cook them like you would fresh shrimp. As long as you buy the raw shrimp, you won't run the risk of overcooking them as you would with the already cooked frozen shrimp.

So break out your everyday dishes and enjoy shrimp on a weeknight. Happy cooking!

Ginger, Scallion and Garlic Shrimp
4 servings

1 large egg white
1 tablespoon cornstarch
1 1/2 teaspoons sugar
2 teaspoons salt
1/2 teaspoon freshly ground pepper
1 1/2 pounds shrimp, shelled and deveined
6 garlic cloves, finely chopped
One 1-inch piece of ginger, peeled and finely chopped
1/2 teaspoon crushed red pepper flakes (optional)
1/4 cup canola or vegetable oil
3 scallions, halved lengthwise, cut into 1-inch pieces, dark green parts set aside
Steamed rice

1. In a medium bowl, whisk the egg white with the cornstarch, sugar, salt and pepper until a paste forms. Add the shrimp and toss to coat. Set the shrimp aside to marinate for 10 minutes.

2. In a small bowl, combine the garlic, ginger and red pepper flakes; set aside.

3. Heat a large, heavy skillet over high heat for 3 minutes. Add the oil and swirl to coat the bottom of the skillet. Add the shrimp and the white and light green scallion pieces and stir to coat with the oil. Cook, stirring and scraping up any brown bits from the bottom of the skillet, until the shrimp are almost cooked through, about 2 minutes. Add the garlic mixture and the dark green scallion pieces and cook, stirring, until the shrimp are cooked through, about 1 minute more.

4. Season to taste with salt and pepper. Transfer the shrimp to a large platter and serve with steamed rice.
Pin It!

Thursday, August 10, 2006

Cabo Chicken


Tonight didn't go according to plan. But you know what they say about the best laid plans....

Dinner was supposed to be Ginger, Garlic and Scallion Shrimp over white rice. I had been thinking about it all day. Then I got home in time to see SP frantically closing all the windows, keys in hand. Turns out his mom had called, in tears, because her oven "exploded." I barely had time to change before we were out the door and on our way to her apartment. After flipping the fuse for her electric stove, SP did some investigating and figured out that the coil had simply died. The oven is, after all, over 20 years old, so this shouldn't have been a huge shock.

After all that excitement, we needed some dinner. I wasn't in the mood for the diner down the street, SP wasn't in the mood for Chinese and neither of us was in the mood to drive around aimlessly trying to find some sustenance.

After a few minutes of deliberation we settled on Quiznos. Normally we're not fans of chain restaurants, but Quiznos has been good in a pinch before and it was just as good tonight. I got the Cabo Chicken sandwich, which comes with chicken, bacon bits, lettuce, tomato, onion, guacamole, cheddar cheese and spicy mayo on a toasted roll. For what it is, it doesn't get much better. The mayo is super spicy, the guac has a nice tang and the chicken actually tastes like chicken.

Sometimes you just have to go for the junk food.
Pin It!

Pasta with Onions and Ricotta Salata


Back when we lived in our old apartment, I bought a hunk of cheese at the supermarket on a whim. I knew nothing about it, except it had a cool name. Ricotta salata. I love ricotta cheese, so I thought "what the heck." Turns out ricotta salata is related to ricotta - it's made from the same sheep's milk, but it's pressed to get out all the moisture and then dried, leaving it hard and crumbly.

I ended up using it in a pasta dish with carmelized onions. It was a pretty basic recipe: thinly slice some onion and carmelize it in a pan with olive oil. Cook a pound of spaghetti, crumble the ricotta salata, mix everything together and eat. The first taste was sublime. The cheese was salty, the onions creamy and the pasta was a vehicle to transport both into my mouth.

I only bought the cheese and made the dish once. For some reason it fell off my radar. Then the other day while we were at the supermarket I was looking at the cheese case and saw the ricotta salata. I remembered the dish and, on a whim, bought a good-sized chunk. While dinner tonight was good, it wasn't as sublime as the last time. For starters, I only used one onion, which just wasn't enough. There was too much pasta and not enough of the good stuff (i.e. the sweet onions and the salty cheese). I'll know for next time.


I also bought Romaine hearts this week, so I chopped up half of a heart, added some diced red onion, shredded carrot, diced green bell pepper and a tomato. Drizzled with balsamic vinegar and oil, it was the perfect counterpart to the pasta.
Pin It!

Wednesday, August 09, 2006

Breaded Pork Chops


Lately I've had a hankering for breaded pork chops with applesauce, so we got a family pack of pork chops on sale at the supermarket last week. I wanted to make roasted potatoes to go with them, but it's just too hot for that kind of cooking. I opted for mashed potatoes, but I wanted to try this tip from a blog I've been reading. This woman in Australia makes garlic mashed potatoes by throwing a few cloves of garlic in when the potatoes are cooking and then mashes both together when they're done. But SP decided to be helpful and started the potatoes when he got home so by the time I arrived the potatoes were done cooking. Looks like that experiment will have to happen another time.

The pork chops were about an inch thick, which meant I would have to finish them in the oven if I didn't pound them thinner. I was going for something schnitzel-like (hence the breading and pan frying....all I would have needed for the proper schnitzel is a fried egg). I pounded the chops in a plastic bag with my trusty Death Blow hammer. I should take a picture of this thing sometime. It works so much better than a traditional meat pounder and was super cheap at the hardware store. Plus it's bright orange so it never gets lost in the drawer.

I beat two eggs in a pie plate and filled another pie plate with Italian seasoned bread crumbs. Once the chops were the right thickness (or thinness, as it were), I dipped the chop in the egg, then in the bread crumbs and then straight into a hot skillet. The chops cooked for maybe 3 minutes per side until the bread crumbs were golden brown.

I mashed the potatoes with about 3 tablespoons of butter, a few good pinches of salt, a lot of freshly cracked black pepper, a splash of milk and three good spoonfuls of sour cream. I threw in some chopped scallions at the end for some onion-y flavor.

We were supposed to have green beans, but the beans had been purchased over a week ago and were looking a little past their prime. So, we settled for an old standby - frozen corn. Still tasty, but I was kicking myself for not buying the beautiful broccoli crowns that had been on sale this week. Oh well, live and learn.

I served my chop with a nice heaping helping of applesauce.
Pin It!

Sunday, August 06, 2006

Breakfast of Champions


Sunday morning. A time to relax over a nice, leisurely breakfast. Except that with church and my mother-in-law's surprise party this afternoon, not to mention going to the grocery store in between, there isn't much time for relaxing. But I still needed something to eat between my cereal at 8:45 a.m. and the party at 2:30 p.m.

That's where the breakfast sandwich comes in. Far healthier than anything you could get at the local drive-through, I start my sandwich with an English muffin, lightly toasted. I scramble one egg with salt and pepper and cook it gently over low heat so it remains creamy. I got some deli ham at the store and two slices of that completes the sandwich.

We had some slices of tomato leftover from dinner last night, so I ate those as well, sprinkled with salt and pepper. A big glass of orange juice and breakfast is served.
Pin It!

Burgers and Onion Rings


While chowing down tonight SP said, "I know sometimes I push for us to go out to eat, but your cooking is so darn good I don't know why we bother." Awww...shucks. Thanks honey.


Tonight I made burgers and onion rings. I use Rachael Ray's recipe for Spicy O'Nuts. It's pretty simple. You just take 2 cups of pancake mix, add about 3/4 of a bottle of beer, 1 teaspoon each of chili powder, paprika and hot sauce. Mix it all together, add in a thickly sliced onion, stir to coat and fry the rings in a shallow frying pan in about an inch of oil (use a light oil like vegetable or canola).


Make sure that once you put the rings in you leave them alone until they get nice and dark or else the batter will fall off and you'll be left with a naked ring.


Once the rings are golden brown, remove them from the oil and drain them on paper towels. Make sure to salt them as soon as they come out of the oil.


I made the burgers using 80% lean ground beef mixed with minced shallot, a few dashes of Worcestershire sauce, salt and pepper. I topped my burger with cheddar cheese and SP's with Swiss. I used our electric grill and the burgers took about 3 minutes per side for medium rare.


I served the burgers with some thinly sliced red onion, tomatoes Mom gave me from her box o'veggies last week and some Romaine lettuce. I top my burger with ketchup, a squirt of yellow mustard and a thick slathering of mayo. SP built his with some Thousand Island dressing and some jalapeno hot sauce. He said it was a good combination.
Pin It!

Friday, August 04, 2006

A How-To For Pierogies


Pierogies with bacon, onions and sour cream served with steamed broccoli coated with cheddar cheese. This meal is, by far, one of my favorites. It's also a heart attack on a plate. But I love the way the flavor of the cheddar mingles with the bacony goodness. Just typing this post is making my mouth water.


You start by chopping up about half a pound of bacon and putting it in a skillet over medium heat. Cook the bacon until crisp and remove with a slotted spoon, leaving the bacon fat in the pan. Drain the bacon on some paper towels.


Meanwhile, bring a pot of water to a boil for the pierogies. In another pot, put the broccoli that you've chopped into bite-sized pieces. The broccoli only takes a few minutes, so that can be started when you put the pierogies in to cook.


In the pot where you cooked the bacon, add one large onion thinly sliced. Cook until the onion is very soft and starting to brown. This usually takes about 20 minutes.


When the onions are almost done, add the pierogies to the boiling water and cook according to package directions. I use Mrs. T's pierogies because I can get them in bulk at my local BJ's.


To the pot with the broccoli, add about half a cup of chicken broth, cover and allow the broccoli to steam in the broth. This might seem like an odd step (why can't I just use water? you might ask) but the flavor the broth brings to the broccoli is unsurpassed. I got this tip from my good friend C, who was kind enough to share this recipe with me. While you're waiting for the pierogies to cook, grate about 2 cups of cheddar cheese.


Once the pierogies are cooked through, drain them and add them to the pan with the onions. Stir to coat so all the pierogies get some of the bacon fat on them and all the good onion flavor.


When the broccoli is tender (which should also coincide with when all the broth has evaporated), remove the broccoli to a bowl. I take out half the broccoli and then cover it with cheese.


Add the other half of the broccoli to the bowl, cover with the remaining cheese and then cover the bowl tightly with aluminum foil so the cheese melts. Once the cheese has melted, place a heaping spoonful on a plate, add pierogies (I allow 4 or 5 per person), cover the pierogies with some onions, sprinkle bacon on top and add a dollop of sour cream.
Pin It!