Monday, June 26, 2017

Tomato and Goat Cheese Tart

Do you ever see a recipe and just know, instinctively, that it's going to be amazingly delicious? That's how I felt when I read my friend Kylee's post about this Tomato and Goat Cheese Tart . I could practically taste the buttery, flaky crust, the ripe, juicy tomatoes and the tang of the goat cheese. I couldn't wait to make it.

Goat cheese and tomato tart

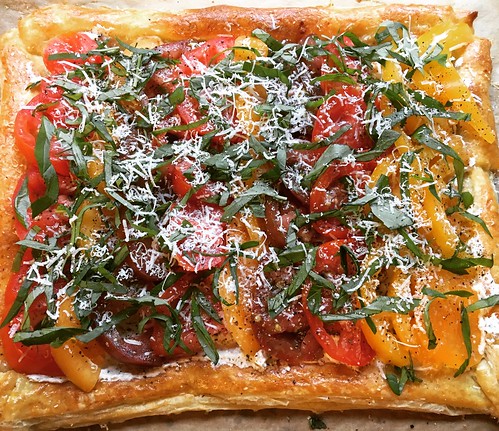
I tried to find the Nature Sweet tomatoes Kylee mentions in her post (Eclipse tomatoes), but the stores near me don't seem to carry them (despite the Nature Sweet site claiming they did). I ended up splurging on heirloom tomatoes and I'm so glad I did. All I can say is wow. I'm lucky to live in an area known for amazing tomatoes, but it's not quite peak season yet. The heirlooms I picked up were stunning and really brought the whole tart together.

Katie helped me mix up the goat cheese spread the day before and then I assembled and baked the tart at my parent's house. We ate it as an app and holy guacamole was it delicious. Everything comes together beautifully and we were all sad when it was gone. My aunt is coming for a visit this weekend and since a pack of puff pastry comes with two sheets I'll be using her visit as an excuse to make this again. It's the perfect summer treat since you really want to make this when tomatoes are at their best. The only downside is that this wouldn't reheat well, so plan to devour the whole thing in one sitting. Maybe that's not such a bad thing...

Tomato & Goat Cheese Tart
Slightly modified from Kylee Cooks

1 puff pastry sheet, thawed in the fridge
1 egg, beaten
Grated Parmesan or Pecorino cheese
4 oz goat cheese, softened (a small log, the ones in my supermarket are 4oz)
1 clove garlic, grated
1 teaspoon dried Italian seasoning
4 heirloom tomatoes, sliced then cut into half-moons
1/2 cup fresh basil, chopped roughly
Salt & pepper

Preheat the oven to 425.

Place the sheet of puff pastry on a piece of parchment laid on a pizza stone or baking sheet. Use a rolling pin to gently flatten and spread out the pastry so it's smooth as well as longer and wider than when you started.

Using a sharp knife, cut a 1/2-inch strip off the pastry on all four sides. Keep the strips - you'll be adding them back onto the pastry in a minute. Brush all the pastry with the beaten egg, then put each strip you just cut back onto the dough, essentially making a border around the edges (Katie said it looked like a picture frame). Use the tines of a fork to press the strips down so they stick to the pastry underneath. Prick the entire surface (where the picture would go) with a fork. Sprinkle with some Parmesan or Pecorino cheese.

Bake for 15 minutes until puffed and golden.

Mix together the goat cheese, garlic and Italian seasoning. This can be done a day or two ahead of time. Once the puff pastry is golden brown, remove it from the oven. Spread the goat cheese mixture over the center area of the pastry (now you'll really see what Katie meant by it looking like a picture frame).

Top the goat cheese with slices of tomato. I bought different colored heirlooms so I alternated the colors to make it look pretty. Keep the tomato slices close together - you really want to pack them on for maximum flavor. Sprinkle the chopped basil and extra Parmesan or Pecorino cheese on top, then season with a little salt and pepper. Cut the tart into slices and serve.
Pin It!

Thursday, June 22, 2017

Crispy Shrimp Tacos with Cilantro-Lime Slaw

Wow, wow, WOW!! What a showstopper. As soon as I saw Caroline post this recipe for Crispy Shrimp Tacos with Cilantro-Lime Slaw I had a feeling they'd be good, but I wasn't expecting them to be amazing.

Crispy shrimp tacos

The ingredients are actually very simple and there's almost no prep work. The shrimp take next to no time to cook and the result is a wonderful medley of textures - crispy shrimp, creamy slaw, slightly chewy tortilla combined with the heat of the Sriracha mayo. Steve and I added extra Sriracha to our tacos because I can't use too much spice or Katie complains. The only thing that would make these better is buttery slices of avocado nestled next to the shrimp, so I included that in the recipe below.

Make these soon! I know I'll be putting them on the menu again ASAP.

Crispy Shrimp Tacos with Cilantro-Lime Slaw
Slightly modified from The Barbee Housewife

Cilantro-Lime Slaw:
2 cups coleslaw mix
1/4 cup mayonnaise (or to taste, I eyeballed it)
Juice of 1 lime
salt and pepper
1/4 cup fresh cilantro, chopped

Sriracha-Lime Sauce:
1/4 cup mayonnaise
Sriracha, to taste
Juice of half a lime

Crispy Shrimp:
1 lb. shrimp, peeled and deveined
1/2 cup flour
salt and pepper
2 eggs, whisked
1 cup panko
Vegetable oil, for frying

To serve:
Flour tortillas, warmed in a dry skillet
Sliced avocado

Combine the coleslaw mix, mayonnaise, lime juice, salt and pepper and cilantro in a bowl. Cover and refrigerate until ready to use.

Stir the mayonnaise, Sriracha and lime juice together. Taste and adjust the heat to your preference. Cover and refrigerate until ready to use.

Put the flour, along with some salt and pepper, in a plastic food storage bag. Whisk the eggs in a shallow bowl. Put the panko in another food storage bag. Place the shrimp in the bag with the flour first. Seal the bag, then toss to coat all the shrimp with the flour. Remove the shrimp from the bag, shaking off any excess flour (I like to use a colander for this), then place them in the bowl with the egg. Toss to coat all the shrimp with the egg. Add the shrimp to the bag with the panko, seal the bag and toss to coat all the shrimp with the panko.

Heat 2-3 inches of vegetable oil over medium heat in a large skillet. Put the shrimp in the pan, being careful not to overcrowd them, and cook for about 2 minutes, until the panko is nicely browned. Remove the shrimp to a paper-towel lined plate.

Build your taco starting with some of the slaw, a few shrimp, and a drizzle of the Sriracha-lime sauce. Nestle a few slices of avocado alongside the shrimp and enjoy!
Pin It!

Thursday, June 01, 2017

One-Pot Bacon and Feta Pasta

One-pot meals are amazing, right? I know they're so 2015, but what busy family doesn't love a meal that combines minimal effort with maximum flavor? Ashley's recipe for One-Pot Chicken Feta Alfredo sounded perfect for a busy weeknight.

One pot pasta

I decided to make a few changes to the recipe - I left out the chicken, swapped the pancetta for bacon (although my family LOVES pancetta) and left the tomatoes and basil as a garnish rather than cooking them with the pasta (because I simply cannot stand loose tomato skin - blech).

The result was a creamy, cheesy, simply delicious and EASY weeknight meal. This is absolutely going in the permanent rotation, although I'll need to double it next time if we want leftovers.

One-Pot Bacon and Feta Pasta
Modified from Cheesecurd in Paradise

4 slices of bacon, cut into pieces (I like to use kitchen shears)
8 oz bow tie pasta
6 oz crumbled feta, divided
1 1/2 cups shredded Parmesan cheese
2 cups reduced sodium chicken broth
1 cup half-and-half
1/4 teaspoon garlic powder
1 tablespoon minced fresh basil
2 tomatoes, chopped

In a large non-stick skillet with a lid, cook the bacon until it's crispy. If there's a lot of fat, drain most of it off. Add the pasta, 4 oz of the feta, Parmesan, chicken broth, half-and-half and garlic powder.

Bring to a boil, then cover and reduce to a simmer. Cook for 15-20 minutes, just until the pasta is al dente (with a little bite left).

Add the basil, tomatoes and remaining 2 oz of feta. Stir to combine and let sit for 5 minutes before serving.
Pin It!