Monday, July 23, 2018

Cuban Taquitos

My friend Amy over at Bellyfull recently posted a photo of these Cuban Taquitos on her Instagram page. I knew immediately that they'd be a huge hit. We all love the flavors in a Cuban sandwich but my usual recipe is much more time-consuming. These were so easy!

Cuban rollups

I guesstimated the amounts based on how we like our Cuban sandwiches and the results were perfect. I was only able to make one small (taco size) roll-up and four larger (fajita size) roll-ups so I adjusted the amounts below. I had the leftovers for lunch today and they reheat beautifully in the toaster oven.

Cuban Taquitos
As seen on Bellyfull's Instagram

10 fajita size flour tortillas
mayo
yellow mustard
1/2-lb thinly sliced deli ham
1/2-lb thinly sliced deli turkey
1/2-lb thinly sliced lacy Swiss cheese
1 jar sandwich stacker dill pickles

Preheat the oven to 400 degrees.

Lay out your tortillas on a clean work surface. I find it easier to portion out amounts when you can do all of them at once. Spread some mayo on the bottom half of each tortilla. Squirt a little mustard on top of the mayo. Divide the ham and turkey evenly between the tortillas. You should be have at least two slices of each meat per tortilla. Layer on some of the Swiss and then top with one or two pickles.

Roll the tortillas as tightly as you can and place on a baking sheet lined with parchment paper that's been sprayed with nonstick cooking spray. Spray the tops of the tortillas or baste with melted butter. Sprinkle some salt on top.

Bake for 10-12 minutes until the cheese is melted and the meat is hot.
Pin It!

Thursday, July 12, 2018

Easy Weeknight Beef and Broccoli Lo Mein

Busy, busy, busy. That's all I can say about life these days.

It's summer, so at least I've got that going for me. It's my favorite time of year and I soak it all in to get me through the cold, dark days of winter.

We recently had a privacy fence installed on the part of our backyard that faces the street and quite a bit of landscaping done, so we're using our patio again. It's so lovely back there now and the weather has been cooperating so we can eat dinner outside.

This Easy Weeknight Beef and Broccoli Lo Mein was last night's meal, eaten al fresco until the damn flies found us and made things so miserable Katie decided to finish her dinner inside while Steve and I cleaned up.

And THAT is why I want a screened in porch.

Beef and broccoli lo mein

So...this lo mein was awesome. I thought it was a bit too sweet so I'll cut down on the sugar next time, but my family loved it. You'll see quite a large range for the flank steak. The original recipe called for half a pound but my supermarket doesn't sell such a small amount of steak, and we wanted more steak than that anyway, so I upped it to 1.5-lbs. Use however much you like.

I also used oyster sauce instead of hoisin because I already had it in the house. They're completely different flavors but I think both will work fine.

Easy Weeknight Beef and Broccoli Lo Mein
Modified from The Recipe Critic

12 ounces lo mein noodles, or spaghetti (I use Dreamfields and the boxes are some weird amount like 13.25 oz)
3 cups broccoli florets
1 tablespoon vegetable or canola oil
8 oz - 1.5 lbs flank steak, sliced against the grain
4 garlic cloves, minced
1 cup shredded carrot
1 cup chicken broth
1/4 cup packed brown sugar
1/2 cup reduced-sodium soy sauce
3 tablespoons hoisin or oyster sauce
1 tablespoon cornstarch
2 teaspoons sesame oil
1/3 teaspoon ground ginger
1/4 teaspoon crushed red pepper flakes
1/4 teaspoon pepper

Cook the noodles according to package directions. Add the broccoli during the last 4 minutes of cooking. Drain the noodles and broccoli. Set aside.

While the pasta is cooking, heat oil in a wok or other deep skillet over high heat. Add the steak and cook until just starting to brown. Add the garlic and carrots and cook for a minute more.

In a 2-cup measuring cup whisk together the chicken broth, brown sugar, soy sauce, hoisin or oyster sauce, cornstarch, sesame oil, ginger, red pepper flakes and pepper. Add to the skillet and bring to a boil. Simmer until the sauce thickens.

Add the spaghetti and broccoli to the wok and toss until incorporated. Serve.
Pin It!

Monday, June 04, 2018

Soft Cheese Tacos

I've been on a serious Tex-Mex kick lately. I can't get enough tortillas, salsa, cilantro, cheese, avocados...I want it ALL. I saw these Soft Cheese Tacos from Homesick Texan and I was hooked. Cheese, cheese and more cheese - sign me up!

Soft cheese tacos

There is absolutely nothing healthy about this dish but sometimes you just need to indulge. The ingredient list seems long, but it's actually a really easy meal to put together. And, surprisingly, these reheat beautifully. My only caution is to test your jalapenos before you add them to the queso. Sometimes jalapenos are more like green peppers and other times they're fiery little devils. The last time I made these one jalapeno was mild and the other was super spicy. I ended up using only a quarter of the spicy one and the queso was perfect.

One more note - these are a wonderful vegetarian meal but Steve likes meat so I usually add some of the rotisserie chicken I keep in the freezer. The chicken is entirely unnecessary but know it's an option if you also live with a carnivore.

Soft Cheese Tacos
Homesick Texan

For the queso:
2 tablespoons unsalted butter
1/4 cup diced yellow onion
2-4 jalapeños, seeded and diced (check spice level!)
2 cloves garlic, minced
3/4 cup diced grape tomatoes
2 tablespoons cornstarch
1 cup whole milk
1 cup water
1 pound American cheese, chopped or shredded
1/2 teaspoon kosher salt
1/2 teaspoon ground cumin

For the soft cheese tacos:
2 tablespoons vegetable oil
12 corn tortillas
12 ounces (3 cups) Colby Jack, shredded
1/4 cup diced yellow onion
2 cups cooked chicken (optional)
Garnish: sliced pickled jalapeño, minced cilantro

Preheat the oven to 350°F.

In a 2-quart saucepan, heat the butter over medium-low heat. Add the onion and jalapeños. Cook until softened, about 5 minutes. Add the garlic and tomatoes and cook for 30 more seconds.

Whisk together the cornstarch, milk and water until well combined then pour into the pot. Bring to a simmer and cook for a couple of minutes until it thickens. Turn the heat down to low and add the American cheese. Stir until the cheese has melted, then add the salt and cumin. Turn off the heat.

Pour the oil into a 9x13 baking dish. Place the tortillas in the baking dish (it’s okay if they overlap) and move them around to make sure they all get coated with some of the oil. Place uncovered in the oven for 5 minutes until they're soft and warm. Remove the baking dish from the oven and stack the tortillas on a plate. Reserve the baking dish.

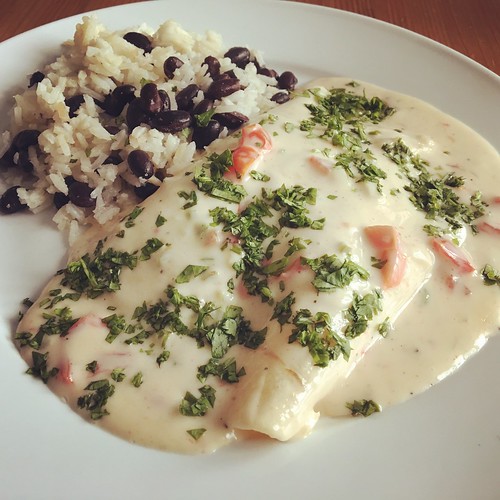
To assemble the tacos, place a warm tortilla on a clean surface. Add 1/4 cup of the shredded Colby Jack down the center of the tortilla then add 1 teaspoon of the onions and some chicken, if using. Roll the tortilla then place seam side down in the reserved baking dish. Repeat with the remaining tortillas.

Cover the baking dish with foil and bake for 15 minutes. Reheat the queso over low heat, stirring occasionally. Once the tacos are done, remove them from the oven and pour the queso evenly over the tacos. They'll be swimming in queso, which is what you want. Serve warm with sliced pickled jalapeños and cilantro.
Pin It!

Friday, February 23, 2018

Recipe Redo - Chicken with Apples

I first posted this recipe waaaaay back in 2007 so I thought it was time for an update. For starters, the original photo is cringe worthy but I've also tweaked the prep a bit since then.

chicken apples

Quick reminder of this recipe's origin - my mom first made this recipe in the summer of 1973. This was the first summer (while she was in college) that she didn't go home. She was looking for a recipe to make, probably for a boyfriend, and came across this one. She doesn't remember where she saw it, but her copy calls for wine instead of apple juice. One time she was making it for a group of people and didn't have wine so she decided to substitute apple juice. We all prefer it that way, but you can decide. This is an authentic tried and true recipe for going on 44 years!

She also claims it makes a knock-out chicken salad the next day but I've never had enough leftover to try it.

Chicken with Apples

1 tablespoon vegetable oil
4 bone-in, skin-on chicken breasts (or 2 large/4 small thighs and 2 breasts)
1 medium onion, cut into large dice
2 celery stalks, cut into large dice
1 large Red Delicious apple, cut into large dice
1 tablespoon flour
1 cup apple juice (or white wine)
1 cup sour cream
salt and pepper

Preheat the oven to 350 degrees.

Heat the oil in a large skillet or Dutch oven over medium-high heat. Add the chicken and brown on both sides.

Place the chicken in a large baking dish and cover with the onion, celery and apple. Pour off all but 1 tablespoon of oil from the skillet and add the flour, stirring until it's incorporated. Add the apple juice and whisk until thickened. Remove the skillet from the heat and add the sour cream. Season with salt and pepper to taste and pour over the chicken.

Cover the baking dish with foil and bake for an hour. Uncover and bake another 30 minutes.

When the chicken is done, remove to a plate and cover the baking dish to keep the sauce warm. Once the chicken has cooled enough to handle it (I usually put the plate in the fridge for 30 minutes), remove the meat and pull into bite-size pieces with your fingers, discarding the skin and bones. Toss the chicken pieces with the sauce.

Serve over egg noodles.
Pin It!

Monday, January 22, 2018

Sheet Pan Chicken Tikka with Pickled Onions

I already have a chicken tikka recipe that my whole family absolutely loves, but when I saw this Sheet Pan Chicken Tikka on Smitten Kitchen I knew I had to make it. Just reading the ingredient list was making my mouth water and I loved the idea of everything cooking on one sheet pan. Of course Steve and Katie were skeptical when they saw me putting it together, but once they tasted the amazing flavors they were hooked.

Sheet pan chicken tikka

I made only slight modifications - using Greek yogurt for the marinade and sour cream for topping, adding some lemon juice to the marinade and a different recipe for pickled onions. If you love Indian flavors you really need to try this one. It's delicious!

Sheet Pan Chicken Tikka with Pickled Onions
As seen on Smitten Kitchen, picked onions from Bon Appetit

For the chicken
1 3/4-inch piece of ginger, peeled and grated
4 cloves garlic, grated
1 5-oz container plain Greek yogurt
2 tablespoons fresh lemon juice
1 teaspoon kosher salt
1/2 teaspoon chili powder
1/2 teaspoon ground turmeric
1/2 teaspoon ground cumin
3/4 teaspoon granulated sugar
1 teaspoon paprika
1 teaspoon garam masala
3 pounds chicken thighs or halved chicken breasts (mixture of both, skin-on, bone-in)

For the vegetables
3 tablespoons olive oil
1 1/4 pounds (about 4 medium) Yukon Gold potatoes, peeled and cut into small chunks
1 3/4 pounds (1 small head) cauliflower, cut into florets
1/2 teaspoon kosher salt
1/2 teaspoon ground cumin

Garnish
Pickled red onion
Dollops of yogurt/sour cream
Chopped cilantro

Combine ginger, garlic, yogurt, lemon juice, salt, spices and sugar in a freezer bag. Add chicken pieces and toss to coat evenly. Let marinate overnight in the fridge.

Heat oven to 425°F. Coat a large baking sheet with 1 tablespoon of the olive oil. In a large bowl toss the potatoes, cauliflower, salt, cumin and remaining 2 tablespoons olive oil together until evenly coated. Spread evenly on the baking sheet.

Remove chicken from marinade and nestle in the vegetables. Roast in oven for 40-50 minutes until chicken and vegetables are cooked through. Test the potatoes with a knife to make sure they're cooked through.

To serve, top with pickled red onion, dollops of yogurt/sour cream and chopped cilantro. Serve right in the pan.

Pickled Onions
1/4 cup apple cider vinegar
1/2 cup water
1/2 tablespoon sugar
3/4 teaspoons kosher salt
1/2 red onion, thinly sliced

Separate the onion rings and place in a small bowl. Whisk the vinegar, water, sugar and salt together until the sugar and salt dissolve, then pour over the onion rings. Let sit at room temperature for at least 1 hour. Can be made 2 weeks ahead. Cover and chill. Drain onions before using.
Pin It!