Monday, December 29, 2014

Recipe Redo: Polish Chicken

My grandmother has been making this recipe for Polish Chicken for as long as I can remember. It's the ultimate comfort food and one of those meals that instantly transports me back to my childhood.

Polish chicken

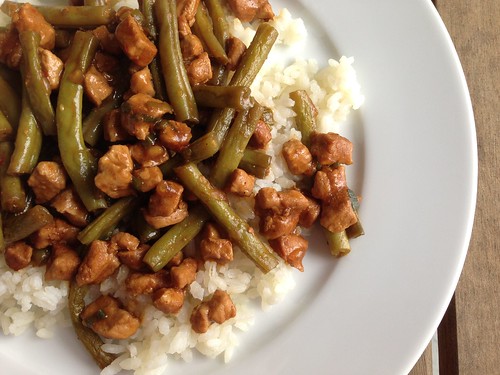
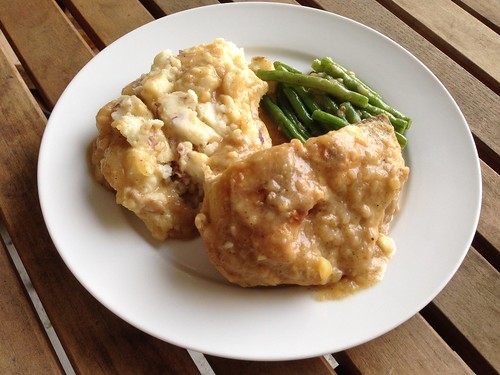
I went through a period where I didn't like meat on the bone (sacrilege) but thankfully I got over it. This is absolutely a meal you want to make with bone-in chicken. The bone helps the meat stay moist and tender. There's nothing complicated about this recipe, making it perfect for both a weeknight or a hearty, warming Sunday dinner. I think the gravy is my favorite part. As you can see in the photo, I smother everything on the plate with copious amounts. My grandmother always served Polish chicken with mashed potatoes and green beans so that's what I do, too.

And if you're wondering why this is called Polish chicken, I asked my grandmother and she said it's just what her mother called it when she was making it and the name stuck. Her family is Polish, so there you go. Regardless, it's delicious.

Polish Chicken
My grandmother's recipe

4 bone-in, skin-on chicken breasts*
1/4 cup flour
1 teaspoon garlic powder
1 teaspoon onion powder
salt and pepper
2 tablespoons vegetable oil
1 small onion, minced
2 cups water
1 cube chicken bouillon

Place the chicken in a resealable plastic food storage bag or in a baking dish. Add the flour, garlic and onion powder, and some salt and pepper. Seal the bag and toss to coat the chicken evenly in the flour (if using a baking dish, rub the flour and seasoning over the chicken to coat both sides).

Heat the oil in a large, deep skillet (make sure the skillet has a lid) over medium heat. Add the chicken, skin side down. Cook for 5 minutes, until the skin is brown and crispy. Flip and cook another 5 minutes. Add the minced onion around the chicken pieces and cook for about 5 minutes, until the onions begin to soften.

While the onion is cooking, bring the water to a boil (you can use an electric kettle, a pan on the stove, or heat it in the microwave). Add the bouillon cube and stir to dissolve. Once the onions are soft, add the water to the skillet. Bring to a boil, reduce the heat to medium-low, then cover. Cook for 25-30 minutes, stirring and turning the chicken every so often.

If the gravy looks a little thin, put a few tablespoons of flour in a bowl and add some water to make a paste. Whisk the paste into the gravy in the skillet. You should see the gravy thicken immediately. Taste the gravy and adjust the seasoning with salt and pepper, as needed.

Serve the chicken topped with the gravy.

*You can also use thighs or legs, just increase the amount based on how much you think your family will eat.
Pin It!

Friday, December 26, 2014

Penne with Five Cheeses

Another Sunday dinner prepared by SP. As I've mentioned before, he's loving Ina Garten right now. Her Penne with Five Cheeses sounded not only easy, but delicious. I've never seen a cream sauce like this before - you don't cook it ahead of time, just add the cooked pasta to the sauce and cheese and bake. I was skeptical but it worked.

Untitled

We all loved this but, unfortunately, it doesn't reheat well. I was so excited for the leftovers the next day, too. Oh well - that just means we get to eat it all next time. The only thing he changed was the cooking method. We don't own enough large ramekins to make individual servings, so we put the pasta and sauce in a large baking dish and baked it at 350 for about 20 minutes, until the sauce was bubbling.

Penne with Five Cheese
From Ina Garten

2 cups heavy cream
1 cup crushed tomatoes in thick tomato puree
1/2 cup freshly grated Pecorino Romano (1 1/2 ounces)
1/2 cup shredded Italian fontina (1 1/2 ounces)
1/4 cup crumbled Italian Gorgonzola (1 1/2 ounces)
2 tablespoons ricotta cheese
1/4 pound fresh mozzarella, sliced
6 fresh basil leaves, chopped
1 pound penne rigate pasta

Preheat the oven to 350 degrees.

Combine all the ingredients except the penne in a large mixing bowl. Mix well.

Cook the penne in boiling, salted water until al dente (1 or 2 minutes less than the recommended cooking time on the package). Drain well in a colander, then add to the ingredients in the mixing bowl, tossing to combine.

Add the pasta to a large baking dish (9x13 or larger). Bake for 20 minutes, until the sauce is bubbly and the edges are beginning to brown. Allow to cool for a few minutes before serving.

Note: due to the cream in the sauce, this doesn't reheat well.
Pin It!

Wednesday, December 24, 2014

"The Gobbler" {aka a Thanksgiving leftovers sandwich}

Despite living in New Jersey and Pennsylvania for most of my life, I've never eaten at a WaWa. Apparently I'm missing out. See, they sell this sandwich called The Gobbler and it's right up my alley. Turkey, stuffing, gravy and cranberry sauce on a hoagie roll. It's the ultimate in Thanksgiving leftovers, only you don't have to do any of the cooking.

Recently Coleen over at The Redhead Baker made an at-home version of The Gobbler sandwich. I was practically drooling all over my keyboard just reading about it so I knew I had to make it. The only problem was, we weren't going to be home for Thanksgiving. No problem - I just asked my mom to save me some turkey, stuffing and gravy. When we got home she dropped off the leftovers, I picked up some cranberry sauce and hoagie rolls and we were in business.

Untitled

As suspected, these were outstanding. I added a little mayo to our sandwiches because we all love mayo. Now I just need to get my hands on some more turkey or chicken, stuffing and gravy so I can make these again.

Thanksgiving Leftover Sandwiches (aka "The Gobbler")
As seen on The Redhead Baker

1 cup leftover turkey gravy
8 ounces leftover turkey, thinly sliced
4 hoagie rolls
mayo
jellied cranberry sauce
1 cup leftover stuffing

Warm the gravy in a medium saucepan over medium heat. When just starting to simmer, add the turkey meat. Heat just until the turkey is warmed through.

Split the rolls and toast them. Spread mayo on both side, then add cranberry sauce to each sandwich. Arrange some of the turkey meat and stuffing on each sandwich. Spoon more gravy over top. Serve warm.
Pin It!

Monday, December 22, 2014

Burgers with Brie, Caramelized Onions, Arugula and Garlic Mayo

I love a good burger, don't you? These Burgers with Brie, Caramelized Onions, Arugula and Garlic Mayo have been on my radar ever since Kate posted them. What's not to like about Brie and caramelized onions?

Untitled

Sorry for yet another bad sandwich photo but you get the gist. These were delicious. SP mistakenly bought the "intense, earthy" Brie rather than our usual "nutty and buttery" Brie, so the cheese really shone through. Between that and the peppery arugula, we were glad for the sweetness of the caramelized onions.

Burgers with Brie, Caramelized Onions, Arugula and Garlic Mayo
As seen on Kate's Recipe Box

1 lb. ground chuck
Salt and pepper, to taste
Brie cheese
caramelized onions
arugula
garlic mayo
4 burger buns

Heat a grill to medium heat.

Divide the meat into 4 patties. Press an indentation in the center so they don't bulge while they cook. Season both sides liberally with salt and pepper.

Grill for 3 minutes on one side, then flip and grill for another 2 minutes. Remove to a plate, top each patty with some of the cheese and tent with foil. Let rest for 5 minutes.

Serve the burgers on buns topped with caramelized onions, arugula and garlic mayo.
Pin It!

Friday, December 19, 2014

Pasta with Chicken Meatballs

Raise your hand if you miss natural light? ::raises hand:: My photos are nothing special in the spring and summer, but once I lose the natural light all bets are off. And it makes me so sad because I know people choose recipes in part because of the drool-inducing photos. So, my apologies, but you'll have to trust me that this was incredible.

On our flight home from California SP and I both watched cooking shows on the plane. During an episode of Giada's show she made Orecchiette with Mini Chicken Meatballs. It looked so delicious I knew I had to make it as soon as we got home.

Untitled

I made a few modifications, subbing campagnelle for the orecchiette since I had a box in the pantry. Really, any small shape will do. I also used diced tomatoes because I'm weird and don't like loose tomato skin. Because I used canned tomatoes, I measured out the liquid in the can and then topped it off with chicken broth.

This was truly outstanding, with light, tender meatballs and a delicious sauce made even better by the addition of fresh, melty, gooey mozzarella cheese. The recipe made enough food to feed an army, which was good because we were all fighting over the leftovers.

Pasta with Chicken Meatballs
Slightly adapted from Giada De Laurentiis

1 pound small cut pasta, such as orecchiette, campagnelle, penne, etc.
1/4 cup dry bread crumbs
1/4 cup chopped fresh flat-leaf parsley
2 large eggs, lightly beaten
1 tablespoon milk
1 tablespoon ketchup
3/4 cup grated Pecorino Romano cheese
3/4 teaspoon salt
3/4 teaspoon freshly ground black pepper
1 pound ground chicken
1/4 cup olive oil
chicken stock (amount will vary, see directions)
1 28-oz can diced tomatoes, juice reserved
1/2 cup freshly grated Parmesan or more Pecorino
8 ounces fresh mozzarella, cut into small pieces
1/2 cup chopped fresh basil leaves

Bring a large pot of salted water to a boil over high heat. Add the pasta and cook according to package directions. Drain the pasta, reserving about 1 cup of the pasta water. Set aside.

In a medium bowl, stir together the bread crumbs, parsley, eggs, milk, ketchup, cheese, and the salt and pepper. Add the chicken and gently stir to combine. With wet hands (this is key, otherwise the chicken will just stick to you rather than form into meatballs), roll the chicken into mini meatballs. Make them as big or as small as you want. You'll need to wet your hands often so keep a bowl of water nearby.

In a large skillet, heat the oil over medium-high heat. Add the meatballs and cook without moving until brown on the bottom, about 2 minutes. Turn the meatballs over and brown the other side, about 2 minutes longer.

Add the juice from the tomatoes to a large measuring cup. Add enough chicken stock to make 1 1/2 cups total. Add the chicken stock, tomato juice and tomatoes to the skillet. Bring to a boil. Using a wooden spoon, scrape up the brown bits from the bottom of the pan. Reduce the heat to low and simmer until the meatballs are cooked through, about 5 minutes.

Add the pasta to the skillet. Add the Parmesan and toss, adding reserved pasta water, if needed, to loosen the pasta. Add the mozzarella cheese and chopped basil. Gently toss to combine. Serve immediately.
Pin It!

Wednesday, December 17, 2014

Chinese Green Beans with Pork

I think of my friend MaryEllen as the queen of stir fries. Pretty much any Asian stir fry on this blog came from her. This recipe for Chinese Green Beans with Pork is based on her recipe, but modified a bit based on what I had in my pantry and fridge.


This was a great way to use up 2 lone pork chops I found in the freezer. Green beans have been hit or miss for us this year but this was a good batch. Simple, tasty, and quick - my idea of a great weeknight dinner.


Chinese Green Beans with Pork
Modified from Mary Ellen’s Cooking Creations

1 tablespoon sesame oil
2 pork chops cut into very small pieces
1 lb washed and trimmed green beans
2 cloves garlic, minced
1 1/2 cups chicken stock
2 tablespoons cornstarch
2 tablespoons oyster or hoisin sauce
2 tablespoons soy sauce
1 heaping teaspoon chili garlic sauce
Freshly ground black pepper
1-inch piece fresh ginger, peeled and grated
2 tablespoons Shaohsing rice wine
1 small bunch scallions, sliced thin
white rice or spaghetti/angel hair, cooked, for serving

Heat a large skillet over high heat. Add the sesame oil then add the pork and sauté for 3-5 minutes until the meat is mostly cooked. Add the green beans and garlic and sauté 1 minute. Combine the stock, cornstarch, oyster or hoisin sauce, soy sauce, chili garlic sauce, pepper and grated ginger, then add to the skillet. Bring to a boil. Continue cooking over high heat for 7-9 minutes longer, stirring frequently, until beans are slightly tender but still have some crispiness to them.

Stir in the scallions and rice vinegar, and cook one minute longer. Serve over cooked rice or noodles.

Pin It!

Monday, December 15, 2014

Indonesian Ginger Chicken

I've mentioned before that SP has taken over cooking Sunday dinner. He's been on an Ina Garten kick lately and was very excited to make her Indonesian Ginger Chicken.


This was some seriously awesome chicken. Incredibly flavorful from the marinade and really easy to cook. He used two cut-up chickens from the grocery store and we noticed that the white meat wasn't nearly as flavorful as the dark meat. You could really taste the marinade in the dark meat pieces. As much as I love white meat, I think this would be best with legs and thighs rather than whole chickens.

Untitled

He served the chicken with herb basmati rice and roasted carrots. At my recommendation, he boiled the marinade to thicken it into a gravy to serve over the chicken. That was a big hit as well.

Indonesian Ginger Chicken
From Ina Garten

1 cup honey
3/4 cup soy sauce
1/4 cup minced garlic (8 to 12 cloves)
1/2 cup peeled and grated fresh ginger
6lbs total bone-in chicken legs and thighs

Cook the honey, soy sauce, garlic, and ginger in a small saucepan over low heat until the honey is melted. Arrange the chicken pieces in 1 layer in a shallow baking pan, skin side down. Pour on the sauce. Cover the pan tightly with aluminum foil. Marinate overnight in the refrigerator.

Preheat the oven to 350 degrees.

Place the baking pan, still covered with the foil, in the oven and bake for 30 minutes. Remove the foil, turn the chicken pieces skin side up, and raise the temperature to 375 degrees. Continue baking for 30 minutes or until the juices run clear when you cut between a leg and thigh and the sauce is a rich, dark brown.

If you want, remove the chicken pieces to a serving platter and cover with foil. Strain the sauce from the baking dish through a sieve and add to a small pot. Boil the sauce until it thickens slightly. Serve as gravy to spoon over the chicken.
Pin It!

Friday, December 12, 2014

Hawaiian Pork Sliders

I decided to make these Hawaiian Pork Sliders after my friend Amy posted a photo of them on Instagram. They looked so good I could almost taste them.


I have such a hard time photographing sandwiches. I wonder how the pros do it? I should pay more attention when I see sandwiches or burgers in my feedly. Anyway, despite the less than stellar pictures, these were great. Very simple to throw together and took no time to cook. I served these on King's Hawaiian rolls but we honestly couldn't taste the rolls so next time I'll go with traditional sliders rolls instead. Or maybe I'll make them into regular burgers rather than sliders.

Hawaiian Pork Sliders
As seen on Very Culinary

1 1/2 pounds ground pork
1/2 cup minced scallions
3/4 teaspoon ground ginger
sprinkle of salt and pepper
8 pineapple rings
1/2 cup of your favorite barbecue sauce
mayonnaise
8 King’s Hawaiian or regular slider rolls

In a large bowl, using your hands, mix the pork, scallions, ground ginger, salt and pepper until just combined. Don’t over mix! Gently form 8 equal patties, with a slight indentation in the middle (this helps keep the burgers from bulging in the middle.)

Preheat your grill for medium-high. Coat the grates with oil or nonstick cooking spray. Place the pork patties on the hot grill and lightly coat tops with barbecue sauce. Cover the grill and cook for about 5 minutes. Flip the burgers and coat with more barbecue sauce.

After you’ve flipped the burgers, place the pineapple rings down on the grill. Cook the burgers for another 4-5 minutes, until cooked through. Cook the pineapple rings for about 3 minutes, or until you have nice grill marks on one side. Flip the pineapple and grill another 1-2 minutes. Remove the pineapple and burgers from the grill and let them rest 5 minutes.

While the meat is resting, toast the rolls on the hot grill until the edges brown nicely, about 1-2 minutes.

Spread more barbecue sauce and some mayo on the rolls, add the burger patty and a pineapple ring, then the other roll. Serve immediately.
Pin It!

Monday, December 08, 2014

Skillet Chicken Saltimbocca Spaghetti

I've done it again. I'm sorry that I disappeared for a few weeks. This whole blogging thing has become a lot more complicated these days. We're just so busy. And the lack of natural light, coupled with a waning desire to be in the kitchen, isn't exactly conducive to blogging.

I wish my photo of this Skillet Chicken Saltimbocca Spaghetti was better because this is one outstanding meal. Go look at Elly's photo to see it in all its drool-inducing glory.


We all thought this was outstanding. Baby Girl isn't a huge fan of capers, but otherwise this was right up her alley. I can't wait to make it again.

Skillet Chicken Saltimbocca Spaghetti
As seen on Elly Says Opa!

2 tablespoons olive oil
4 oz. thinly sliced prosciutto, chopped
8 large fresh sages leaves, plus 3 Tbsp. minced sage
1 lb. boneless/skinless chicken breast, cut into pieces
1 medium onion, diced
4 cloves garlic, minced
pinch of red pepper flakes
2 teaspoons flour
1 cup dry white wine
3 1/2 cups low-sodium chicken broth
1 cup water
12 oz. dried spaghetti, broken in half
3 tablespoons capers, rinsed and chopped
2 tablespoons unsalted butter
1/2 teaspoon lemon zest + 2-3 tablespoons juice

Heat 1 1/2 tablespoons of the oil in a large, nonstick skillet over medium-high heat. Add the prosciutto and cook, stirring occasionally, until crisp (about 5 minutes). During the last 30 seconds or so, add the sage leaves and cook until crisp. Using a slotted spoon, transfer the prosciutto and sage to a paper-towel lined plate.

Season the chicken with salt and pepper and then place in the hot skillet. Cook until browned and just shy of cooked through. Remove the chicken and keep warm.

Add the remaining 1/2 tablespoon oil to the skillet. Stir in the onion and cook over medium heat until softened, about 5-6 minutes. Stir in the minced sage, garlic, and red pepper flakes, and saute until fragrant, about 30 seconds. Add the flour and cook for one minute before whisking in the wine. Simmer until reduced by half, about 1-2 minutes.

Slowly whisk in the broth and water. and then stir in the pasta. Increase the heat to medium-high and cook at a vigorous simmer, stirring often with tongs, until pasta is tender and sauce has thickened (about 12 minutes).

Add the chicken and cook just a minute longer, until completely cooked and warmed through. Stir in the capers, butter, lemon zest, and lemon juice, and season to taste with salt and pepper. Serve the pasta with the crispy prosciutto and sage.
Pin It!