Showing posts with label appetizers. Show all posts

Thursday, July 20, 2017

Smoked Salmon Pizza

I'm not sure how or when I came across this recipe for Smoked Salmon Pizza, but every time I looked through my huge stack of printed recipes I'd see it. While we're on the subject, yes I print recipes I want to make because I like having a hard copy in front of me while I'm cooking so I can make notes. And yes, I desperately need a better filing system than stuffing the pile of papers into a reusable grocery bag.

Ahem.

Smoked salmon pizza

I've been eyeing up this recipe for a while but I could never find a good time to make it. Then our friends invited us over for brunch and I finally got a chance to try it. As an aside, I love that my friend didn't blink when I asked if I could use her kitchen, or when I busted out my pizza stone, parchment paper and all the various toppings I'd put in individual containers.

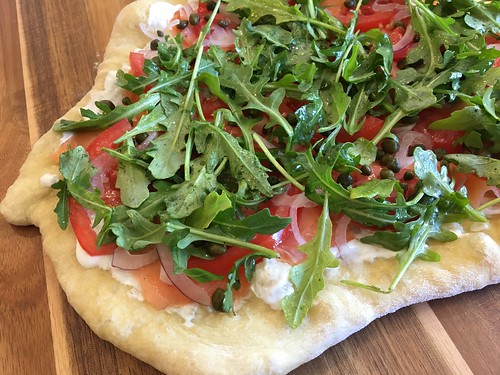
This was a cinch to make and I loved the crispy pizza crust with the luscious smoked salmon, salty capers and the tang of the red onion. Next time I think I'll swap the sour cream (which I subbed for crème fraiche) for cream cheese to make it more like a bagel, while also adding some of the same seasonings found on my favorite bagel of all time, the everything bagel. I hear Trader Joes makes an everything bagel seasoning blend. I really need to get my hands on some of that!

Our Best Ever Smoked Salmon Pizza
Modified from Spoon, Fork, Bacon

1/2 a ball of pizza dough (homemade or store bought)
Olive oil
1/2 cup cream cheese, sour cream or crème fraiche
4oz sliced smoked salmon or lox
Thinly sliced tomato
Thinly sliced red onion
1/4 cup capers, drained
1/2 cup baby arugula
Lemon juice
Salt and pepper, to taste
Dried dill

Preheat the oven to 425°F with a pizza stone on the center rack.

Roll out the dough on a piece of parchment paper dusted with flour. Pierce the surface all over with a fork and brush with small amount olive oil. Remove the pizza stone from the oven and transfer the parchment paper to the stone. If you have a pizza peel (I really need to get one of these) just put the pizza dough directly on the heated stone.

Bake for 10-12 minutes or until the crust is golden brown and crisp. Remove from oven and allow crust to cool a bit before adding the toppings.

Spread the cream cheese/sour cream/crème fraiche on the crust and top with pieces of the salmon and tomato. Sprinkle on the red onions and capers. Toss the arugula with some lemon juice, salt and pepper and add that to the pizza. Add a sprinkling of dill, cut into wedges and serve.
Pin It!

Monday, June 26, 2017

Tomato and Goat Cheese Tart

Do you ever see a recipe and just know, instinctively, that it's going to be amazingly delicious? That's how I felt when I read my friend Kylee's post about this Tomato and Goat Cheese Tart . I could practically taste the buttery, flaky crust, the ripe, juicy tomatoes and the tang of the goat cheese. I couldn't wait to make it.

Goat cheese and tomato tart

I tried to find the Nature Sweet tomatoes Kylee mentions in her post (Eclipse tomatoes), but the stores near me don't seem to carry them (despite the Nature Sweet site claiming they did). I ended up splurging on heirloom tomatoes and I'm so glad I did. All I can say is wow. I'm lucky to live in an area known for amazing tomatoes, but it's not quite peak season yet. The heirlooms I picked up were stunning and really brought the whole tart together.

Katie helped me mix up the goat cheese spread the day before and then I assembled and baked the tart at my parent's house. We ate it as an app and holy guacamole was it delicious. Everything comes together beautifully and we were all sad when it was gone. My aunt is coming for a visit this weekend and since a pack of puff pastry comes with two sheets I'll be using her visit as an excuse to make this again. It's the perfect summer treat since you really want to make this when tomatoes are at their best. The only downside is that this wouldn't reheat well, so plan to devour the whole thing in one sitting. Maybe that's not such a bad thing...

Tomato & Goat Cheese Tart
Slightly modified from Kylee Cooks

1 puff pastry sheet, thawed in the fridge
1 egg, beaten
Grated Parmesan or Pecorino cheese
4 oz goat cheese, softened (a small log, the ones in my supermarket are 4oz)
1 clove garlic, grated
1 teaspoon dried Italian seasoning
4 heirloom tomatoes, sliced then cut into half-moons
1/2 cup fresh basil, chopped roughly
Salt & pepper

Preheat the oven to 425.

Place the sheet of puff pastry on a piece of parchment laid on a pizza stone or baking sheet. Use a rolling pin to gently flatten and spread out the pastry so it's smooth as well as longer and wider than when you started.

Using a sharp knife, cut a 1/2-inch strip off the pastry on all four sides. Keep the strips - you'll be adding them back onto the pastry in a minute. Brush all the pastry with the beaten egg, then put each strip you just cut back onto the dough, essentially making a border around the edges (Katie said it looked like a picture frame). Use the tines of a fork to press the strips down so they stick to the pastry underneath. Prick the entire surface (where the picture would go) with a fork. Sprinkle with some Parmesan or Pecorino cheese.

Bake for 15 minutes until puffed and golden.

Mix together the goat cheese, garlic and Italian seasoning. This can be done a day or two ahead of time. Once the puff pastry is golden brown, remove it from the oven. Spread the goat cheese mixture over the center area of the pastry (now you'll really see what Katie meant by it looking like a picture frame).

Top the goat cheese with slices of tomato. I bought different colored heirlooms so I alternated the colors to make it look pretty. Keep the tomato slices close together - you really want to pack them on for maximum flavor. Sprinkle the chopped basil and extra Parmesan or Pecorino cheese on top, then season with a little salt and pepper. Cut the tart into slices and serve.
Pin It!

Tuesday, April 18, 2017

Grilled Shrimp with Anchovy Butter

Heeeeeeeeeey!!! I am SUPER excited to announce that we're officially in the new house. Squeeeeeeeee! It's been a crazy whirlwind these last few months but we're settling in and, shockingly, we're finding that this house already feels like home. Here are some photos of our new digs, including the listing photo of the kitchen:

Home pics

Home pics

Home pics

I'll admit, I was a bit nervous about cooking in this kitchen. It may look nice, but it was most definitely NOT designed by someone who enjoys cooking. For starters, there's no triangle. And insufficient storage. Heck, there isn't even a silverware drawer. Needless to say, a kitchen remodel is on the horizon...just as soon as we save up the necessary funds to do it right. We'll be knocking down the wall where the stove is and expanding into the space that was previously the dining room. That's why we turned the formal living room into the dining room.

Shrimp with anchovy butter

Sigh. We are just so in love with the space, the neighborhood, everything. I still can't quite believe we pulled it off. But enough about the new house...on to the recipe! I first had grilled shrimp with anchovy butter at least 20 years ago (likely closer to 25...eeek!) at Hamilton's Grillroom. It's been a staple on their ever-changing menu for all this time, and for good reason - it's delicious. And so simple. They serve massive shrimp at the Grillroom, but all I had on hand were these smaller ones. It doesn't make too much of a difference, but I may splurge on larger shrimp next time so they can spend a bit more time on the grill and get that wonderfully smoky char.

Grilled Shrimp with Anchovy Butter
Inspired by Hamilton's Grillroom

1/2-lb shell-on shrimp, any size (go for the larger ones, if you can)
6 tablespoons butter
half a tin of anchovies
crusty bread, for serving

Prepare your grill. If the shrimp are on the smaller side, place them on skewers so they're easier to flip. Grill until just pink.

Meanwhile, melt the butter with the anchovies in a small skillet. You want the anchovy filets to melt into the butter.

When the shrimp are cooked, divide them evenly on plates. Top each with some of the anchovy butter. Serve with slices of crusty bread to sop up all the delicious butter.
Pin It!

Tuesday, May 10, 2016

Baked Camembert

Do you remember when food blogs weren't nearly as plentiful as they are today? Back when I started blogging (August 2006!) the Internet was a much quieter place. One of the first food blogs I stumbled on was The Food Pornographer. She rarely posts recipes - her focus is on restaurants and photos of food - but she did post this one for Baked Camembert, which her extended family likes to make for special occasions.

Untitled

I made the same tweaks that they did - more garlic, no nuts or cranberries - and served it with crackers as our first course on Mother's Day.

Untitled

The smell of the garlic and rosemary baking in the oven was downright intoxicating. As soon as it came out of the oven we all descended like vultures and it was quickly devoured. Poor Steve is lactose intolerant so he took a Lactaid pill to enjoy the cheesy deliciousness. And then Katie proceeded to all but elbow him out of the way to get to the cheese. I had to restrain her so Daddy could have a few bites. That girl loves cheese, just like her parents.

Baked Camembert
Modified from Jamie Oliver

8oz Camembert cheese
2 cloves garlic, thinly sliced
1 teaspoon fresh rosemary leaves, minced
olive oil
crackers or bread for dipping

Preheat the oven to 350.

Cut off the rind from one side of the cheese. Put the cheese into an oven-safe ramekin. Press the sliced garlic into the top of the cheese, then sprinkle with the minced rosemary. Drizzle with a little olive oil. Bake in the preheated oven for 15 to 20 minutes, until the cheese is soft and gooey.

Allow to cool slightly, then serve with crackers or bread cubes for dipping.
Pin It!

Monday, February 22, 2016

Dill Pickle Dip

People. People! Have I got an amazing party treat for you.

I had this recipe for Dill Pickle Dip saved for almost a year before I got around to making it. Why? Because we so rarely go to parties these days. Sad, but true. So when a friend invited a group of moms over for a post-Valentine's Day party, I knew this was my chance.

Dill pickle dip

As soon as I unpacked the chips and dip, all the moms were oohing and ahhing. Apparently I'm not the only one who loves pickles. I hadn't bothered to photograph the dip beforehand, not knowing just how good it would be, so as soon as everyone started raving I grabbed the chips and the plastic container I'd brought the dip in, asked the hostess for a proper bowl, and went into the kitchen to take a quick photo.

Rebecca said this dip is also amazing as a burger topping and I can't wait to test that out.

Dill Pickle Dip
As seen on Foodie with Family

1 (8 ounce) package cream cheese, softened to room temperature
1 cup chopped dill pickles
1/4 cup finely chopped sweet onion
4 tablespoons pickle juice (use less for thicker dip or more for thinner dip)
1 teaspoon dried dill weed
salt and pepper, to taste
Pretzels, vegetable sticks, crackers, or potato chips for serving

Place the cream cheese in a bowl and use a wooden spoon to press and loosen the cream cheese. Stir in all of the remaining ingredients and mix until evenly distributed. Cover with plastic wrap and refrigerate for at least an hour before serving.

If you have any leftovers, this dip will keep for up to a week tightly covered in the refrigerator. It may become thinner as it sits.
Pin It!

Monday, June 29, 2015

Pork and Shrimp Dumplings

The theme for our latest dinner with our friends C & T was Asian food. We usually pick one recipe to make at T's house and this time we chose Steamed Dumplings. I've never made dumplings before and incorrectly assumed they'd be a lot of work. Nope!

Asian night
(all photos by T. Casey)

T always cons me into doing all the work (just kidding, I love cooking in her gorgeous kitchen). After I mixed up the filling we assembled the first batch, placing up a little bit of filling onto each dumpling wrapper, wiping the edges with water, and then folding the dough into a triangle. Then we pinched the two edges together to make little packages.

Asian night

SP and I got a bamboo steamer as a wedding present and had never used it. Oops! We lined the bottom with cabbage leaves, placed the dumplings on top and set it over a pot of boiling water for 10 minutes.

Asian night

These dumplings were outstanding. They had great flavor from the filling and the dipping sauce (which mirrored those same flavors) was perfect. We all gobbled them up. We doubled the recipe below so we had 40+ dumplings for 6 adults and 2 kids and it wasn't enough. Thankfully we had extra filling and T had more wrappers in her fridge, so I quickly assembled another 20 dumplings. The kids would run into the room, grab a handful of dumplings off the platter and run off to play, then come back for more. So, so good.

Asian night

I can't wait to make these again. My mom has already put her in request.

Pork and Shrimp Dumplings
From Rasa Malaysia
Makes about 20-24 steamed dumplings

1/2 pound ground pork
8-10 medium-sized shrimp, peeled, deveined, and cut into small pieces
1 scallion, finely chopped
3 dashes white pepper
1 teaspoon Shaoxing wine or sherry
1/2 teaspoon salt
1/2 teaspoon soy sauce
1/4 teaspoon sesame oil
1 inch ginger, peeled and grated
1 pack potsticker/dumpling wrappers

Combine the ground pork, shrimp, chopped scallions, ginger, and all the seasonings together. Mix well and set aside.

To make dumplings, place a small spoonful of the filling in the center of a wrapper. Dab a little water with your finger and circle around the edge of the skin, and then fold and pleat the dumpling accordingly. Repeat the same for the rest.

Arrange the dumplings in a bamboo steamer (lined with parchment paper or cabbage leaves at the bottom) and steam for 8-10 minutes. Serve immediately with dipping sauce.

To pan fry the dumplings: heat a large skillet and swirl some oil around to coat the pan. Add a single layer of pot stickers. Cook for 2 to 3 minutes until they begin to turn golden on the underside. Don't move them. Add 1/4 cup of water to the pan and cover immediately. Cook for 5 minutes, or until the meat is cooked through and the dumplings release from the pan. Serve immediately with the dipping sauce.

Soy-Vinegar Dipping Sauce
From Martha Stewart

1/2 cup soy sauce
1 teaspoon rice vinegar
1/2 teaspoon toasted sesame oil
2 teaspoons sugar
1 scallion, trimmed and sliced
2 tablespoons water

Combine all ingredients for the dipping sauce in a small bowl.
Pin It!

Monday, February 23, 2015

Fried Mozzarella Sticks

Baby Girl loves cheese sticks. She eats them as a snack almost every day after school. Or rather, she used to. One week I noticed the package in the fridge was still mostly full so I checked the expiration date. It was that weekend. Since the Super Bowl was coming up I figured I'd turn them into Fried Mozzarella Sticks and went searching for a recipe.

Untitled

The key to any mozzarella stick recipe is to freeze the cheese sticks before you bake or fry them. I'm not sure why the recipe I used doesn't say to do that but it's an absolute MUST. The cheese will melt if it's anywhere close to room temperature. Heck, even mine frozen started to melt and ooze as they fried. So do not, under any circumstances, forget that step.

These were delicious, full of melty, gooey cheese. I only made 8 since it was just the three of us. SP and I each had three and Baby Girl devoured two. I'll definitely be making these again the next time we have cheese sticks that need to be used up.

Fried Mozzarella Sticks
Modified from Add a Pinch

24 mozzarella sticks
1 cup buttermilk
1 egg
1 cup flour
3 cups panko
1 tablespoon Italian seasoning
vegetable oil
pizza or marinara sauce, for dipping

The day before you plan to make these, place however many cheese sticks you want to eat into the freeze. Freeze them overnight. Do not skip this step!

The next day, prepare three separate bowls for dredging your mozzarella sticks. Whisk the buttermilk and the egg in one bowl. Put the flour in the second bowl. In the third bowl, combine the panko and the Italian seasoning.

Dip each cheese stick into the buttermilk, then into the flour, then back into the buttermilk and finally into the panko. Set aside on a sheet pan until all the cheese sticks have been coated.

Pour about 1 inch of oil into a 12-inch non-stick skillet. Heat over medium heat until the oil starts to shimmer. Add a few cheese sticks at a time, being careful not to crowd the pan. Use tongs to remove them as they turn golden brown.

Place on a baking sheet lined with paper towels to drain. Serve warm with pizza or marinara sauce for dipping.
Pin It!

Wednesday, April 09, 2014

Salsa Fresca

This is the other salsa recipe I made for the Mexican-themed dinner we had with friends last month. I've been making this one for ages but never thought to take a picture to share with you guys.

salsa fresca
Photo credit - T. Casey

Obviously this one is very different from the grilled salsa. This one is much lighter and chunkier. They're both delicious, just different. I think it was great to have both versions at the dinner. We had no problem inhaling both salsas and the guacamole.

guacamole and two salsas
Photo credit - T. Casey

Salsa Fresca
As seen in the Williams-Sonoma Mexican cookbook

1 lb. ripe tomatoes, cut into 1/4-inch pieces
1/3 cup finely chopped white onion
1/4 cup chopped fresh cilantro
1 jalapeno chiles, finely chopped (ribs and seeds removed if you want it less spicy)
2 teaspoons fresh lime juice
Sea salt to taste

In a bowl, toss together the tomatoes, onion, cilantro, chiles, and lime juice. Sprinkle with salt and toss again. Cover and let stand for 10 to 15 minutes to allow the flavors to mingle, then serve with your favorite chips.

Makes 2 cups.
Pin It!

Wednesday, March 26, 2014

Restaurant Knockoff - Baja Fresh Grilled Salsa

I've been wanting to make Nicole's recipe for Baja Fresh Grilled Salsa for years, I just needed a party with enough people to eat it all. When we decided to do a Mexican-themed dinner with our friends, it was the first thing I knew I wanted to make.

roasted salsa
Photo credit - T. Casey

This could not have been easier. I used my indoor grill pan to char the vegetables and then whirred them up in the food processor. I only used one jalapeno since I wanted this to be mild enough for the kids to enjoy, but unfortunately my jalapeno was pretty spicy. It was great for the grown-ups, though. We inhaled this. Initially SP had been more excited about the salsa fresca I also made but ended up loving this one more. It's positively delicious and I can't wait to make it again.

Baja Fresh Grilled Salsa
As seen on Prevention RD, adapted from My Bizzy Kitchen

2 teaspoons extra virgin olive oil, to coat
6 large tomatoes
1-3 jalapenos (1 for mild, 2 for medium, 3 for hot), stem removed
1 onion, peeled and quartered
4 cloves garlic, peeled
Couple handfuls cilantro
1 teaspoon salt
Juice of 1/2 lime

Pre-heat a grill or grill pan to medium heat. Coat the tomatoes, jalapenos, onion, and garlic in the olive oil.

Grill the vegetables until they are charred, but not falling apart.

Place the vegetables in the bowl of a food processor or blender. Add the cilantro, salt, and lime juice. Blend until smooth. Serve with your favorite tortilla chip.
Pin It!

Friday, January 24, 2014

Artichoke and Brie Dip

I wanted to have a few things out to snack on when our guests arrived on Christmas Day. I'd had my eye on this Artichoke and Brie Dip for awhile and couldn't wait to make it.

Untitled

This made a ton of dip - definitely good for a large party - so next time I'd cut the recipe in half. We all loved it. Rich, creamy and cheesy, what's not to like? I served it with toasted bread slices and Triscuits on Christmas Day but the next day we had it with Ritz crackers and I think we all preferred them.

Artichoke and Brie Dip
The Kilkenny House

12 oz artichokes, drained and chopped
1 cup mayonnaise
1/2 cup sour cream
1 teaspoon Worcestershire sauce
8oz Brie cheese
1 cup grated Parmesan cheese
1 cup shredded mozzarella cheese
1/2 teaspoon salt
1/2 teaspoon pepper

Preheat the oven to 450 degrees.

Combine artichokes, mayonnaise, sour cream and Worcestershire sauce together until well blended. Add the Brie, Parmesan and mozzarella and blend. Season with salt and pepper.

Place the mixture in a round 1.5-quart baking dish and bake for 15-20 minutes. Serve warm with toasted bread, crackers or veggies.
Pin It!

Monday, January 20, 2014

Loaded Baked Potato Dip {Giveaway}

Have I got a giveaway for you guys!

But first, let's talk about this Loaded Baked Potato Dip. It has all the flavors of a loaded baked potato in dip form. Brilliant. I halved the recipe since I was only serving 4 people and it was plenty. We all agreed this would be a great dip for the Super Bowl.

Untitled

Which brings me to the giveaway. Just in time for the Super Bowl, Cape Cod is offering a great prize pack to four of my readers (yes, you read that right). Four of you will each receive a package containing 3 bags of Cape Cod Waffle Cut chips and 3 bags of Cape Cod 40% Reduced Fat Original chips. We used the Waffle Cut for this dip and they really stood up well to the task.

Untitled

Simply enter using the Rafflecopter link below. This giveaway will run until Thursday, February 23 at 12:00am. Winner will be announced by 11:00am ET on February 23 so Cape Cod will have a chance to ship the packages in time for Super Bowl Sunday. Good luck!

a Rafflecopter giveaway


Loaded Baked Potato Dip
As seen on Mary Ellen’s Cooking Creations, originally from The Barbee Housewife

16 oz sour cream
16 slices bacon, cooked and crumbled
8 oz shredded cheddar cheese
3 green onions, chopped

Mix the sour cream, most of the bacon, most of the cheese, and most of the green onions together. Chill for a few hours (at least one hour).

When ready to serve, stir and then top with the remaining bacon, cheddar and green onions.

Serve with potato chips.

Disclosure: I received the same number and variety of chips for review purposes. All opinions are my own.
Pin It!

Monday, January 13, 2014

Roasted Shrimp with Mayo and Mustard Sauce

My mom offered to bring an appetizer for Christmas dinner. I'd had my eye on Ina Garten's roasted shrimp for awhile so I asked her to try that method with some shrimp.

Untitled

We all agreed that there's no other way to make shrimp now that we've had them roasted. They were incredible, so bursty, plump and flavorful. I asked her to make a mayo and grainy mustard sauce to go with them. These were gone within a matter of minutes.

Roasted Shrimp
Shrimp from Ina Garten, sauce from A Taste of Home Cooking

2 pounds (12 to 15-count) shrimp
1 tablespoon olive oil
1/2 teaspoon kosher salt
1/2 teaspoon freshly ground black pepper
1/2 cup mayo
2-3 tablespoons whole grain mustard

Preheat the oven to 400 degrees.

Peel and devein the shrimp, leaving the tails on. Place them on a sheet pan with the olive oil, salt and pepper and spread them in an even layer.

Roast for 8 to 10 minutes, until just pink, firm and cooked through. Set aside to cool.

Mix together the mayo and mustard, tasting and adding more mustard as needed.
Pin It!

Friday, May 03, 2013

Pull-Apart Pizza Bites

A few weeks ago Baby Girl and I met my mom and aunt for dinner. We went to a pizza place and since it was a Thursday I figured I'd make something other than pizza for dinner on Friday. Then Maeghan posted these Pull-Apart Pizza Bites and I figured they were different enough from pizza to warrant making them the day after a pizza dinner.

pizzapuffs

I served these with Caesar salad to make it more of a dinner. We really enjoyed these - simple to make and great flavor, especially dipped in pizza sauce. Baby Girl loved that it was even easier to eat than pizza. These would also make a great appetizer for a party.

Pull-Apart Pizza Bites
As seen on The Way to His Heart

1 ball pizza dough
4 oz. mozzarella cheese, cubed (about 24 pieces)
Sliced pepperoni

For Topping:
Olive oil
Italian seasoning or pizza spices
Grated Parmesan cheese
Serve with pizza sauce

Pre-heat oven to 400 F. Lightly grease a 9-inch pie plate.

Roll the dough out into a thin round, as if you're making pizza. Place one mozzarella cube and two pieces of pepperoni about an inch apart around the dough. Using a pizza cutter, cut the dough around the mozzarella and pepperoni. Alternatively, divide the dough into 24 equal sized pieces, approximately 1 oz. each. Place one mozzarella cube and one to two pieces of pepperoni slices on each piece of dough. Pull the sides of the dough up around the cheese and pepperoni. Pinch to seal and place the dough, seam side down in the pie plate.

Repeat with the remaining dough and place the pieces of dough in a circular pattern around the pie plate.

Lightly brush olive oil over the top of the dough balls. Lightly sprinkle the Italian seasoning or pizza spices and Parmesan cheese over the top of the dough balls.

Bake for 20 minutes or until golden brown. Serve warm with pizza sauce for dipping.
Pin It!

Wednesday, February 13, 2013

Sponsored Post: Kung Wow Spicy Kung Pao Chicken Tenders

Chinese New Year began on Monday, February 10, and to help kick off the celebration Thai Kitchen and Simply Asia partnered with food bloggers to try some of their products.

thai kitche2

SP and I were looking for a quick meal after having a big lunch and this recipe for Kung Wow Spicy Kung Pao Chicken Tenders sounded like the perfect snack. From mixing the sauce to cooking the chicken, the whole thing took all of 15 minutes to prepare.

thai kitchen

Thai Kitchen and Simply Asia offer a complete line of Asian ingredients and convenience items, including sauces, curry pastes, rice noodles, fish sauce, coconut milk, noodle bowls, and more. Most items are gluten free and contain no artificial colors, flavors or MSG. Check out Thai Kitchen and explore their Asian cuisine ingredients.


I was pleasantly surprised by the flavor of the Kung Pao sauce. It wasn't overly spicy but added a pleasant heat to the chicken. The dipping sauce was the perfect compliment as well. The original recipe calls for either chicken tenders or chicken wings - I opted for the tenders because we had just purchased a club pack of chicken breasts at the store, but we both agreed the chicken wings would have been even better.

I'm including the recipe for both versions below. Obviously the tenders take much less time to prepare, which was perfect for our needs. However, wings would be a great alternative to the traditional Buffalo wings, a nice Asian twist perfect for celebrating the Chinese New Year.

Kung Wow Spicy Kung Pao Chicken Wings (or Tenders)
Slightly modified from Thai Kitchen/Simply Asia

1 pouch Simply Asia® Spicy Kung Pao Stir-Fry Sauce
2 pounds chicken wings (or breast tenders)
Cooking spray
1 Romaine heart, cut into large dice
Sweet Chili Dipping Sauce (recipe below)
2 scallions, thinly sliced

If using wings - Preheat an oven to 425 degrees. Line a baking sheet with parchment paper and place the wings in an even layer. Bake for 30 minutes, then baste the wings with some of the sauce. Bake for another 15 minutes, baste with sauce, bake for another 15 minutes.

If using tenders - Mix the stir-fry sauce with the chicken in a large bowl. Heat a non-stick skillet sprayed with cooking spray over medium high heat until smoking. Add chicken pieces in one layer. Cook, about 3 minutes per side, basting with more sauce as they cook. Flip, baste with more sauce and cook another 3 minutes or until cooked through.

Arrange the lettuce on a plate, top with the chicken pieces and dollop the Sweet Chili Dipping Sauce in the center. Garnish with the chopped scallion and serve immediately.

Sweet Chili Dipping Sauce
Recipe from Thai Kitchen/Simply Asia

1/2 cup mayo
1/2 cup sour cream
1/4 cup Thai Kitchen® Sweet Red Chili Sauce
1 teaspoon fresh lime juice

Mix all the ingredients in a bowl until well blended. Cover and refrigerate until ready to serve. Store leftover sauce in the fridge.

Social Media


Follow Thai Kitchen on Twitter at @Thai_Kitchen
Follow Thai Kitchen on Facebook


Follow Simply Asia Food on Twitter at @SimplyAsiaFoods
Follow Simply Asia on Facebook

This sponsorship is brought to you by Thai Kitchen/Simply Asia whom I have partnered with for this promotion.
Pin It!

Monday, January 14, 2013

Baguette with Prosciutto, Gorgonzola and Fig Jam

Right before the holidays a friend posted on Facebook about a recipe for Baguette with Prosciutto, Gorgonzola and Fig Jam. It sounded divine and I immediately planned my New Year's Eve menu around it.

fig toast

I only made about a quarter of the baguette because it was just SP and I eating these (Baby Girl licked all the fig jam off her slice - she turned her nose up at the gorgonzola and tried the prosciutto but claimed she didn't like it). The recipe below is my best guess at how much of everything you'll need for a full baguette.

I used gorgonzola (and only a little bit at that) but the flavor was still a bit too pungent for me. Soña recommended layering the fig jam and cheese together to help cut the flavor a bit so that's how I wrote the recipe below. I also think Brie would be excellent. Good thing I have 3/4 of a jar of jam left. Have you tried fig jam? I hadn't before making this and it was great!

Baguette with Prosciutto, Gorgonzola and Fig Jam
Recipe from Soña

1 French baguette
1 small jar fig jam
8oz blue cheese
12-16oz prosciutto, thinly sliced

Preheat the oven to 400 degrees (or preheat the broiler).

Slice the baguette into 1/2"-thick slices, on a slight bias. Place on a baking sheet lined with parchment paper and toast briefly, until just starting to brown. Remove from the oven.

Top each slice with a small amount of fig jam. Add some blue cheese then a slice of prosciutto.

Return to the oven (or broiler) and heat until the cheese melts and the prosciutto starts to crisp.

Serve immediately.
Pin It!

Wednesday, December 05, 2012

Baked Brie in Mini Phyllo Cups with Strawberry Jam

I love baked brie. There's a restaurant near my house that serves a slice of baked brie topped with raspberry jam, slivered almonds and a brown sugar glaze. I knew I wanted to try making some sort of baked brie for Thanksgiving but I wanted it to be easier to eat.

Baked Brie

There are hundreds of recipes out there so this is basically a method, not a recipe. I had to leave out the almonds because of Baby Girl's nut allergy and since I already had strawberry jam open I used that instead of raspberry. I added a pinch of brown sugar to each cup for that added sweetness. These were delicious and so simple to make.

Baked Brie in Mini Phyllo Cups with Strawberry Jam
Makes 24 cups

2 boxes mini phyllo cups
6oz Brie, rind removed, cut into 24 cubes
Fruit jam of your choice
Brown sugar
Sliced almonds (optional)

Preheat the oven to 325 degrees.

Remove phyllo cups from their packaging and place on a baking sheet. Add one piece of Brie into each phyllo cup. Top the cheese with some of the jam and sprinkle with brown sugar. Top with sliced almonds, if using.

Bake for 5-8 minutes until the cheese is melted and the cups start to brown. Serve warm.


Pin It!

Monday, December 03, 2012

White Bean Dip with Pita Chips

This year I decided we needed some appetizers to nosh on before Thanksgiving dinner. I made a list of a few different recipes and asked SP to pick three. He was most excited about this White Bean Dip with Pita Chips.

White Bean Dip
This was a huge hit and couldn't have been simpler to make. You could save even more time by using store-bought pita chips but, really, making your own takes next to no time. I made the dip the night before and brought it to room temperature before serving. I also used whole wheat pitas for the chips to make this a bit healthier.

White Bean Dip with Pita Chips
Giada De Laurentiis

1 (15-ounce) can cannellini beans, drained and rinsed
2 cloves garlic
2 tablespoons fresh lemon juice
1/3 cup olive oil, plus 4 tablespoons
1/4 cup (loosely packed) fresh Italian parsley leaves
Salt
Freshly ground black pepper
6 pitas
1 teaspoon dried oregano

Preheat the oven to 400 degrees F.

Place the beans, garlic, lemon juice, 1/3 cup olive oil, and parsley in the work bowl of a food processor. Pulse until the mixture is coarsely chopped. Season with salt and pepper, to taste. Transfer the bean puree to a small bowl.

Cut each pita in half and then into 8 wedges. Arrange the pita wedges on a large baking sheet. Pour the remaining oil over the pitas. Toss and spread out the wedges evenly. Sprinkle with the oregano, salt, and pepper. Bake for 8 to 12 minutes, or until toasted and golden in color.

Serve the pita toasts warm or at room temperature alongside the bean puree.

Make Ahead: Make the dip up to 2 days before and keep refrigerated. Bring to room temperature before serving.
Pin It!

Friday, December 30, 2011

Recipe Swap - Endive Stuffed with Goat Cheese and Walnuts

Want to see what other Special Occasion recipes were made during the swap? Here is the link to the Special Occasion Recipe Swap Roundup

The holiday season means parties and special dinners for many people. We always have a special meal for dinner Christmas Eve and New Year's Eve, so I thought a special occasion recipe swap would be perfect. The guidelines were for an appetizer, entree or side dish since we just did two dessert swaps in a row. I received a recipe for Endive Stuffed with Goat Cheese and Walnuts. My step-aunt always brings an antipasto platter to Christmas dinner and I thought these would be the perfect accompaniment.


I assembled these in the morning and kept them refrigerated until our guests arrived. They were incredibly easy to make since the only real cooking is making the sauce and that takes care of itself. My walnuts took 10 minutes in the toaster oven to get golden brown but definitely keep an eye on them.


I loved the presentation of the endive stuffed with all the delicious bits drizzled with the balsamic syrup. I've always been a fan of savory and sweet flavors together and these were the perfect blend of both. Everyone loved them. We only had three left and that was with them competing with the gorgeous antipasto platter. I will definitely make these again. Thanks for a delicious, easy recipe Leanne!

Endive Stuffed with Goat Cheese and Walnuts
Slightly Modified from Cooking Light, recommended by Around the Table

1/3 cup coarsely chopped walnuts
2 tablespoons honey, divided
Cooking spray
1/4 cup balsamic vinegar
3 tablespoons orange juice
16 Belgian endive leaves (about 2 heads)
2 ounces crumbled goat cheese
1 large can mandarin oranges in juice (about 16 slices)
1 tablespoon minced fresh chives
1/4 teaspoon cracked black pepper

Preheat oven to 350. Combine walnuts and 1 tablespoon honey; spread on a baking sheet coated with cooking spray. Bake at 350° for 10 minutes, stirring after 5 minutes. Watch carefully so they don’t burn.

Combine 1 tablespoon honey, vinegar, and orange juice in a small saucepan. Bring mixture to a boil over high heat, and cook until reduced to 3 tablespoons (about 5 minutes).

Separate and wash endive leaves. Lay each leaf, cup side up, on a platter. Top each section with about 1 teaspoon goat cheese, one orange slice and 1 teaspoon walnuts. Drizzle the vinegar mixture evenly over leaves, and sprinkle evenly with chives and pepper.

Pin It!

Thursday, October 27, 2011

Chickpea Dip (Hummus)

A few weekends ago I went to my friend Mary Ellen's house for a lunch play date. Our girls are 9 months apart in age and seeing them play together was a lot of fun. Baby Girl loves to take care of younger kids so she was bringing Mary Ellen's daughter toys, her sippy cup and helping her eat. Too cute.

One of the things Mary Ellen prepared for lunch was Chickpea Dip (Hummus). Hummus purists might balk at the lack of tahini in the recipe, which is why I renamed it Chickpea Dip, but it was still delicious. She served it with cucumber sticks and pita chips and I totally gorged myself. And Baby Girl kept asking for more hummus, which made me very happy.


I had a can of chickpeas in my pantry so I decided to whip up my own batch for snacking during the week. I love recipes that use ingredients I always keep on hand and involve dumping everything into a food processor and pulsing together. I had a nice little snack on a Sunday afternoon while I cooked dinner. Thanks for an awesome recipe, Mary Ellen!

Chickpea Dip (Hummus)
Mary Ellen's Cooking Creations

1 can garbanzo beans (chickpeas)
1 clove garlic
Salt to taste
Juice from 1/2 of a lemon
1/3 cup olive oil
1 cucumber, peeled, seeds removed and cut into sticks
Pita chips

Rinse the beans then put them in a bowl of cold water. After 10 minutes or so, run your hands through them to remove the clear-shells from the beans. This step isn't necessary but it helps with the creamy consistency. Drain.

Combine all ingredients in a food processor; blend until creamy
Chill before serving with cucumber and pita chips.

Pin It!

Friday, September 30, 2011

Recipe Swap Roundup - Tailgating/Party Appetizers

For many people this time of year means only one thing - football. Even if you aren't into the game itself, there's always delicious food to cook and eat. In honor of football season I thought tailgating/party appetizers would be a great theme for the recipe swap. I was pleasantly surprised by the popularity of this theme. I'm proud to say this was the swap with the highest number of participants at 28 people. Woohoo!

Whatever team you root for, whether you prefer college or NFL, I'm sure you'll enjoy the recipes below.

Nicole enjoyed her Italian Appetizer Bites during a recent football game:


Caitlin loves having an excuse to make football food and she loved this recipe for Crispy Baked Thai Chicken Wings:


Heather is a football fan and loved her recipe for Buffalo Chicken Tenders:


Katie and her toddler both enjoyed the Ham and Swiss Double Pinwheels:


The Cooking Nurse was a little wary of her recipe for Brat Bruschetta but ended up being pleasantly surprised by this fun twist:


Jaida loves dips and pizza so she thought her White Pizza Dip was a great football snack:


Ashley, a newcomer to the swaps, loved her recipe for Grilled Sriracha "Poppers" so much she's already got plans to make them again when she tailgates in a few weeks:


Brianna isn't a big football watcher (like me), but she enjoyed making and eating her recipe for Buffalo Chicken Rolls:


Coleen enjoyed her BBQ Chicken Dip:


Jessy had planned to take some of her Prosciutto and Fontina Pinwheels to a friend, but they were so delicious she and her husband couldn't part with a single one:


Lishie's husband is a wing fanatic so her recipe for Baked Buffalo Wings was a perfect addition to their game-day spread:


Melissa loved the idea of putting Hot Artichoke Dip in wonton cups:


The Cookaholic Wife just recently started experimenting with different burger toppings and found out she loved this recipe for Tailgate Sliders:


Jey's recipe for Oven Fried Pickles made the cut for game-day:


My recipe for Philly Cheesesteak Eggrolls with Spicy Ketchup was perfect for this Philly-area girl:


Krystal had my recipe for Potato Slabs:


Maryanna's recipe for Corn and Jalapeno Nachos is great because each chip is individually filled with all the yummy toppings:


Melissa put a buffalo chicken spin on her Cheesy Chili Chip Dip:


Ellie really enjoyed watching a game while eating her Chile-Lime Chicken Wings:


Jenna enjoyed her Chicken Cordon Bleu Rollups:


Peace, Love and French Fries loved her Soft Pretzel Bites and Beer Cheese Dip:


Melissa brought her Spinach Artichoke Dip to a recent family gathering, where it was a huge hit:


Jill took inspiration from her recipe to create Mediterranean Chicken Calzones:


Lindsay took a trip back to where she used to live with Hot Crab Dip:


Mary Ellen simplified her recipe for Creamy Sundried Tomato Pesto Dip:


Vicki, a swap newcomer, made Thai Shrimp and Scallion Dumplings (no photo).
Pin It!