This is one of those recipes that makes you wonder how something with so few ingredients (and pantry staples at that) can come together into something downright magical.
Amy's post about this Cheater Korean Beef recipe made it sound like one of the best things she's ever made so, of course, I was intrigued. I trust her judgement when it comes to food, and after a quick glance at the ingredient list I figured it would make a quick and easy weeknight meal.
What I wasn't expecting was for it to be so delicious I was fighting my 5-year-old for a second helping. And wishing my husband had other dinner plans that night. Seriously, this is so utterly amazing, there are no words. And it's ridiculously easy. So easy that said 5-year-old could probably cook it herself. You know, if she was allowed to use the stove.
Make this one soon. You won't be sorry.
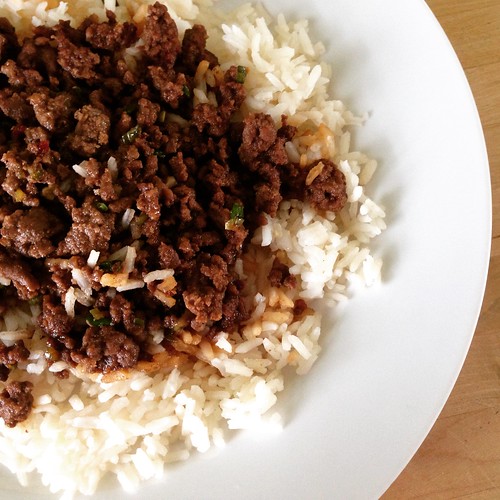
Cheater Korean Beef
As seen on Very Culinary
Serves 2 (so double it or make a side dish if you want leftovers)
1 tablespoon sesame oil
1 pound lean ground beef
3 large cloves garlic, minced
1/4 cup brown sugar
1/3 cup low sodium soy sauce
1 teaspoon minced ginger
1/4 - 1 teaspoon chili garlic sauce (adjust to your spice preference)
salt and pepper
3 scallions, chopped
toasted sesame seeds
Heat the sesame oil in a large skillet over medium-high. Brown the beef until cooked through, about 3 minutes. Toss in the garlic and cook for another minute. Drain off all the fat*.
Stir in the brown sugar, soy sauce, ginger, and chili garlic sauce. Season with salt and pepper. Simmer for 1-2 more minutes to blend the flavors. Toss in the scallions.
Serve over hot rice and sprinkle with a few sesame seeds.
*Quick tip: An easy way to drain off the fat is to use paper towels. Turn off the heat, then move all the beef to one side of the skillet. Tilt the pan the other way so all the oil runs to the other side, away from the beef. Use balled up paper towels to soak up the excess oil. Leave a little oil in the pan (you want some moisture). Then simply throw the paper towels in the trash.
Friday, January 30, 2015
Wednesday, January 21, 2015
Florentine Lasagna Roll-ups
I haven't made a lasagna roll-up in years. I don't know why; they're so easy to make and more fun than regular lasagna because everyone gets their own roll or two. As soon as Kylee posted these Florentine Lasagna Roll-ups on her blog I knew I had to make them.
I prepped the roll-ups on a Sunday and popped it in the fridge for later in the week. The night we had them for dinner I just had to preheat the oven, make the salad while the roll-ups cooked and dinner was served. I love easy meals like that.
The only change I made was adding ricotta cheese to the filling. I had some to use up and ricotta is synonymous with lasagna, in my opinion. But feel free to leave it out since there's enough going on with that delectable Alfredo sauce.
Florentine Lasagna Roll-ups
Slightly modified from Kylee Cooks
Alfredo sauce:
1 stick butter
2 large garlic cloves, minced
2oz cream cheese
2 cups half and half
salt and pepper, to taste
1/2 teaspoon dried Italian seasoning
1/2 cup Parmesan cheese
12 lasagna noodles
Filling:
2 cups cooked and shredded chicken
1 1/2 cups baby spinach, chopped finely
1 cup ricotta cheese
1 teaspoon dried Italian seasoning
Salt and pepper, to taste
1 1/2 cups shredded mozzarella, or cheese of your choice
In a medium saucepan, melt the butter over medium heat. Add garlic and cook for about 1 minute. Add the cream cheese and whisk until smooth. Whisk in the half and half. Season with salt, pepper and Italian seasoning. Bring to a simmer (don’t boil!) and whisk frequently until the sauce thickens, about 15 minutes. Add the Parmesan and whisk until melted and blended. Set aside,
Cook the lasagna noodles according to package directions. Drain and rinse the noodles with cold water. Lay them out to dry on clean kitchen towels. This will make them easier to work with.
While the noodles are cooking, combine the chicken, spinach, ricotta, Italian seasoning, salt, pepper and 1 cup mozzarella cheese in a large bowl.
Spread about half a cup of the Alfredo sauce in a 9x13" baking dish. Working with one noodle at a time, place some filling onto each noodle, then roll it up. Place each roll seam side down into your baking dish. Top with the remaining Alfredo sauce and 1/2 cup mozzarella cheese. (If making in advance, stop here, cover the dish with foil or plastic wrap and refrigerate until ready to bake).
Bake at 350 degrees, for about 30 minutes until the casserole is heated through and cheese is bubbling.
Monday, January 12, 2015
Best of 2014: My Favorites
On Friday I brought you your 14 favorite recipes from 2014. Today I'm sharing my favorites from the year. Looking back through my posts, I realized I made quite a few awesome recipes. A few of these we eat time and time again while others are ones I need to remember to remake in 2015.
And this is where I struggle. There are only so many meals in a day. I want to remake all of these again and again, but there are literally hundreds of other recipes I want to try. Oh, the trial and tribulations of a food blogger.
14. Breakfast Risotto - I love risotto and I love runny eggs. Put the two together and you've got one heck of a dish. The poached egg is key - you want that gooey yolk to mix with the risotto, almost like a sauce. So amazing.
13. Chicken Stew with Biscuits - This was a surprise winner for me. I'm not usually a fan of chicken pot pie, which is pretty much what this is. But there's just something wonderful and comforting about this dish. The biscuits on top just make it even better. I love that everyone gets their own biscuit.
12. Skillet Chicken Saltimbocca Spaghetti - I love one pot meals and this one is incredible. Salty, tangy and easy to make.
11. Collard Greens - I tried this recipe a year ago and it was a huge flop due to an excess of salt. I scaled way back on the salt this time and they were pure perfection, with just a hint of spicy goodness.
10. Oven Fried Chicken - To go with those delectable collard greens, we had this killer oven fried chicken. Not to toot my own horn, but this was some of the best fried chicken I've ever had. Moist and flavorful, with a crackly crust.
9. "The Gobbler" - This sandwich is the perfect way to use up Thanksgiving leftovers. I can't wait for my mom to make another roast chicken with all the trimmings so I can make this again.
8. Grilled BBQ Chicken Sandwiches with Brown Sugar Grilled Onions - These are some incredibly flavorful sandwiches. Don't be put off by the word "grilled" - you can make these year-round on an indoor grill pan or even just a regular skillet.
7. Baja Fresh Grilled Salsa - We made this salsa for a get together with our friends and inhaled it. I love how easy it was to make, too.
6. Mozzarella Stuffed Meatballs - These are my new favorite meatballs. So simple to make and I love the addition of the melty cheese inside. My new favorite way to eat them is just with some sauce and extra mozzarella, with some crusty buttered bread to mop it all up.
5. Grilled Hawaiian Chicken with Coconut Rice - I wish Baby Girl could eat coconut because this rice was outstanding. Definitely the highlight of the meal, although the chicken was also delicious.
4. Chicken Piccata Risotto with Crispy Capers - Again with the salty, briny capers. What can I say, I have a thing for those little buds of goodness.
3. Pasta with Chicken Meatballs - Another fantastic meatball recipe, only lighter because they're made with chicken instead of beef. These were like little pillows of softness that melted in our mouths.
2. 3 Cheese Rosemary and Pepperoni Pizza - We make a lot of pizza and this one is, hands down, our all-time favorite. No contest. The fresh rosemary is key and you can't go wrong with three different cheeses.
1. Chicken Chorizo Patty Melts - I made 3lbs of fresh chorizo early in 2014 and had no idea what to make with it. SP did some searching online and found these patty melts. And the rest, as they say, is history. We fell hard for the wonderful flavors. When I found the last bag of chorizo in the freezer I actually shed a tear, knowing we wouldn't be able to enjoy another round of patty melts. I plan to make another batch of chorizo in the spring just so we can eat these again and again.
Friday, January 09, 2015
Best of 2014: Your Favorites
2014 was a tough year for us. Nothing catastrophic happened, it was just little things that piled one on top of another until we cried uncle. As we watched the ball drop on New Year's Eve, we both breathed a sigh of relief that 2014 was finally over and we could look forward to a fresh start in 2015. That's not to say we didn't have some good times in 2014. The highlight of the year was our first family trip to Disney World. And we tried to spend more time with family and friends, something we want to do more of in 2015.
As for this blog, I wasn't the best blogger in 2014. I'm hoping to change that this year. I want to focus on making new recipes and rediscover the joy of cooking.
So, while I didn't make a ton of new recipes in 2014, I figured it would still be fun to share your favorites and mine from the past year.
Here are your favorites from 2014. I'm not surprised to see any of these on the list. In fact, some even made my favorite list, which will post on Monday.
14. Peanut Butter Chocolate Chip Bars. Peanut butter and chocolate are a perfect match so it was no surprise that these were just as amazing as they sound.
13. Crunchy Baked Tacos. We have these tacos (or taco rice) at least every other week. It's simple to throw together and usually makes enough to put some leftovers into the freezer for another time.
12. Grilled Ham and Cheese Sandwiches with Caramelized Onions. This is a grilled cheese sandwich with the volume turned up. Melty, gooey perfection.
11. Loaded Baked Potato Dip. I wish I had more reasons to make dips. I think I need to invite myself to more parties, or throw a few of my own.
10. Corn Casserole. I do love it when a recipe calls for stirring a few ingredients together and baking.
9. Artichoke and Brie Dip. I wish SP and Baby Girl like artichokes. Then I might stand a chance of making this delicious dip again.

8. Broccoli Cheddar Risotto. I was on a serious risotto kick in 2014. Not surprised to see this one on the list. It makes a great side dish but if you add some protein like shrimp, chicken or even sausage it would become a one-pot meal.
7. Bang Bang Cauliflower. Man alive was this recipe good. I need another excuse to make it. I'll be sure to invite some friends over, though, since I can't seem to find a small head of cauliflower.
6. Pasta with Shrimp in Lemon Cream Sauce. I used this sauce as the base for various pasta dishes throughout the year. We even had this on New Year's Day 2015. It's just that good.
5. Chocolate Pudding. I love, love, love being able to make pudding from scratch. Rich and decadent, yet so easy to throw together. You just need to plan ahead so the pudding has time to cool.
4. Breakfast Bowls. These bowls need to make another appearance on my dining room table ASAP. How could I have only made these one time?
3. Avocado Enchiladas. Stuff some guacamole inside tortillas, smother with sauce and cheese, bake. What's not to love?
2. Perfect Roast Chicken. I may have only gotten around to posting this recipe in 2014 but I've been making it for years. Like the name implies, this comes out perfectly every single time.
1. Pasta alla Norcina. I admit, out of all the recipes I made in 2014 I was surprised to see this one at the top of your list. Don't get me wrong, it's a great pasta dish, but it just goes to show that you never know which recipes will grab your readers attention the most.
As for this blog, I wasn't the best blogger in 2014. I'm hoping to change that this year. I want to focus on making new recipes and rediscover the joy of cooking.
So, while I didn't make a ton of new recipes in 2014, I figured it would still be fun to share your favorites and mine from the past year.
Here are your favorites from 2014. I'm not surprised to see any of these on the list. In fact, some even made my favorite list, which will post on Monday.
14. Peanut Butter Chocolate Chip Bars. Peanut butter and chocolate are a perfect match so it was no surprise that these were just as amazing as they sound.
13. Crunchy Baked Tacos. We have these tacos (or taco rice) at least every other week. It's simple to throw together and usually makes enough to put some leftovers into the freezer for another time.
12. Grilled Ham and Cheese Sandwiches with Caramelized Onions. This is a grilled cheese sandwich with the volume turned up. Melty, gooey perfection.
11. Loaded Baked Potato Dip. I wish I had more reasons to make dips. I think I need to invite myself to more parties, or throw a few of my own.
10. Corn Casserole. I do love it when a recipe calls for stirring a few ingredients together and baking.
9. Artichoke and Brie Dip. I wish SP and Baby Girl like artichokes. Then I might stand a chance of making this delicious dip again.
8. Broccoli Cheddar Risotto. I was on a serious risotto kick in 2014. Not surprised to see this one on the list. It makes a great side dish but if you add some protein like shrimp, chicken or even sausage it would become a one-pot meal.
7. Bang Bang Cauliflower. Man alive was this recipe good. I need another excuse to make it. I'll be sure to invite some friends over, though, since I can't seem to find a small head of cauliflower.
6. Pasta with Shrimp in Lemon Cream Sauce. I used this sauce as the base for various pasta dishes throughout the year. We even had this on New Year's Day 2015. It's just that good.
5. Chocolate Pudding. I love, love, love being able to make pudding from scratch. Rich and decadent, yet so easy to throw together. You just need to plan ahead so the pudding has time to cool.
4. Breakfast Bowls. These bowls need to make another appearance on my dining room table ASAP. How could I have only made these one time?
3. Avocado Enchiladas. Stuff some guacamole inside tortillas, smother with sauce and cheese, bake. What's not to love?
2. Perfect Roast Chicken. I may have only gotten around to posting this recipe in 2014 but I've been making it for years. Like the name implies, this comes out perfectly every single time.
1. Pasta alla Norcina. I admit, out of all the recipes I made in 2014 I was surprised to see this one at the top of your list. Don't get me wrong, it's a great pasta dish, but it just goes to show that you never know which recipes will grab your readers attention the most.
Monday, December 29, 2014
Recipe Redo: Polish Chicken
My grandmother has been making this recipe for Polish Chicken for as long as I can remember. It's the ultimate comfort food and one of those meals that instantly transports me back to my childhood.
I went through a period where I didn't like meat on the bone (sacrilege) but thankfully I got over it. This is absolutely a meal you want to make with bone-in chicken. The bone helps the meat stay moist and tender. There's nothing complicated about this recipe, making it perfect for both a weeknight or a hearty, warming Sunday dinner. I think the gravy is my favorite part. As you can see in the photo, I smother everything on the plate with copious amounts. My grandmother always served Polish chicken with mashed potatoes and green beans so that's what I do, too.
And if you're wondering why this is called Polish chicken, I asked my grandmother and she said it's just what her mother called it when she was making it and the name stuck. Her family is Polish, so there you go. Regardless, it's delicious.
Polish Chicken
My grandmother's recipe
4 bone-in, skin-on chicken breasts*
1/4 cup flour
1 teaspoon garlic powder
1 teaspoon onion powder
salt and pepper
2 tablespoons vegetable oil
1 small onion, minced
2 cups water
1 cube chicken bouillon
Place the chicken in a resealable plastic food storage bag or in a baking dish. Add the flour, garlic and onion powder, and some salt and pepper. Seal the bag and toss to coat the chicken evenly in the flour (if using a baking dish, rub the flour and seasoning over the chicken to coat both sides).
Heat the oil in a large, deep skillet (make sure the skillet has a lid) over medium heat. Add the chicken, skin side down. Cook for 5 minutes, until the skin is brown and crispy. Flip and cook another 5 minutes. Add the minced onion around the chicken pieces and cook for about 5 minutes, until the onions begin to soften.
While the onion is cooking, bring the water to a boil (you can use an electric kettle, a pan on the stove, or heat it in the microwave). Add the bouillon cube and stir to dissolve. Once the onions are soft, add the water to the skillet. Bring to a boil, reduce the heat to medium-low, then cover. Cook for 25-30 minutes, stirring and turning the chicken every so often.
If the gravy looks a little thin, put a few tablespoons of flour in a bowl and add some water to make a paste. Whisk the paste into the gravy in the skillet. You should see the gravy thicken immediately. Taste the gravy and adjust the seasoning with salt and pepper, as needed.
Serve the chicken topped with the gravy.
*You can also use thighs or legs, just increase the amount based on how much you think your family will eat.
Labels:
chicken,
easy weeknight meal,
kid-approved
Friday, December 26, 2014
Penne with Five Cheeses
Another Sunday dinner prepared by SP. As I've mentioned before, he's loving Ina Garten right now. Her Penne with Five Cheeses sounded not only easy, but delicious. I've never seen a cream sauce like this before - you don't cook it ahead of time, just add the cooked pasta to the sauce and cheese and bake. I was skeptical but it worked.
We all loved this but, unfortunately, it doesn't reheat well. I was so excited for the leftovers the next day, too. Oh well - that just means we get to eat it all next time. The only thing he changed was the cooking method. We don't own enough large ramekins to make individual servings, so we put the pasta and sauce in a large baking dish and baked it at 350 for about 20 minutes, until the sauce was bubbling.
Penne with Five Cheese
From Ina Garten
2 cups heavy cream
1 cup crushed tomatoes in thick tomato puree
1/2 cup freshly grated Pecorino Romano (1 1/2 ounces)
1/2 cup shredded Italian fontina (1 1/2 ounces)
1/4 cup crumbled Italian Gorgonzola (1 1/2 ounces)
2 tablespoons ricotta cheese
1/4 pound fresh mozzarella, sliced
6 fresh basil leaves, chopped
1 pound penne rigate pasta
Preheat the oven to 350 degrees.
Combine all the ingredients except the penne in a large mixing bowl. Mix well.
Cook the penne in boiling, salted water until al dente (1 or 2 minutes less than the recommended cooking time on the package). Drain well in a colander, then add to the ingredients in the mixing bowl, tossing to combine.
Add the pasta to a large baking dish (9x13 or larger). Bake for 20 minutes, until the sauce is bubbly and the edges are beginning to brown. Allow to cool for a few minutes before serving.
Note: due to the cream in the sauce, this doesn't reheat well.
Labels:
easy weeknight meal,
Ina Garten,
pasta
Wednesday, December 24, 2014
"The Gobbler" {aka a Thanksgiving leftovers sandwich}
Despite living in New Jersey and Pennsylvania for most of my life, I've never eaten at a WaWa. Apparently I'm missing out. See, they sell this sandwich called The Gobbler and it's right up my alley. Turkey, stuffing, gravy and cranberry sauce on a hoagie roll. It's the ultimate in Thanksgiving leftovers, only you don't have to do any of the cooking.
Recently Coleen over at The Redhead Baker made an at-home version of The Gobbler sandwich. I was practically drooling all over my keyboard just reading about it so I knew I had to make it. The only problem was, we weren't going to be home for Thanksgiving. No problem - I just asked my mom to save me some turkey, stuffing and gravy. When we got home she dropped off the leftovers, I picked up some cranberry sauce and hoagie rolls and we were in business.
As suspected, these were outstanding. I added a little mayo to our sandwiches because we all love mayo. Now I just need to get my hands on some more turkey or chicken, stuffing and gravy so I can make these again.
Thanksgiving Leftover Sandwiches (aka "The Gobbler")
As seen on The Redhead Baker
1 cup leftover turkey gravy
8 ounces leftover turkey, thinly sliced
4 hoagie rolls
mayo
jellied cranberry sauce
1 cup leftover stuffing
Warm the gravy in a medium saucepan over medium heat. When just starting to simmer, add the turkey meat. Heat just until the turkey is warmed through.
Split the rolls and toast them. Spread mayo on both side, then add cranberry sauce to each sandwich. Arrange some of the turkey meat and stuffing on each sandwich. Spoon more gravy over top. Serve warm.
Labels:
easy weeknight meal,
holiday,
kid-approved,
sandwiches,
Thanksgiving
Monday, December 22, 2014
Burgers with Brie, Caramelized Onions, Arugula and Garlic Mayo
I love a good burger, don't you? These Burgers with Brie, Caramelized Onions, Arugula and Garlic Mayo have been on my radar ever since Kate posted them. What's not to like about Brie and caramelized onions?
Sorry for yet another bad sandwich photo but you get the gist. These were delicious. SP mistakenly bought the "intense, earthy" Brie rather than our usual "nutty and buttery" Brie, so the cheese really shone through. Between that and the peppery arugula, we were glad for the sweetness of the caramelized onions.
Burgers with Brie, Caramelized Onions, Arugula and Garlic Mayo
As seen on Kate's Recipe Box
1 lb. ground chuck
Salt and pepper, to taste
Brie cheese
caramelized onions
arugula
garlic mayo
4 burger buns
Heat a grill to medium heat.
Divide the meat into 4 patties. Press an indentation in the center so they don't bulge while they cook. Season both sides liberally with salt and pepper.
Grill for 3 minutes on one side, then flip and grill for another 2 minutes. Remove to a plate, top each patty with some of the cheese and tent with foil. Let rest for 5 minutes.
Serve the burgers on buns topped with caramelized onions, arugula and garlic mayo.
Friday, December 19, 2014
Pasta with Chicken Meatballs
Raise your hand if you miss natural light? ::raises hand:: My photos are nothing special in the spring and summer, but once I lose the natural light all bets are off. And it makes me so sad because I know people choose recipes in part because of the drool-inducing photos. So, my apologies, but you'll have to trust me that this was incredible.
On our flight home from California SP and I both watched cooking shows on the plane. During an episode of Giada's show she made Orecchiette with Mini Chicken Meatballs. It looked so delicious I knew I had to make it as soon as we got home.
I made a few modifications, subbing campagnelle for the orecchiette since I had a box in the pantry. Really, any small shape will do. I also used diced tomatoes because I'm weird and don't like loose tomato skin. Because I used canned tomatoes, I measured out the liquid in the can and then topped it off with chicken broth.
This was truly outstanding, with light, tender meatballs and a delicious sauce made even better by the addition of fresh, melty, gooey mozzarella cheese. The recipe made enough food to feed an army, which was good because we were all fighting over the leftovers.
Pasta with Chicken Meatballs
Slightly adapted from Giada De Laurentiis
1 pound small cut pasta, such as orecchiette, campagnelle, penne, etc.
1/4 cup dry bread crumbs
1/4 cup chopped fresh flat-leaf parsley
2 large eggs, lightly beaten
1 tablespoon milk
1 tablespoon ketchup
3/4 cup grated Pecorino Romano cheese
3/4 teaspoon salt
3/4 teaspoon freshly ground black pepper
1 pound ground chicken
1/4 cup olive oil
chicken stock (amount will vary, see directions)
1 28-oz can diced tomatoes, juice reserved
1/2 cup freshly grated Parmesan or more Pecorino
8 ounces fresh mozzarella, cut into small pieces
1/2 cup chopped fresh basil leaves
Bring a large pot of salted water to a boil over high heat. Add the pasta and cook according to package directions. Drain the pasta, reserving about 1 cup of the pasta water. Set aside.
In a medium bowl, stir together the bread crumbs, parsley, eggs, milk, ketchup, cheese, and the salt and pepper. Add the chicken and gently stir to combine. With wet hands (this is key, otherwise the chicken will just stick to you rather than form into meatballs), roll the chicken into mini meatballs. Make them as big or as small as you want. You'll need to wet your hands often so keep a bowl of water nearby.
In a large skillet, heat the oil over medium-high heat. Add the meatballs and cook without moving until brown on the bottom, about 2 minutes. Turn the meatballs over and brown the other side, about 2 minutes longer.
Add the juice from the tomatoes to a large measuring cup. Add enough chicken stock to make 1 1/2 cups total. Add the chicken stock, tomato juice and tomatoes to the skillet. Bring to a boil. Using a wooden spoon, scrape up the brown bits from the bottom of the pan. Reduce the heat to low and simmer until the meatballs are cooked through, about 5 minutes.
Add the pasta to the skillet. Add the Parmesan and toss, adding reserved pasta water, if needed, to loosen the pasta. Add the mozzarella cheese and chopped basil. Gently toss to combine. Serve immediately.
Labels:
chicken,
easy weeknight meal,
giada,
kid-approved,
pasta
Wednesday, December 17, 2014
Chinese Green Beans with Pork
I think of my friend MaryEllen as the queen of stir fries. Pretty much any Asian stir fry on this blog came from her. This recipe for Chinese Green Beans with Pork is based on her recipe, but modified a bit based on what I had in my pantry and fridge.
This was a great way to use up 2 lone pork chops I found in the freezer. Green beans have been hit or miss for us this year but this was a good batch. Simple, tasty, and quick - my idea of a great weeknight dinner.
Chinese Green Beans with Pork
Modified from Mary Ellen’s Cooking Creations
1 tablespoon sesame oil
2 pork chops cut into very small pieces
1 lb washed and trimmed green beans
2 cloves garlic, minced
1 1/2 cups chicken stock
2 tablespoons cornstarch
2 tablespoons oyster or hoisin sauce
2 tablespoons soy sauce
1 heaping teaspoon chili garlic sauce
Freshly ground black pepper
1-inch piece fresh ginger, peeled and grated
2 tablespoons Shaohsing rice wine
1 small bunch scallions, sliced thin
white rice or spaghetti/angel hair, cooked, for serving
Heat a large skillet over high heat. Add the sesame oil then add the pork and sauté for 3-5 minutes until the meat is mostly cooked. Add the green beans and garlic and sauté 1 minute. Combine the stock, cornstarch, oyster or hoisin sauce, soy sauce, chili garlic sauce, pepper and grated ginger, then add to the skillet. Bring to a boil. Continue cooking over high heat for 7-9 minutes longer, stirring frequently, until beans are slightly tender but still have some crispiness to them.
Stir in the scallions and rice vinegar, and cook one minute longer. Serve over cooked rice or noodles.
Labels:
Chinese,
easy weeknight meal,
green beans,
pork
Monday, December 15, 2014
Indonesian Ginger Chicken
I've mentioned before that SP has taken over cooking Sunday dinner. He's been on an Ina Garten kick lately and was very excited to make her Indonesian Ginger Chicken.
This was some seriously awesome chicken. Incredibly flavorful from the marinade and really easy to cook. He used two cut-up chickens from the grocery store and we noticed that the white meat wasn't nearly as flavorful as the dark meat. You could really taste the marinade in the dark meat pieces. As much as I love white meat, I think this would be best with legs and thighs rather than whole chickens.
He served the chicken with herb basmati rice and roasted carrots. At my recommendation, he boiled the marinade to thicken it into a gravy to serve over the chicken. That was a big hit as well.
Indonesian Ginger Chicken
From Ina Garten
1 cup honey
3/4 cup soy sauce
1/4 cup minced garlic (8 to 12 cloves)
1/2 cup peeled and grated fresh ginger
6lbs total bone-in chicken legs and thighs
Cook the honey, soy sauce, garlic, and ginger in a small saucepan over low heat until the honey is melted. Arrange the chicken pieces in 1 layer in a shallow baking pan, skin side down. Pour on the sauce. Cover the pan tightly with aluminum foil. Marinate overnight in the refrigerator.
Preheat the oven to 350 degrees.
Place the baking pan, still covered with the foil, in the oven and bake for 30 minutes. Remove the foil, turn the chicken pieces skin side up, and raise the temperature to 375 degrees. Continue baking for 30 minutes or until the juices run clear when you cut between a leg and thigh and the sauce is a rich, dark brown.
If you want, remove the chicken pieces to a serving platter and cover with foil. Strain the sauce from the baking dish through a sieve and add to a small pot. Boil the sauce until it thickens slightly. Serve as gravy to spoon over the chicken.
Friday, December 12, 2014
Hawaiian Pork Sliders
I decided to make these Hawaiian Pork Sliders after my friend Amy posted a photo of them on Instagram. They looked so good I could almost taste them.
I have such a hard time photographing sandwiches. I wonder how the pros do it? I should pay more attention when I see sandwiches or burgers in my feedly. Anyway, despite the less than stellar pictures, these were great. Very simple to throw together and took no time to cook. I served these on King's Hawaiian rolls but we honestly couldn't taste the rolls so next time I'll go with traditional sliders rolls instead. Or maybe I'll make them into regular burgers rather than sliders.
Hawaiian Pork Sliders
As seen on Very Culinary
1 1/2 pounds ground pork
1/2 cup minced scallions
3/4 teaspoon ground ginger
sprinkle of salt and pepper
8 pineapple rings
1/2 cup of your favorite barbecue sauce
mayonnaise
8 King’s Hawaiian or regular slider rolls
In a large bowl, using your hands, mix the pork, scallions, ground ginger, salt and pepper until just combined. Don’t over mix! Gently form 8 equal patties, with a slight indentation in the middle (this helps keep the burgers from bulging in the middle.)
Preheat your grill for medium-high. Coat the grates with oil or nonstick cooking spray. Place the pork patties on the hot grill and lightly coat tops with barbecue sauce. Cover the grill and cook for about 5 minutes. Flip the burgers and coat with more barbecue sauce.
After you’ve flipped the burgers, place the pineapple rings down on the grill. Cook the burgers for another 4-5 minutes, until cooked through. Cook the pineapple rings for about 3 minutes, or until you have nice grill marks on one side. Flip the pineapple and grill another 1-2 minutes. Remove the pineapple and burgers from the grill and let them rest 5 minutes.
While the meat is resting, toast the rolls on the hot grill until the edges brown nicely, about 1-2 minutes.
Spread more barbecue sauce and some mayo on the rolls, add the burger patty and a pineapple ring, then the other roll. Serve immediately.
Labels:
easy weeknight meal,
pork,
sandwiches
Monday, December 08, 2014
Skillet Chicken Saltimbocca Spaghetti
I've done it again. I'm sorry that I disappeared for a few weeks. This whole blogging thing has become a lot more complicated these days. We're just so busy. And the lack of natural light, coupled with a waning desire to be in the kitchen, isn't exactly conducive to blogging.
I wish my photo of this Skillet Chicken Saltimbocca Spaghetti was better because this is one outstanding meal. Go look at Elly's photo to see it in all its drool-inducing glory.
We all thought this was outstanding. Baby Girl isn't a huge fan of capers, but otherwise this was right up her alley. I can't wait to make it again.
Skillet Chicken Saltimbocca Spaghetti
As seen on Elly Says Opa!
2 tablespoons olive oil
4 oz. thinly sliced prosciutto, chopped
8 large fresh sages leaves, plus 3 Tbsp. minced sage
1 lb. boneless/skinless chicken breast, cut into pieces
1 medium onion, diced
4 cloves garlic, minced
pinch of red pepper flakes
2 teaspoons flour
1 cup dry white wine
3 1/2 cups low-sodium chicken broth
1 cup water
12 oz. dried spaghetti, broken in half
3 tablespoons capers, rinsed and chopped
2 tablespoons unsalted butter
1/2 teaspoon lemon zest + 2-3 tablespoons juice
Heat 1 1/2 tablespoons of the oil in a large, nonstick skillet over medium-high heat. Add the prosciutto and cook, stirring occasionally, until crisp (about 5 minutes). During the last 30 seconds or so, add the sage leaves and cook until crisp. Using a slotted spoon, transfer the prosciutto and sage to a paper-towel lined plate.
Season the chicken with salt and pepper and then place in the hot skillet. Cook until browned and just shy of cooked through. Remove the chicken and keep warm.
Add the remaining 1/2 tablespoon oil to the skillet. Stir in the onion and cook over medium heat until softened, about 5-6 minutes. Stir in the minced sage, garlic, and red pepper flakes, and saute until fragrant, about 30 seconds. Add the flour and cook for one minute before whisking in the wine. Simmer until reduced by half, about 1-2 minutes.
Slowly whisk in the broth and water. and then stir in the pasta. Increase the heat to medium-high and cook at a vigorous simmer, stirring often with tongs, until pasta is tender and sauce has thickened (about 12 minutes).
Add the chicken and cook just a minute longer, until completely cooked and warmed through. Stir in the capers, butter, lemon zest, and lemon juice, and season to taste with salt and pepper. Serve the pasta with the crispy prosciutto and sage.
Labels:
chicken,
easy weeknight meal,
one-pot,
pasta
Wednesday, November 26, 2014
Collard Greens
I love collard greens but the last time I tried to make them they were inedible. So. Much. Salt. I vowed to try again for our Southern night redo. This time I pretty much eliminated the salt from the recipe and I nailed it!
These were perfect with fried chicken, mac and cheese and cornbread. It takes some time to prep the collard greens but since you have to boil the water for an hour that's the perfect time to get it done. These were just as good as the ones we get from our favorite BBQ spot - a little spicy and so flavorful.
Collard Greens
Modified from Paula Deen
1 smoked ham hock
1 tablespoon seasoned salt
1/4 teaspoon black pepper
1/2 teaspoon garlic powder
a few dashes Tabasco sauce
1 large bunch collard greens
1 tablespoon butter
In a large pot, bring 3 quarts of water to a boil. Add the ham hock, seasoned salt, black pepper, garlic powder and hot sauce. Reduce heat to medium and cook for 1 hour.
While the water is boiling, wash the collard greens thoroughly. Remove the stems that run down the center by holding the leaf in one hand and stripping the leaf down with your other hand. The tender young leaves in the heart of the collards don't need to be stripped.
Once all the leaves have been washed and dried, stack 6 to 8 leaves on top of one another, roll them up, and slice into 1/2 to 1-inch thick slices.
After the water cooks for an hour, put the greens in the pot and add the butter. Cook for 45 to 60 minutes, stirring occasionally. Taste and adjust the seasoning, if needed. If you want, you can remove the ham hock, allow to cool and pick the meat off the bone. Add the meat to the collard greens and stir to combine before serving.
Monday, November 24, 2014
Honey Hush Cornbread
I've been searching for a good cornbread recipe and I think I finally found it. This Honey Hush Cornbread is pretty amazing and so easy to make. Baby Girl helped me mix this one up before our Southern dinner with friends.
This is a sweet cornbread, which I happen to like. I even added a bit of sugar to make a crust on top, just like our favorite Southern restaurant. The flavors are so, so good. You definitely want to eat this warm/hot.
Honey Hush Cornbread
Dinosaur BBQ
vegetable shortening or butter
1 1/4 cups yellow cornmeal
1/4 cup sugar
3/4 cup flour
1 1/2 teaspoons baking powder
1/2 teaspoon baking soda
1/2 teaspoon salt
1 cup buttermilk
2 eggs, slightly beaten
1/2 teaspoon vanilla
1/2 cup butter, melted
2 tablespoons honey
sugar for dusting
Preheat the oven to 350 degrees. Grease an 8x8 inch baking pan with shortening or butter. Put the pan in the oven to heat while you're mixing up the cornbread.
Combine the cornmeal, sugar, flour, baking powder, baking soda, and salt in a large bowl. In another medium bowl, whisk together the buttermilk, eggs, vanilla and melted butter.
Pour the wet ingredients into the dry and stir, just until everything is moistened.
Take the hot pan from the oven and pour in the batter. Bake for 25-30 minutes, or until a toothpick inserted in the middle comes out clean.
Remove the cornbread from the oven and brush the top with honey and dust with sugar. Cool for 10 minutes in the pan before cutting into squares. Serve warm/hot.
Friday, November 21, 2014
Oven Fried Chicken
You may remember our friends C & T from Mexican night, Italian night and our previous try at Southern night. Unfortunately, the last Southern night was a disaster. Undercooked fried chicken, way too salty collard greens and disappointing cornbread. We didn't eat until almost 9pm because of the darn chicken. We knew we had to try again. Thankfully this time we nailed it.
Since T's fryer isn't very big, and because we'd undercooked the chicken the last time, we decided to use Ina Garten's oven method for frying the chicken. This is a truly brilliant method. You fry the pieces so they get a nice, crispy, golden brown crust and then you finish cooking them in the oven. This ensures the chicken is cooked through, but the best part is you can cook a lot of chicken at one time so you're ready to feed a crowd all at once.
T brined the chicken all day and then she (once again) conned me into breading the chicken while she took pictures. It's a good thing she's an excellent photographer. I dipped the chicken into buttermilk first and then into the seasoned flour, then back into the buttermilk and finished with the flour.
We were able to fry 4 legs or two breasts at once. As each batch was finished, we laid the pieces on a cooling rack. Once the rack was full it went into the oven. Thirty minutes later we took it out and tested each piece with a meat thermometer to make sure it was 165 degrees.
Look at these gorgeous pieces of chicken. Moist and flavorful. We SO nailed it. In addition to the chicken I made cornbread and collard greens. Stay tuned for those recipes to post next week.
Oven Fried Chicken
Prep compiled from various recipes, cooking method from Ina Garten
bone-in chicken pieces (legs, thighs, breasts)
Brine:
kosher salt
sugar
thyme
onion powder
Tabasco sauce
water
Vegetable oil
Breading:
buttermilk
flour
salt
pepper
paprika
Place the chicken pieces in large plastic food storage bags. Fill each bag with water and add some salt, sugar, thyme, onion powder and a few dashes of tabasco sauce. Just use as much as you want - T didn't measure. Refrigerate overnight or at least 6 hours.
Take the chicken out of the brine and let sit, covered, at room temperature for at least 4 hours.
Preheat the oven to 350 degrees. Heat oil into a large heavy-bottomed stockpot to a depth of 1-inch or a deep fryer. Heat to 350 degrees.
Pour some buttermilk into a large bowl. Combine the flour, salt, pepper, and paprika in another large bowl. Coat each piece of chicken in buttermilk then in the flour mixture, back into the buttermilk and into the flour again.
Working in batches, carefully place several pieces of chicken in the oil and fry for about 3 minutes on each side until the coating is a light golden brown (if using a deep fryer, cook for 6 minutes). Don't crowd the pieces.
Remove the chicken from the oil and place each piece on a metal baking rack set on a sheet pan. Allow the oil to return to 360 degrees before frying the next batch. When all the chicken is fried, bake for 30 to 40 minutes, until the chicken is no longer pink inside and registers 165 degrees on a thermometer.
Subscribe to:
Comments (Atom)


