Wednesday, February 03, 2021

Greek Chicken Bowls

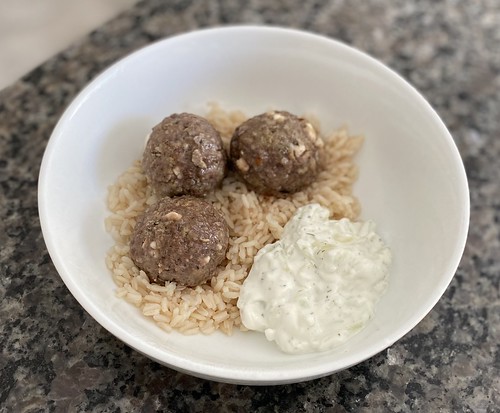
I really should make more bowls. I know they're all the rage - or they were, I'm not exactly up on current food trends. All I know is they're incredibly satisfying and every time I make one we love it. Take these Greek Chicken Bowls. There's nothing crazy in here, but the combination of flavors is fantastic. The best part was that I made the tzatziki and cooked the chicken the night before so the day we had these all I had to do was cook the orzo and prepare the rest of the sides.


These are wonderfully customizable. I added cooked spinach because I had some to use up. If you like peppers, you could add some chopped red pepper. You could make this vegetarian by swapping the chicken for tofu or potatoes or beans.

Greek Chicken Bowls
As seen on Tipps in the Kitchen

For the chicken:
4 boneless, skinless chicken breasts (or 4 chicken thighs)
4 tablespoons olive oil
Zest and juice of 1 lemon
2 teaspoons garlic powder
2 teaspoons dried oregano
1/2 teaspoon red pepper flakes
Salt and pepper, to taste

For the bowls:
Rice, quinoa, jasmine rice, couscous, orzo, etc
Cherry tomatoes, diced
Cucumber, peeled, seeded and diced
Red onion, minced
Kalamata olives
Crumbled feta, more to taste
Homemade or store-bought tzatziki
Sauteed spinach, chopped red pepper, beans, etc.
Toasted pita bread, for serving

Add chicken to a large food storage bag with the olive oil, zest and juice of lemon, garlic powder, oregano, red pepper flakes, salt and pepper. Marinate overnight.

Heat more olive oil in a large skillet over medium high heat. Add chicken and cook for 7-8 minutes per side, until juices run clear and chicken is no longer pink. Slice or cut into chunks.

Assemble the bowls with rice/grain in the bottom, followed by tomatoes, cucumber, red onion, olives, feta, tzatziki, and chicken. Add any other toppings you want. Serve with toasted pita.

Pin It!

Wednesday, January 27, 2021

Saag Feta

I've been listening to old episode of the Bon Appetit podcast lately and let me tell you, listening to people talk about food trends and going out to eat and the boring normality of life pre-pandemic has been equal parts enjoyable and soul-crushing. This recipe falls squarely into the enjoyable column. I heard an interview with Indian-ish cookbook author Priya Krishna and immediately checked the book out of the library solely for this Saag Paneer, but with Feta recipe.

This was seriously amazing. We all love paneer, but the feta was so, so good with the spinach. Obviously spinach and feta are a natural combo, but I didn't appreciate how good this would be until we tasted it. 

You definitely want to use a good quality feta since it's one of the stars of the dish. My friend brings me huge tubs of authentic Greek feta from NYC and we're spoiled for anything else. 

I served this with one of our all-time favs, Indian Spiced Chicken Stew with Potatoes, which was a great pairing.

Saag Feta
As seen in Indian-ish by Priya Krishna

1/4 cup plus 2 tablespoons ghee or extra-virgin olive oil
2 tablespoons coriander seeds (or 3 teaspoons ground coriander)
1/4 teaspoon ground cardamom
1 small onion, chopped
1 garlic clove, finely chopped
1 1 1/2" piece ginger, peeled, chopped
1 lb. baby spinach (about 12 cups)
1 small Indian green chile, jalapeno, or serrano chile, ribs and seeds removed, coarsely chopped
1 1/2 teaspoons fresh lime juice
Kosher salt
6 oz. feta, cut into 1" pieces
1 teaspoon cumin seeds (or 3/4 teaspoon ground cumin)
1/4 teaspoon red chili powder
Roti, naan, and/or rice, for serving

Heat 1/4 cup ghee or olive oil in a large skillet over medium heat. Toast the coriander seeds and cardamom, stirring constantly, until starting to brown and smell fragrant. Add onion and cook until translucent and slightly browned. Mix in garlic and ginger and cook, stirring, 1 minute. Add spinach by the handful, letting it wilt slightly after each addition before adding more. Cook until all of the spinach is just wilted. Remove pan from heat and add chile and lime juice; season with salt. Let cool 5 minutes.

Transfer spinach mixture to a blender (reserve skillet) and blend until a coarse paste forms, about 1 minute. Return spinach mixture to skillet and set over low heat. Stir in 1/2 cup water, then gently fold in feta, being careful not to break up. Cook until feta is slightly softened and has absorbed some of the sauce, 5–7 minutes.

Meanwhile, heat remaining 2 tablespoon ghee or olive oil in a small saucepan over medium-high heat. Add cumin seeds. As soon as cumin seeds start to pop, sputter, and brown, remove from heat, 1 minute tops. Immediately add asafetida, if using, and chili powder. Pour mixture over spinach and stir to combine. Spinach (without spiced ghee) can be made 1 day ahead. Let cool; cover and chill.
Pin It!

Monday, January 25, 2021

Breakfast Hot Pockets

I made apple turnovers over the Christmas holiday and used only one sheet of a box of puff pastry. I wanted to do something fun with the other one so I did a quick search and found this recipe for breakfast hot pockets.


The original recipe calls for sausage links, but I didn't have any on hand so I used cooked ham. I don't think I'd ever use links because we really liked these with small pieces of meat. I'd recommend crumbled bacon, sausage or cooked ham. I'm sure it would also be great with veggies. They're infinitely customizable. Just be careful not to overfill them.

Breakfast Hot Pockets
Slightly modified from Foodie with Family

7 eggs
1/4 cup milk
1/2 teaspoon kosher salt
3 tablespoons butter
1 1/2 cups shredded cheddar cheese
4 scallions, trimmed and thinly sliced
2 sheets puff pastry dough thawed according to package instructions
8oz cooked and crumbled breakfast sausage, bacon, or ham

Preheat the oven to 400.

Crack the eggs into a large liquid measuring cup and whisk with the milk and salt. Ladle out about 1/3 cup of the eggs into a small bowl to brush on the pastries.

Melt the butter in a non-stick pan over low to medium low heat, and pour in the eggs. Use a silicone spatula to move the eggs gently toward the center of the pan until they're soft and set. Sprinkle the cheese over the top and stir until the cheese is melted and no liquid egg remains. Stir in the thinly sliced scallions. Remove the pan from the heat, spread the eggs on a large plate and transfer to the refrigerator to cool.

Unfold 1 sheet of puff pastry and cut straight down along the fold lines (lengthwise) to create 3 long rectangles. Then cut across them in the center to create 6 evenly sized rectangles.

Separate the rectangles and place them on a baking sheet lined with parchment paper, leaving at least 2 inches between each rectangle. Put he baking pan in the refrigerator.

Unfold the second sheet of puff pastry onto a lightly floured cutting board. Roll it gently with a rolling pin until it is about 4 inches wider and 4 inches longer than it was, or 14" by 19". Cut this sheet along the fold lines (they should still be barely visible) lengthwise into 3 long rectangles, then crosswise once down the center so you have 6 slightly larger rectangles.

Remove the baking sheet from the refrigerator and brush the perimeter of the smaller rectangles with the reserved egg wash. You do not need to brush the whole pastry base. Divide the cheesy scrambled eggs evenly between the bases, leaving a 1-inch perimeter, using your hands to mound the eggs slightly. Nestle some of the cooked meat in the center of the eggs. Top with one of the larger pastry rectangle, being sure to tuck any filling back under the pastry.

Use a fork to crimp the edges together, then brush the remaining egg wash on top of the pastries. Use a sharp knife to cut to small vent slashes in the top of each pastry.

Bake for 25 to 30 minutes, or until the pastry is puffed and set and is a deep golden brown. Remove the pan from the oven and let the pastries rest on the pan for 5 minutes before serving.

Pin It!

Friday, January 22, 2021

Pizza Friday: Apple, Bacon, Caramelized Onions, Blue Cheese

Pizzas to blog

I have a huge backlog of pizzas from Pizza Fridays that I need to blog, including this one with sliced apple, bacon, caramelized onions and blue cheese. I know it sounds weird, but we love fruit on pizza, especially when the sweetness of the fruit is paired with salty goodness.

Apple, Bacon, Caramelized Onions, Blue Cheese Pizza

1 teaspoon olive oil
1 small onion, thinly sliced
salt and pepper
1-lb ball of pizza dough
8 oz mozzarella, shredded
1 small apple (we like honeycrisp), peeled and thinly sliced
4 slices bacon, cooked and crumbled
1/4 cup blue cheese crumbles

Preheat a pizza stone in a 500-degree oven for at least an hour while you assemble your ingredients.

Heat the oil in a non-stick skillet over medium heat. Add the onion and season with salt and pepper. Allow the onion to cook slowly - you want it to get brown without burning. Lower the heat if the onions are browning too quickly. If the pan seems dry, add a splash of water. The onions should take about 20-30 minutes to turn a nice, caramel color and become soft.

Lay a piece of parchment paper the size of the pizza stone on a work surface. Dust lightly with flour and roll out the pizza dough into a 14-inch circle. Drizzle some olive oil on the dough and rub around so all the dough is lightly coated.

Top with the mozzarella cheese, followed by the apple sliced, bacon and the caramelized onions. Dollop the blue cheese evenly on top.

Transfer the pizza on the parchment paper to the pizza stone. Bake for 15 minutes, checking often to make sure there are no bubbles forming. I keep a poking fork handy to pop them during the first 5 minutes.

Remove the pizza from the oven. Cool for a few minutes, then slice.

Pin It!

Wednesday, January 20, 2021

Grapefruit Cake

Early in the pandemic I went on a baking spree because we needed all the comforting things. I also instituted 3pm dessert as a way for us to get out of our respective funks, gather in the kitchen and have something sweet. 

To blog

This grapefruit cake came about because Katie insisted that Steve buy a grapefruit on their last shopping trip together before the lockdown. She didn't want to eat it plain, so I Googled dessert recipes and came across this one. It was so, so, so good. Nice and flavorful from the grapefruit with a perfect sweetness thanks to the glaze.

Grapefruit Greek Yogurt Cake
As seen on Sally's Baking Addiction

1 1/2 cups flour
1 1/2 teaspoons baking powder
1/2 teaspoon salt
3 large eggs
3/4 cup plain, vanilla or citrus Greek yogurt
1 cup packed light brown sugar
1/2 cup vegetable or canola oil
1/4 cup freshly squeezed grapefruit juice, strained
1 1/2 tablespoons grapefruit zest
1 teaspoon pure vanilla extract
seeds scraped from 1/2 of a vanilla bean (optional)

Grapefruit Glaze
1 cup confectioners’ sugar, sifted
2 tablespoons freshly squeezed grapefruit juice, strained
1/4 teaspoon pure vanilla extract

Preheat the oven to 350 and grease a 9×5 inch loaf pan.

Whisk the flour, baking powder, and salt together in a large bowl. In a medium bowl, whisk the eggs. Once combined, whisk in the yogurt, brown sugar, oil, grapefruit juice, zest, vanilla extract, and (optional) seeds. Pour the wet ingredients into the dry ingredients and mix with a large wooden spoon or rubber spatula until combined.  Spread batter into the prepared loaf pan. 

Bake for 45-50 minutes. Baking times vary, so keep an eye on it. The cake is done when a toothpick inserted in the center comes out clean. If you find the top of the cake is browning too quickly in the oven, loosely cover it with aluminum foil.

Remove the cake from the oven and set on a wire rack. Allow to cool before drizzling with glaze.
For the glaze, whisk the ingredients together and drizzle over cake. Slice and serve. 

Cover and store leftover cake at room temperature for up to 5 days or store it in the refrigerator.

Pin It!

Monday, January 18, 2021

Sausage and Hasbrown Breakfast Quiche

I think by now you know how much I love make-ahead breakfasts. I'm not a morning person (understatement of the century) so it's nice to just reheat a delicious, hearty breakfast when I'm half asleep.  I've had Amy's recipe for Sausage and Hashbrown Breakfast Quiche printed for awhile now but there hadn't been a good time to make it.  

I finally got my act together recently and got it made. The biggest question was whether it would reheat well so I could make it in advance. I made this one the same day we ate it and my family almost died of starvation (sarcasm) waiting for it to bake. When we reheated the leftovers the next day it was even better than the first day, so I'm definitely making it ahead of time next time.

My quiche took a lot longer to cook than the original recipe stated and I'm trying to remember if I used a full pound of sausage vs. the half pound called for. I probably did, knowing how my mind works. Just be aware of that and keep an eye on it. I ended up covering mine at the end because it was getting super brown on top.

Sausage and Hasbrown Breakfast Quiche
As seen on Bellyfull

3 cups shredded Simply potatoes
4 tablespoons unsalted butter, melted
salt and pepper
8 ounces breakfast sausage
6 large eggs
1/4 cup heavy cream
1 cup shredded cheddar cheese
1 cup shredded Monterey jack cheese
2 whole scallions, finely chopped

Preheat oven to 375 degrees. Coat a 9-inch pie plate with non-stick cooking spray.

In a large bowl gently toss the hash browns with the butter to coat. Season with salt and pepper. Press the hash browns into the bottom and up the sides of the plate to form a crust. Bake for approximately 25-30 minutes or until golden brown.

In the meantime, sauté the ground sausage in a skillet over medium-high heat, breaking it up with a wooden spoon, until no pink remains, about 5 minutes. Set aside to cool.

In the large bowl you used for the hash browns, whisk together the eggs, cream, cheeses, and scallions. Season with a dash of salt and pepper. Add in the cooked sausage crumbles. Mix to combine.

Pour mixture on top of the hash brown crust. Bake for approximately 30 minutes or until set. Let cool slightly, cut into wedges and serve.

Pin It!

Friday, January 15, 2021

Pizza Friday: Veggies with Goat Cheese

Another delicious pizza I made a long time ago and haven't found a chance to blog. This is a great pizza to make with summer veggies, but it's good any time of year. The freshness of the basil goes so well with the goat cheese, and the crunch of the veggies is a great contrast to the doughy crust. 

Pizzas to blog

Pizza with Veggies and Goat Cheese
Modified from A Couple Cooks

1-lb ball pizza dough
1/2 cup pizza sauce (see below)
8oz shredded mozzarella cheese
1/4 red bell pepper, thinly sliced
1/4 yellow or green bell pepper, thinly sliced
1/4 small red onion, thinly sliced
10-12 grape tomatoes, halved
8 to 10 leaves fresh basil, minced
4 ounces soft goat cheese
Kosher salt and pepper

Preheat a pizza stone in a 500-degree oven for at least an hour while you assemble your ingredients. 

Lay a piece of parchment paper the size of the pizza stone on a work surface. Dust lightly with flour and roll out the pizza dough into a 14-inch circle. Drizzle some olive oil on the dough and rub around so all the dough is lightly coated.

Top with the pizza sauce, then the mozzarella cheese, then the veggies (peppers, onion and tomatoes). Sprinkle the basil and dollop the goat cheese evenly on top. Season lightly with salt and pepper

Transfer the pizza on the parchment paper to the pizza stone. Bake for 15 minutes, checking often to make sure there are no bubbles forming. I keep a poking fork handy to pop them during the first 5 minutes.

Allow to cool slightly, then slice.

Pin It!

Wednesday, January 13, 2021

{Restaurant Knockoff} Homemade Big Macs

Any time we pass a McDonald's Steve gets wistful about their burgers and fries. He knows if we actually stopped for food he'd be disappointed, but the nostalgia is strong. 

Homemade Big Mac

At the beginning of the pandemic I decided to make homemade Big Macs to satisfy his craving. I Googled a sauce recipe, made super thin burger patties, shredded some lettuce, minced white onion and even carefully cut burger buns into thirds. 

These were absolutely perfect and certainly better than what we could get from McDonald's.

Better-than-McDonald’s Big Macs

1-lb ground beef
Salt and pepper
10 slices American cheese
5 hamburger buns
Big Mac sauce (see below)
Toppings: finely shredded romaine lettuce, very finely minced white onion, dill pickle chips

Separate the ground beef into 10 equal balls (approximately 1 1/2 oz each). Flatten into patties. Season with salt and pepper. Heat a large skillet over medium-high heat until very hot, then add half the patties. Don't crowd the pan; you want the meat to have room to brown. Press the meat with a spatula to make sure they're nice and flat. Cook for 2-3 minutes per side. After you flip them over, top each patty with a slice of American cheese. Remove the patties to a plate and repeat the process with the remaining patties. 

While the burgers are cooking, cut each top burger bun in half so you have three buns per burger. Make the sauce (recipe below) and prep your toppings.

Once all the burgers have been cooked, assemble the burgers. Spread some sauce on the bottom bun, top with minced onion and pickles. Add one burger patty and top with one piece of the cut top bun. Spread more sauce on top and add shredded lettuce. Top with a second burger patty. Spread more sauce on the top bun and place on top. Serve with fries.

Big Mac Sauce
From the Kitchn

3/4 cup mayonnaise
1 tablespoon yellow mustard
2 tablespoons sweet pickle relish
2 teaspoons granulated sugar
1/2 teaspoon white wine vinegar
1/2 teaspoon paprika
1/4 teaspoon garlic powder
1/4 teaspoon onion powder

Place all the ingredients in a bowl and whisk to combine. The sauce can be refrigerated in an airtight container for up to 1 week.

Pin It!

Monday, January 11, 2021

No-Knead Dutch Oven Bread

If you didn't bake bread sometime in the last 10 months were you even living through a global pandemic? Back in March and April, yeast and flour were in short supply because everyone was suddenly making their own bread. I'll admit to jumping on that train for many of the same reasons everyone else had - I've always been afraid of yeast and now I had nothing but time to overcome that fear. 

To blog

My go-to recipe was the simple no-knead Dutch oven bread that comes out perfectly crispy on the outside and pillowy on the inside every time. Honestly, what changed me from a person who feared yeast to someone who uses it regularly was my Thermapen. Being able to accurately measure the water temp so I didn't kill the yeast was a game-changed. Can't recommend it highly enough (and no, they didn't sponsor this). We've had many thermometers in our time but none hold a candle to this one.

One of these days I'll add herbs and/or garlic to this recipe.

No-Knead Bread
As seen on the Kitchn

1 pound all-purpose flour (be sure to actually weigh it) plus more for sprinkling
2 teaspoons salt
3/4 teaspoon active dry yeast
1 1/2 cups lukewarm water (110-115 degrees)

Place the flour, salt, and yeast in a large bowl and whisk to combine. Make a well in the center, and add the water into the well. Stir until it forms a shaggy dough. 

Cover the bowl with plastic wrap. Set aside in a warm place to rise until doubled in size and bubbly, 6 to 8 hours. 

Lightly flour a piece of parchment paper. Turn the dough out onto it, folding it over on itself at least once while you do so. Quickly shape the dough into a round ball. Cover with a kitchen towel and let rise for 1 hour more.

About 30 minutes before the hour is up, arrange a rack in the middle of the oven. Place a large Dutch oven with its lid on the rack. Heat the oven to 450°F. 

Using the parchment paper as a sling, carefully transfer the loaf, still on the paper, to the Dutch oven. If desired, make a slash or shallow cut on the top of the dough with kitchen shears or a sharp knife so that the bread can expand while baking.

Place the lid on the pot and put it in the oven. (Careful, the lid is hot!) Bake covered for 30 minutes. Remove the lid and bake for 15 minutes more. You can be extra-sure that the bread is done when an instant-read thermometer inserted in the top or side registers 210°F.

Remove the Dutch oven from the oven and use the parchment paper to transfer the bread to a wire rack. Let cool at least 15 minutes before slicing the bread.

Pin It!

Friday, January 08, 2021

Pizza Friday: The Works

This pizza is one of our favorites. I'm not sure I've ever seen it actually called "The Works" on a pizzeria menu, but it always reminds me of a pizza I used to love at Pizza Hut, back when I'd get the Book It rewards and go there for dinner with my dad. 

Pizzas to blog

The Works contains pepperoni, sausage, mushrooms, onion, green pepper and black olives. Use as much or as little of each as you want. In case you're new here, I like to load up our pizzas with toppings. 

The Works Pizza

1-lb ball homemade pizza dough
1/2 cup pizza sauce (recipe below)
8oz shredded mozzarella cheese
sliced pepperoni, to taste
2 links of cooked Italian sausage (see note)
4 white button mushrooms, cleaned and cut into chunks
1/4 of a small white onion, peeled and cut into chunks
1/4 of a green bell pepper, cut into chunks
1/2 cup canned black olives, sliced
dried oregano
garlic salt

Place a pizza stone in your oven and preheat the oven to 500 degrees.

Lay a piece of parchment paper the size of the pizza stone on a work surface. Dust lightly with flour and roll out the pizza dough into a 14-inch circle. Spread the pizza sauce in a thin layer over the dough, leaving a half-inch margin around the outer edges. Sprinkle the shredded mozzarella over the top, then add the pepperoni, sausage, mushrooms, onion, bell pepper and olives. Dust with some oregano and garlic salt, to taste.

Transfer the pizza on the parchment paper to the pizza stone. Bake for 15 minutes, checking often to make sure there are no bubbles forming. I keep a poking fork handy to pop them during the first 5 minutes.

Remove the pizza from the oven and allow it to rest for 5 minutes before slicing.

Homemade Pizza Sauce


1 cup canned crushed tomatoes
1 tablespoon extra-virgin olive oil
1 tablespoon chopped fresh basil/1 teaspoon dried basil
1 garlic clove, minced
1 teaspoon dried oregano
1/2 teaspoon sugar
1/2 teaspoon pepper
1/4 teaspoon salt

Mix everything together in a bowl. I like to use a 28-oz can of crushed tomatoes and make multiple portions of sauce at once, then store it in 1-cup measurements for future pizzas.  

NOTE: To cook the Italian sausage, first remove the outer casing and discard. Break the sausage meat into bite-size pieces, or crumble it. It's up to you what texture you like. Heat a small skillet with about a teaspoon of olive oil over medium-high heat. Add the sausage and cook until it's no longer pink.

Pin It!

Thursday, January 07, 2021

Chicken Parm Meatballs

I can't believe I made these Chicken Parm Meatballs months ago and never blogged them. They are utterly amazing and super easy.  Back when the pandemic began, I took a few cookbooks out of the library for inspiration. This was one of the recipes I flagged to make immediately. I even ground my own chicken since ground chicken was so hard to find.

To blog

I started making my own pizza sauce awhile ago, but canned sauce is fine. I'll put the recipe for the sauce below. It's simple to make big batches, portion them out and freeze for later.

Chicken Parm Meatballs
As seen on Dinner: A Love Story

1 1/4 pounds ground chicken
1/2 cup breadcrumbs
2 tablespoons chopped onion
1 tablespoon chopped parsley
1/2 cup Pecorino (or Parm)
salt and pepper to taste
1 clove garlic, minced
1 teaspoon fennel seeds
1 egg, whisked
zest of half a lemon
3 tablespoons olive oil
1 14-ounce can storebought pizza sauce (such as Don Pepino’s)
4 ounces fresh mozzarella, cut in thin slices

Preheat oven to 400. Line a baking sheet with foil and top with a sheet of parchment paper. 

In a large bowl, mix together ground chicken through lemon zest. Shape into balls (I like to use my ice cream scoop for this) and place a few inches from each other on the prepared baking sheet. In a small bowl, mix one spoonful of pizza sauce with the olive oil. Brush some on each meatball. Bake for 15 minutes.

Remove meatballs from oven, spoon more sauce on top of each meatball, and cover each with a slice of cheese. Bake for another 5 minutes until cheese is bubbly and golden.

Serve with remaining sauce on top with pasta and garlicky sauteed spinach on the side.

Homemade Pizza Sauce 

1 cup canned crushed tomatoes
1 tablespoon extra-virgin olive oil
1 tablespoon chopped fresh basil/1 teaspoon dried basil
1 garlic clove, minced
1 teaspoon dried oregano
1/2 teaspoon sugar
1/2 teaspoon pepper
1/4 teaspoon salt

Mix all ingredients together in a bowl. Set aside until ready to use. I recommend making a big batch using a 28-oz can of crushed tomatoes and freezing individual 1-cup portions. 

Pin It!

Tuesday, January 05, 2021

Shrimp with Roasted Potatoes and Kale

My friend Chelsea made this dish (which is a Blue Apron recipe) during the early days of the pandemic. It looked so good I figured I'd try recreating it myself. 

I'm always looking for new ways to make shrimp and this bowl was perfect. In fact, the method for roasting the potatoes is how I roast potatoes now. The high heat crisps up the outside while keeping the inside of the potato nice and soft.

Shrimp with Roasted Potatoes and Kale
Modified from Blue Apron

1/4 cup mayo
1/4 teaspoon cayenne pepper
salt and pepper
1½ lbs Yukon Gold potatoes, washed and cut into bite-size pieces
1/4 teaspoon EACH paprika, ground mustard, garlic powder onion powder
1 bunch kale, stems removed and leaves roughly chopped
4 tablespoons butter
2 lbs shrimp
2 cloves garlic, peeled and minced
1 tablespoon white wine vinegar

Preheat the oven to 450°F. Combine the mayonnaise and cayenne pepper; season with salt and pepper to taste

Place the potatoes on a sheet pan, drizzle with olive oil and season with salt, pepper, and the smoky spice blend; toss to coat. Arrange in an even layer. Roast 22 to 24 minutes, or until browned and tender when pierced with a fork. Remove from the oven.

While the potatoes roast, heat 1 tablespoon of olive oil on medium-high in a large skillet until hot. Add the chopped kale and 3/4 cup of water; season with salt and pepper. Loosely cover the pan and cook, stirring occasionally, 8 to 10 minutes, or until the kale has wilted and the water has cooked off. Transfer to a plate. Wipe out the pan.

Pat the shrimp dry with paper towels; season with salt and pepper. In the same pan that you cooked the kale, heat half the butter on medium-high until melted. Add the seasoned shrimp in an even layer. Cook, without stirring, 2 to 3 minutes, or until slightly opaque. Add the chopped garlic, remaining butter, cooked kale, and vinegar. Cook 1 to 2 minutes, or until thoroughly combined and the shrimp are opaque and cooked through. Turn off the heat. 

Serve the cooked shrimp and kale with the roasted potatoes. Top the potatoes with the seasoned mayonnaise.

Pin It!

Monday, January 04, 2021

Zucchini Fritters

I'm always struggling to use up zucchini in the summer and I don't even grow it in my garden. In 2020, in addition to discovering delectable zucchini muffins, I made a lot of these zucchini fritters. The dipping sauce is what makes them so good (I'm a complete sucker for soy sauce).

I found the recipe in a cookbook, but it looks like the author originally posted it on Bon Appetit's website. I'm happy to report that these even reheat well. They won't be as crispy, but the texture is surprisingly good reheated.

Zucchini Fritters
By Jenny Rosenstrach

Soy Dipping Sauce
3 tablespoons unseasoned rice vinegar
1 tablespoon reduced-sodium soy sauce
1 1/2 teaspoons sugar
Crushed red pepper flakes

Fritters
1 1/2 pounds zucchini (about 3 medium), grated
1/2 teaspoon kosher salt plus more for seasoning
1 large egg
1/4 cup flour
3 tablespoons finely chopped fresh chives or shallot
1 tablespoon cornstarch
Freshly ground black pepper
1/3 cup vegetable oil

Mix vinegar, soy sauce, sugar, and a pinch of red pepper flakes in a small bowl until sugar is dissolved. Set aside.

Place zucchini in a colander set in the sink and toss with 1/2 teaspoons salt. Let stand 10 minutes, then wring zucchini dry in a clean kitchen towel. Place zucchini in a large bowl and gently mix in egg, flour, chives, and cornstarch; season with salt and pepper.

Heat oil in a large skillet over medium heat. Working in 2 batches, drop 1/4-cupfuls zucchini mixture into skillet, flattening slightly; cook until golden and crisp, about 3 minutes per side. Transfer fritters to a paper towel–lined plate; season with salt. Serve with soy dipping sauce.

DO AHEAD: Fritters can be made 30 minutes ahead. Keep warm in a 200° oven.

Pin It!

Sunday, January 03, 2021

Pear Custard Pie

A few years ago someone gifted us Harry & David pears and we've been hooked ever since. Now we just buy them for ourselves and gorge on the sweet perfection. The problem is that they all seem to ripen at the same time and a person can only eat so many pears. 

Enter the Pear Custard Pie. I did a quick search for easy pear desserts and this is the second one that came up. I wanted something I could throw together quickly and this certainly fit the bill. The hardest, most time-consuming part is peeling the pears. The batter is made in a blender and then you bake it.


We loved this so much that I made a second cake the next day. Steve and Katie have decided that every year we'll use 8 pears to make two cakes and eat the remaining 2 pears for breakfast. Sounds good to me.

The flavor of the pear really shines so be sure to use good quality pears (like the ones from Harry & David).

Pear Custard Pie

As seen on Dinner at the Zoo

Cooking spray
4 firm pears peeled, cored and thinly sliced
4 tablespoons unsalted butter, melted
3 eggs
3/4 cup milk
1/4 teaspoon kosher salt
1/3 cup granulated sugar
1/3 cup all purpose flour
2 teaspoons pure vanilla extract
Powdered sugar for garnish

Preheat the oven to 350. Coat a 9 inch round cake pan with cooking spray. Arrange the pear slices in the pan.

Put the butter, eggs, milk, salt, granulated sugar, flour and vanilla into a blender; process until smooth.
Pour the batter over the pears. 

Bake for 40-45 minutes until the custard is golden and firm to the touch. Cool slightly and dust the top with powdered sugar before serving.

Leftovers can be refrigerated up to 3 days, but be sure to reheat the slices for about 20-30 seconds in the microwave to take the chill off.


Pin It!

Friday, January 01, 2021

Restaurant Knockoff: Pooh's Puffed French Toast

We miss Disney World so much that I've taken to making one of our favorite breakfast items from the buffet at Crystal Palace, Pooh's Puffed French Toast, so we can pretend we're there. It's a lot easier to make than it seems and a nice twist on the usual French toast. 

Pooh’s puffed French toast

And, bonus, the leftovers are pretty good reheated. Not crispy and crunchy, but still delicious.

This makes a lot of servings so I cut the original recipe in half.

Crystal Palace Pooh's Puffed French Toast
As seen on AllEars

Cinnamon Sugar
2 teaspoons cinnamon
1/3 cup sugar 

French Toast
4 1/2 teaspoons baking powder
1 1/4 cups flour
3/4-1 cup milk
1/4 teaspoon salt
1 egg
1 tablespoon sugar
1/4 teaspoon vanilla extract
6 slices bread
vegetable/canola/other light oil, for frying

Combine sugar with cinnamon and set aside.

Combine baking powder and flour together in a bowl. Whisk milk, salt, egg, sugar, and vanilla in a measuring cup until well blended. Add to the flour and mix until smooth, adding more milk if the batter is too thick. 

Cut bread diagonally into triangles. Dip pieces in the batter, allowing excess to drip off. 

Heat about a 1/2" of oil in a large non-stick skillet over medium-high heat. Fry the battered bread pieces until golden brown on both sides. Drain on paper towels and then roll in sugar/cinnamon mixture while still warm.

Pin It!

Thursday, December 31, 2020

Southern-Style Smothered Chicken

I don't know what it is about this recipe for Southern-Style Smothered Chicken. There's nothing earth-shattering about the ingredients or the cooking method but it is one of the coziest, tastiest meals I make. And I've made it a lot since I discovered it this spring. For some reason it reminds us of egg-foo yung, which makes zero sense but we all love it so we just go with it.

It's an easy recipe but since we prefer to eat saucy chicken dishes off the bone it does take some time management and prep work to get dinner on the table quickly. We like this with rice and steamed broccoli.

Southern-Style Smothered Chicken
As seen on Cook's Country

3 pounds bone-in chicken pieces (split breasts cut in half crosswise, drumsticks, and/or thighs)
Salt and pepper
1/2 cup plus 2 tablespoons all-purpose flour
1/4 cup vegetable oil
2 onions, chopped fine
2 celery ribs, chopped fine
3 garlic cloves, minced
1 teaspoon dried sage leaves (1/4 teaspoon ground sage)
2 cups chicken broth
1 tablespoon cider vinegar

Season chicken with salt and pepper. Put 1/2 cup flour in a plastic food storage bag and add all the chicken. Seal the bag and toss to coat. 

Heat oil in Dutch oven over medium-high heat. Add half of chicken to pot, skin side down, and cook until deep golden brown, 4 to 6 minutes per side; transfer to plate. Repeat with remaining chicken, adjusting heat if flour begins to burn. 

Pour off all but 2 tablespoons fat and return pot to medium heat. Add onions, celery, 1 teaspoon salt, and 1/2 teaspoon pepper and cook until softened, 6 to 8 minutes. Stir in garlic, sage, and remaining 2 tablespoons flour and cook until vegetables are well coated with flour and garlic is fragrant, about 1 minute. Whisk in broth, scraping up any browned bits. 

Nestle chicken into sauce, add any accumulated juices from plate, and bring to boil. Reduce heat to low, cover, and simmer until breasts register 160 degrees and drumsticks/thighs register 175 degrees, 30 to 40 minutes. 

If you want to remove the chicken from the bone like we do, transfer chicken to a plate and place in the fridge to cool before removing the skin and bones. While the chicken is cooling, stir vinegar into sauce and season with salt and pepper to taste. 

Either add chicken pieces back to the pot and toss to coat or pour sauce over chicken. Serve over white rice.

Pin It!

Wednesday, December 30, 2020

Biscuits and Gravy Make Ahead Breakfast Casserole

We love biscuits and gravy around here. If we see it on a restaurant menu, we order it. Since we live in the Northeast that doesn't happen often, so I usually just make it at home using this excellent recipe I've had for years. It's savory and sweet and very addictive. 

But then I saw this recipe for Biscuits and Gravy Egg Bake on Pinch of Yum and knew it would end up being a family favorite. I was particularly excited for the chiles in the gravy.

The recipe calls for canned dough, but making your own biscuit dough is ridiculously easy so I went that route. I did a quick Google search and found this one from Sally's Baking Addiction and I will never use another recipe. So, so good. I was just sad we didn't have any jam or jelly in the house for the leftover biscuits.

What I love about this recipe is that you can make it ahead and then bake it the next morning. It's perfect for the holidays - a few friends made it for Christmas after I raved about it on Facebook - or to keep in the fridge for busy weekday mornings.

Biscuits and Gravy Make Ahead Breakfast Casserole
As seen on Pinch of Yum

Green Chile Sausage Gravy
1 lb. breakfast sausage
4 tablespoons butter
4 tablespoons flour
2 1/2 cups milk
1/2 teaspoon salt
1 can (4oz) chopped green chiles

Casserole
8 eggs
1/2 cup milk
1/2 teaspoon salt
6-8 jumbo buttermilk biscuits (from a can or make your own, recipe below), cut into cubes
1 cup shredded cheddar cheese

If making your own biscuits, do that first using the recipe below. Save 6-8 biscuits for this recipe and bake off the rest.

Preheat the oven to 350 degrees. If you're making the casserole in advance, do this the next morning. Spray a 9 x 13 pan with cooking spray.

Brown the sausage in a large skillet then remove to a plate. Melt the butter in the now-empty skillet over medium-low heat. Whisk in flour until thickened, 2-3 minutes. Whisk in the 2 1/2 cups milk, salt, and diced green chiles, then add the sausage. Stir to combine.

Whisk the eggs, 1/2 cup milk and salt in a 4-cup measuring cup or large bowl. Place half the biscuits in the greased 9 x13 pan. Pour the eggs over the top. Sprinkle with the cheese, then dollop some of the gravy (be sure to save some gravy for later) on top. Add the rest of the biscuit cubes.

At this point you can cover and refrigerate overnight. In the morning, preheat the oven, and warm up the extra gravy while you bake the casserole for 35-45 minutes, until the eggs are set. It will take longer to cook if the casserole is cold.

Serve slices warm from the oven, with a scoop of sausage gravy over the top (thin it out with a little more milk

Homemade Buttermilk Biscuits
As seen on Sally's Baking Addiction

2 1/2 cups flour, plus extra for dusting
2 tablespoons baking powder
1 teaspoon salt
1 stick very cold unsalted butter, cubed
1 cup cold buttermilk
2 teaspoons honey

Preheat oven to 425.

Add the flour, baking powder, and salt to a large food processor and pulse to combine. Add the cubed butter and pulse until you have coarse crumbs form. Pour into a large bowl. Make a well in the center of the mixture and add the buttermilk and honey. Fold together with a rubber spatula until it begins to come together. Do not overwork the dough.

Turn the dough out onto a floured work surface and gently bring together with generously floured hands. The dough will be sticky so have extra flour nearby. Flatten the dough into a 3/4 inch thick rectangle, fold one side into the center, then the other side. Turn the dough horizontally, flatten into a 3/4 inch thick rectangle again. Repeat three more times.

Cut the dough into circles with a biscuit cutter or glass. (Tip: Do not twist the biscuit cutter when pressing down into the dough– this seals off the edges of the biscuit which prevents them from fully rising.) Re-roll scraps and cut more biscuits until all the dough is used.

Bake for 15-20 minutes or until tops are golden brown. Cover leftovers tightly and store at room temperature or in the refrigerator for up to 5 days.

Pin It!

Tuesday, October 20, 2020

Chicken Milanese

My friend, Dana, recently posted a photo of Chicken Milanese from her anniversary dinner and I had to make it ASAP. Crispy chicken. Bright arugula salad. I could almost taste it.

I followed the same breading and shallow frying method I use for Chicken with Prosciutto, Brie and Arugula and served simple fried potatoes on the side. Absolutely delicious meal. 

Chicken Milanese with Arugula Salad  

1/2 cup flour
2 large eggs, lightly beaten
1 cup Panko breadcrumbs
1 cup Italian breadcrumbs

Salt and freshly ground black pepper, to taste
4 (6 oz) boneless, skinless, chicken breasts
6 tablespoons unsalted butter, divided
2 tablespoons olive oil, divided

1/2 lb baby arugula, rinsed and spun dry
2
tablespoons fresh squeeze lemon juice
Salt and freshly ground black pepper, to taste
1/4 cup extra virgin olive oil
grated pecorino/parmesan cheese
chopped fresh tomatoes
thinly sliced red onion


Place flour, eggs and breadcrumbs in three separate shallow bowls or shallow dishes. Preheat the oven to 300 degrees. Place a wire baking rack over a baking sheet; set aside.

Place each chicken breast between two pieces of waxed paper (or a freezer-style plastic bag) and pound to 1/4-inch thickness. Season chicken on both sides with salt and pepper. Dredge each breast in the flour; tap off excess. Dip into the egg wash and let excess drip off, and then dredge on both side in the breadcrumbs.

Add 3 tablespoons of butter and 1 tablespoon of oil to a large nonstick pan and heat until the butter is melted and sizzling. Place 2 chicken breasts in the pan and cook until golden brown on the first side. Flip over and continue cooking until golden brown on the second side and the chicken is cooked through, about 5 to 6 minutes total. 

Put the cooked chicken on the wire rack and keep warm in the oven while you cook the other pieces. Add more butter and oil as needed.

In a medium bowl, toss the arugula with lemon juice, salt, pepper, oil and grated cheese. Add chopped tomatoes (I used grape tomatoes since it's October and tomatoes are out of season) and very thinly sliced red onion, to taste.

To serve: place one chicken breast on a plate and top with some of the arugula salad mixture.


Pin It!

Wednesday, October 14, 2020

Greek Meatballs

I am such a sucker for Greek flavors. I've been thinking about Greek meatballs forever and finally decided to make them when my friend, Patty, brought me some amazing feta from New York City. She has family up there and whenever she visits she brings home all sorts of Greek delicacies. This feta has spoiled me for all supermarket feta. It's tangy and salty and just plain perfect.


After I posted these to my personal Facebook page, my friend Jaida mentioned that she makes her Greek turkey meatballs with spinach. I wish I'd thought of that because you may notice that we didn't have a veggie side dish. We all thought the texture of the meatballs was perfect so I don't want to add spinach to them directly, but next time I make these I'll definitely wilt some spinach with sliced garlic to serve alongside.


There are a lot of recipes for Greek meatballs out there so I looked at a few and pulled ingredients that sounded good to me. This is my take. Adjust as you like. 

UPDATE: December 2020


I turned leftover meatballs into Greek meatballs sandwiches. Homemade naan, meatballs broken into pieces, lettuce, tomato and tzatziki. Utterly and completely delicious (and very messy). I highly recommend doing this with leftover meatballs.

Greek Meatballs
 
2 lbs. ground beef
1/4 cup finely minced red onion
1/2 to 1 cup feta, crumbled

1 tablespoons dried oregano

1 teaspoon cumin
2 teaspoons dried dill
1 teaspoon garlic powder
1/4 to 1/2 teaspoon red pepper flakes

2/3 cup panko
1/3 cup milk
2 large eggs, slightly beaten

1 teaspoon kosher salt

1/2 teaspoon pepper
Preheat the oven to 415 degrees. Combine all the ingredients in a large bowl and mix well. Refrigerate for 30 minutes.
Line a baking sheet with foil and top with a sheet of parchment paper. Spray the parchment with cooking spray. Form the meat mixture into meatballs. I used an ice cream scoop for larger meatballs.  Place the meatballs on the baking sheet. 
Bake for 30 minutes if you made larger meatballs. Bake for 15 minutes if you used a 1 to 1 1/2 tablespoon scoop. Meatballs are done when the internal temp is at least 165 degrees. 
Serve with rice, garlicky sauteed spinach and tzatziki. 
Tzatziki

1 medium cucumber, peeled and seeded
Salt and pepper, to taste
1 small garlic clove, minced
Dried dill, to taste
2 cups plain Greek nonfat yogurt
Squeeze of fresh lemon juice

Grate the cucumber over the large holes of a box grater. Place the cucumber in a bowl and add the salt, pepper, garlic, and dried dill. Stir to combine. Add the yogurt and some lemon juice and mix well. Taste and adjust the seasonings, as needed. Chill before serving.


Pin It!

Friday, July 24, 2020

Pizza Friday: Pierogi Pizza

This is one of the easiest pizzas I make and easily one of the tastiest. That's saying a lot because you all know how much we love homemade pizza around here.

Pierogi pizza

I first saw this pizza over at Dinner: A Love Story. One bite and we all said it tasted just like a pierogi. The soft potatoes, the sharp cheddar, the caramelized onions. Such a great combo.

The first time I made it with only cheddar cheese and it was too greasy for us, so I swapped out half the cheddar for mozzarella. Sometimes I bake the potato slices like I do for my Roasted Potato and Rosemary Pizza but most of the time I just parboil them.

Pierogi Pizza
Inspired by Dinner: A Love Story

3 tablespoons olive oil
1 large onion, thinly sliced
salt, to taste
4 medium red potatoes, peeled and thinly sliced
1 16-ounce ball pizza dough (or make your own), room temperature
6 oz shredded or deli sliced mozzarella cheese
6 oz shredded or deli sliced sharp cheddar cheese
fresh thyme or rosemary, minced (optional)

Preheat oven to 500°F.

Heat oil in a large non-stick skillet over medium heat. Add the sliced onions, season with a little salt, and cook for at least 25-30 minutes, allowing them to caramelize.

Add potato slices to a pot of salted water and bring to a boil. Cook for 5 minutes, then drain well.

Lightly grease a standard baking sheet. Place the dough in the middle. Press and stretch it out with your fingers so it reaches the edges. Drizzle with a bit of olive oil and rub to coat the dough. Cover with both cheeses, leaving a border around the edges. Put the potatoes on top of the cheese in a single layer, then top with the caramelized onions. Sprinkle with the thyme or rosemary, if using.

Bake for 15 minutes until cheese is bubbly and crust is  golden brown. Remove from the oven and transfer pizza to a cutting board. Slice and serve.


Pin It!