Friday, April 26, 2013

Recipe Swap: Avocado and Cucumber Tartine

It's always fun to receive a new blog for the Blogger's Choice swaps. Obviously I'm familiar with Caroline's blog, The Barbee Housewife, since she's a member of my cooking board, but I haven't had a chance to really look through her blog. Since Caroline is relatively new to blogging I actually went through her entire blog to check out what she's made. I had a really hard time picking something to make - I actually made something for breakfast after seeing it on her blog, post to come soon - but in the end I needed something easy for lunch one day and this Avocado and Cucumber Tartine looked like it would fit the bill.

tartine

I bought a Portuguese roll from my supermarket the same day I made this for lunch, which I highly recommend. There's nothing like fresh-baked bread on a simple sandwich like this. Mincing the cucumber and mashing the avocado took about as long as my toaster oven took to toast the bread, which makes this a super fast lunch.

tartine2

Holy yum, this is one amazing sandwich. Like cancel your lunch plans, go to the supermarket to purchase the ingredients and whip one up today amazing. You can't go wrong in my book when avocado is involved, but add a crispy baguette and tangy cucumber salad and you've got perfection on a plate. The creaminess of the avocado blended nicely with the tang from the rice vinegar and the nuttiness of the toasted sesame oil.


I'm already contemplating when I can make this sandwich again. So, so good. Thanks for sharing this one, Caroline!

Avocado and Cucumber Tartine
As seen on The Barbee Housewife, from Smitten Kitchen

1 6-inch baguette
1/2 cup cucumber, seeds removed, minced
2 teaspoons rice vinegar
1/2 teaspoon toasted sesame oil
Salt and pepper
1 avocado, halved, pit removed
2 teaspoons sesame seeds

Cut bread in half lengthwise and toast.

While the bread is toasting, combine the cucumbers, rice vinegar, sesame oil, and salt in a small bowl. Allow to sit for at least 5 minutes. Mash the avocado in a separate bowl and season with salt and pepper.

Once the bread is toasted, spread the mashed avocado on each baguette half. Top with the cucumber salad, making sure to drizzle the liquid on top. Sprinkle with sesame seeds.


Pin It!

Wednesday, April 24, 2013

Overnight Ham and Cheese Breakfast Enchiladas

My mom warned me there would be a lot of leftover Easter ham this year so I figured I'd better have a game plan in place. As luck would have it, this recipe for Overnight Ham and Cheese Breakfast Enchiladas showed up in my blog reader right before the holiday. I love make-ahead casseroles and this was intriguing because it involved tortillas instead of bread.

eggenchiladas2

I was worried the egg mixture would turn the tortillas into mush like a typical strata but I needn't have worried. This was so easy to prep since there's no cooking involved, just chopping/grating.

eggenchiladas

Since I was serving this for dinner I assembled it in the morning and then baked it off that night. Delicious, filling and a great way to use up some of the leftover ham. I'll definitely be making this one again.

Overnight Ham and Cheese Breakfast Enchiladas
As seen on The Girl Who Ate Everything

2 cups cubed and cooked ham
1/2 cup chopped green onions
2 1/2 cups shredded cheddar cheese, divided
8 flour tortillas (6-8 inches)
1 1/4 cups half-and-half
4 whole eggs
1/2 teaspoon salt
1 tablespoon flour
salsa, sour cream, diced avocado and additional green onions for serving

In a medium bowl stir together ham, green onions and 2 cups of cheese (save the remaining 1/2 cup for later).

Spray a 9x13 inch baking dish with cooking spray. Use a 1/3-cup measuring cup to scoop out cheese mixture onto a tortilla. Roll up tortilla and place seam side down in the baking dish. Roll up all tortillas and place them into the baking dish with the sides touching.
Whisk together half-and-half, eggs, salt, and flour. Pour over tortillas. Cover and refrigerate overnight.

In the morning, preheat oven to 350ยบ. Bake for 30-40 minutes. Remove and sprinkle remaining 1/2 cup of cheese over enchiladas. Bake for 10 more minutes or until tops are golden brown and the egg mixture is set.

Serve with salsa, sour cream, avocado and additional green onions.
Pin It!

Monday, April 22, 2013

Graceland Eggplant Sandwiches

Last year we did a sandwich swap on my cooking board and my friend Lishie submitted her Graceland Eggplant Sandwiches, which my other friend Heather was lucky enough to make. I've had my eye on them for a long time, even adapting them with tomato sauce instead of the roasted red pepper, but I really wanted to make the original version.

eggplant

These were so delicious, although SP told me he prefers them with the tomato sauce. Even Baby Girl ate a few bites of her sandwich and told me eggplant is yummy (she was much more interested in the antipasti pasta salad I served alongside - what can I say, the kid loves her carbs).

My lunch the next day was equally delicious but instead of the oil and vinegar I mixed some vinegar with mayo and spread it on the top and bottom bun. I need to remember to do that more often, it's easier than trying to get the right amount of oil and vinegar out of the bottles, as you can see from the photo my vinegar didn't cooperate.

Graceland Eggplant Sandwich
As seen on Hezzi-D's Books and Cooks, adapted from DeLish Lishie

1 medium eggplant
1 egg, whisked
1 tablespoon milk
1/2 cup breadcrumbs
1 teaspoon oregano
1 teaspoon garlic powder
1/2 teaspoon black pepper
1/2 teaspoon paprika
4 sub rolls
1 jar roasted red pepper
8 oz. fresh mozzarella
2 tablespoons olive oil
1 tablespoon balsamic vinegar

Cut the ends off of the eggplant and then peel it. Slice the eggplant lengthwise into thin slices. Place in a colander set inside a bowl. Salt the eggplant slices. Allow to sit for at least an hour. Blot off any moisture on the eggplant.

Whisk together the egg and the milk in a shallow dish. In a second shallow dish combine the breadcrumbs, oregano, garlic powder, black pepper, and paprika.

Preheat the oven to 375 degrees. Slice the sub rolls in half and place on a baking sheet.

Heat one tablespoon of olive oil in a large skillet over medium high heat. Dip the eggplant slices into the egg mixture and then coat with the breadcrumbs. Place 3 or 4 slices in the skillet and heat for 2-3 minutes per side or until it is golden brown. Remove from skillet and place on a sub roll. Repeat with the remaining 1 tablespoon oil and eggplant slices.

Top eggplant with roasted red pepper, mozzarella slices, and a sprinkle of black pepper. Splash a little olive oil and balsamic vinegar on the sub roll and place in the oven. Bake for 5 minutes or until the cheese is just melting. Serve hot with extra olive oil and balsamic vinegar.

Pin It!

Friday, April 19, 2013

Grilled Chicken Caesar Flatbreads

You all know how much I love my friend Cassie's blog. She and I have a very similar cooking style and I know I can always rely on her for easy weeknight meals. I was making my meal plan recently and struggling to find a sandwich so I went to her blog and clicked on the sandwich tag. Voila! Up popped these Grilled Chicken Caesar Flatbreads. Chicken + Caesar dressing + flatbreads = deliciousness.

flatbread2

These really could not be simpler and the flavors are great. You're basically topping a flatbread with chicken Caesar salad. I got to use my new grill pan, although I need to remember that it's easier to slice chicken in half lengthwise when grilling so you aren't standing there waiting (im)patiently for the chicken to cook.

flatbread

Baby Girl continues to amaze me with what she eats - she cleaned her plate (she had one quarter of a flatbread topped with the chicken and salad). I can't wait to make this one again.

Grilled Chicken Caesar Flatbreads
As seen on Cassie Craves

2 boneless skinless chicken breasts
3/4 cup Caesar dressing, plus more for the salad
Juice of 1 lemon
1 tablespoon Worcestershire sauce
Chopped romaine lettuce
Parmesan cheese
Butter
6 flatbreads

Slice each chicken breast in half lengthwise. Combine dressing, lemon juice, and Worcestershire in a plastic food storage bag. Add chicken and toss to coat. Marinate at least 2 hours, up to overnight.

Heat grill or grill pan to medium-high heat and grill chicken until cooked through. Remove chicken to a plate and allow to rest, then slice. Butter both sides of the flatbreads and add to the grill/grill pan, turning occasionally until each side until marked and slightly crispy.

Combine romaine lettuce, Caesar dressing, and Parmesan cheese. Add some of the salad mixture to each flatbread. Top with sliced chicken and more grated cheese. Serve immediately.
Pin It!

Wednesday, April 17, 2013

Cannoli Cheesecake

I've had my eye on Melissa's Cannoli Cheesecake since she first posted it. I love, love, love cannoli and there's a place near my house that makes such awesome cannoli I end up taking one home since I'm always too full after dinner to eat it there. When my mom and I were figuring out the Easter menu I jumped at the chance to make this cheesecake.

cheesecake

I opted to leave out the orange zest to stay true to my favorite cannoli and took Melissa's advice about just coating the bottom of the pan with the cookie crumbs. You all know I'm not really a baker (I don't own a springform pan so SP had to drive to my mom's one night to borrow one of hers), but this was simple to make. Of course Baby Girl helped and loved sampling the batter before the eggs were added. She also enjoyed the mini chips.

cheesecake2

We all enjoyed this - it tastes just like the cannoli filling I know and love, although I think I overcooked it slightly. The center was perfect but the closer I got to the edge of my slice the firmer it became. Something to remember next time.

Cannoli Cheesecake
As seen on I Was Born to Cook

2 cups crushed vanilla wafers
3 tablespoons sugar
7 tablespoons butter, melted
3 (8 ounce) packages cream cheese, at room temperature
1 cup ricotta cheese
2 tablespoons AP flour
pinch of salt
1 1/4 cups sugar
1/2 cup mini chocolate chips
1 tablespoon pure vanilla extract
4 eggs, at room temperature
confectioners’ sugar, for garnish

Position oven rack to middle of oven and preheat to 375 degrees.

Stir cookie crumbs and 3 tablespoons sugar together in a bowl, then mix in melted butter until crumbs get slightly clumpy. Transfer to a 9-inch springform pan and press evenly along the bottom. Bake for about 10 minutes, or until slightly brown. Let cool on a rack. Lower oven temperature to 300 degrees.

Put paddle attachment on stand mixer. Mix cream cheese, ricotta, flour and salt on medium speed, scraping sides of bowl frequently, until very smooth and fluffy, about 5 minutes. Make sure cheese has no lumps. Add sugar and beat until well blended and smooth.

Add chocolate chips and vanilla. Beat until just combined, about 30 seconds. Add eggs, one at a time, also beating until just blended. Do not overbeat. Pour filling into cooled crust and smooth top.

Bake for about 55-65 minutes. The sides will be puffy and the center will look soft and jiggle. Set on rack and cool completely. Cover and refrigerate, at least 8 hours and up to 3 days.

Unclasp and remove side of pan and run a long, thin spatula under the crust. Slide onto flat serving plate carefully (or leave it on the bottom of the springform pan). Garnish with confectioners’ sugar. Dip knife in warm water before cutting each slice, wiping in between cuts.

Pin It!

Monday, April 15, 2013

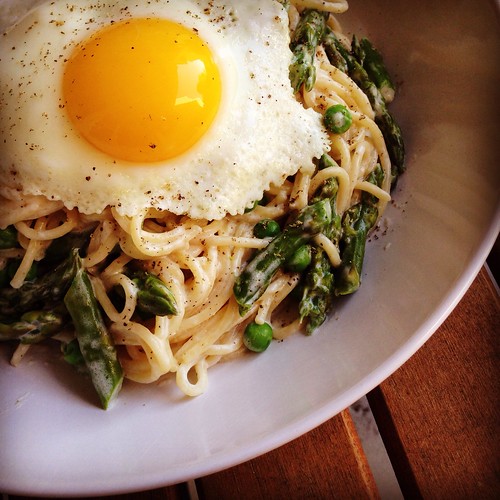
Linguine with Alfredo, Asparagus, Peas and Poached Egg

I love this time of year. Now that the weather is getting warmer I'm gearing up for the influx of fresh fruits and veggies, especially asparagus. I absolutely love asparagus and while we do buy them throughout the year they're always best (and cheapest) in season, of course.

Springtime pasta

Paula recently posted this gorgeous Spring Linguine with Alfredo, Poached Egg and Asparagus. Adding poached eggs to a pasta dish is pure genius, especially pasta that involves asparagus - because we all know eggs and asparagus are a match made in heaven.

spring linguine

I was worried my bunch of asparagus wouldn't stretch to a full pound of pasta so I added in another springtime favorite - peas. Asparagus and peas also go well together and they were a great addition to the dish.

spring linguine3

I was skeptical of poaching the eggs in advance and reheating them, worried the yolk would overcook, but I was proved wrong. What a great idea, especially for brunch parties. Being able to make a bunch of poached eggs in advance and then reheat right before serving is brilliant. This is a delicious spring dish I can't wait to remake during asparagus season.

Linguine with Alfredo, Asparagus, Peas and Poached Egg
Slightly modified from The Saucy Southerner

1lb linguine or spaghetti
1 bunch asparagus, cut into 1-inch pieces
1 cup frozen peas
4 tablespoons butter
1 1/2 cups half & half
salt and ground black pepper, to taste
1/2 cup Parmesan cheese, grated (this is about an ounce)
4 large eggs, poached to desired doneness

In a large pot of boiling salted water, cook pasta according to package directions. In the last two minutes add the asparagus to the pasta water to cook. Drain pasta, reserving 1 cup of the pasta cooking water. Add pasta back to the pot and stir in the peas.

While the pasta is cooking, melt the butter in a pot, then add the cream, salt and pepper. Allow to thicken slightly, then turn off the heat and add the Parmesan cheese. Add the sauce to the pasta and vegetables and toss to coat. Thin with some of the pasta cooking water, if necessary.

Remove the pasta to plates, creating a nest in the center for the eggs. Reheat poached eggs for 15 seconds in hot (but not boiling) water and remove with a slotted spoon to the top of the pasta. Garnish with more Parmesan cheese and freshly ground black pepper.


Pin It!

Friday, April 12, 2013

Recipe Swap: Chicken Suiza Pockets

Chicken was the theme for the latest recipe swap. It's such a versatile meat but like most people I get into a rut making the same chicken dishes over and over again. I was excited when I was assigned these Chicken Suiza Pockets from Jenna. We love Mexican food and these seemed simple yet different from anything I've made before.

chickensuiza

I didn't read the recipe ahead of time so I didn't realize it called for mixing the chicken and other ingredients in a stand mixer to shred the chicken. While I really want to try this tip, I didn't feel like dragging my stand mixer out of the garage when I could just shred the chicken by hand and mix it with the other ingredients.

I ended up cooking the chicken and mixing up the filling a few days before I made this recipe due to a change in dinner plans. The next day I needed a quick lunch so I snagged some of the filling and made a quesadilla. It was good so I was really looking forward to dinner the next night.


Unfortunately I had some issues getting my crescent rolls to stick together. The perforated lines didn't want to cooperate and I only managed to get three pockets made, which was fine because that fed us all for dinner. Baby Girl was a big fan, eating half a pocket in addition to the salad I served on the side. These were good and I liked the concept but I think a different rolled dough would make it easier.

Chicken Suiza Pockets
As seen on Jenna’s Cooking Journey, originally from Cassie Craves

2 small chicken breasts
1 can Rotel (diced tomatoes with green chiles)
5 ounces cream cheese, softened
1/2 cup salsa verde
1 tablespoons honey
Juice of 1 lemon
1/2 teaspoon cumin
Salt and pepper to taste
1/2 cup shredded Mexican Blend cheese
2 packages crescent rolls
Cilantro, chopped

Preheat the oven to 375.

Put chicken breasts and Rotel in a glass baking dish and bake until the chicken is done, about 35 minutes.

Place the chicken breasts, 3 tablespoons of the Rotel and all the other ingredients except the crescent rolls and the cilantro into a standing mixer. Turn on low and mix until all the ingredients are combined (this will shred your chicken and combine all the ingredients). Alternatively, you can shred the chicken and mix with the other ingredients in a large bowl.

Divide each pack of crescent rolls into 4 rectangles by sealing together two triangles of dough. Divide the filling evenly among the 8 rectangles. Seal by pinching the dough up and into the middle. Bake 20 minutes.

Top with cilantro, if desired.


Pin It!

Wednesday, April 10, 2013

Macaroni and Cheese with Bacon and Peas

I mentioned that I made two recipes from Katie's blog for the recent Blogger's Choice swap. This is the second, a version of the Panera mac and cheese I've made countless times - Macaroni and Cheese with Bacon and Peas. I think Katie is brilliant for adding bacon and peas to this recipe, two things my whole family loves and I always have on hand. This was the perfect recipe to make one weeknight when my planned meal went awry due to woody, thick, overpriced asparagus at the supermarket.

maccheese

Once again Baby Girl impressed me with her eating, asking for multiple pieces of cooked bacon and snacking on frozen peas. Bacon was something she's tried before and kept claiming she didn't like. I guess she finally changed her mind. The frozen pea thing perplexes me - the kid loves eating things straight from the freezer.

maccheese2

I haven't been able to find pipette pasta in the store before (that's the shape Panera uses) but I was at a different grocery store recently, saw it in the pasta aisle and grabbed a box to keep on hand. I was so excited to finally use it. It holds the sauce so well and the opening was the perfect size for the peas to hide.

maccheese1

This is a fantastic version of one my favorite stovetop macaroni and cheese with the added bonus of a veggie built right in. And everything is better with bacon.

Macaroni and Cheese with Bacon and Peas
As seen on So Tasty, So Yummy

1 pound small pasta (shells, elbows, pipette)
4 slices bacon
1/3 cup flour
2 1/2 cups whole milk
4 ounces white American cheese, chopped or torn into pieces
8 ounces extra sharp white Vermont cheddar, chopped or torn into pieces
2 teaspoons Dijon mustard
1 teaspoon Kosher salt
1/4 teaspoon hot sauce
1 1/2 cups frozen peas

Cook pasta according to package directions. Drain well. Return to the pot.

While the pasta cooks, cook the bacon in a medium-size pot. Drain the bacon on paper towels and crumble. Leave four tablespoons of the bacon grease in the pot and whisk in the flour; cook for 1 1/2 minutes whisking constantly. Gradually whisk in the milk until no lumps remain. Reduce the heat to medium-low and cook milk mixture, whisking frequently, until it thickens and bubbles, about 8 minutes.

Remove pan from the heat and by the handful, stir in the cheeses allowing all of the cheese to melt into the sauce before adding more. Stir in the mustard, salt, and hot sauce. Stir peas and bacon into the pot with the pasta, then add the cheese sauce. Be sure to stir up the sauce from the bottom of the sauce pan and thoroughly coat all of the pasta with sauce. Serve immediately.
Pin It!

Monday, April 08, 2013

California Club Blue Cheese Chopped Salad

Lately I've been craving salad, not a simple side salad with a few veggies but a hearty dinner salad. I've been wanting to make a chopped salad where all the ingredients are cut to uniform size and this California Club Blue Cheese Chopped Salad sounded perfect.

club salad2

What a great salad. The dressing is so simple but deliciously tangy and I loved the combination of ingredients. I knew SP wouldn't be satisfied with just the veggies and beans so I bulked it up with a roasted chicken breast and frozen corn, my new favorite salad addition. I love the pop of the kernels when I bite into them.

club salad

Baby Girl helped me cut up all the ingredients and ended up snacking on everything. I was worried about her spoiling her dinner but how do you say no when your child wants to eat veggies (answer - you don't). I was anxious to see if she would eat the salad once it was assembled and dressed and get this, she did! I gave her a big girl bowl (read: a ceramic bowl rather than her plastic ones) and she chowed down. I was so proud.

California Club Blue Cheese Chop Salad
Modified from Lauren's Latest

Salad:
2 large romaine hearts, washed and thinly sliced
1/2 pint grape tomatoes, quartered
6 slices bacon, cooked and crumbled
1 chicken breast, roasted* and cubed
1/4 cup blue cheese crumbles
1 ripe avocado, diced
1/2 cup rinsed and drained black beans
1 cup frozen corn

Dressing:
2 cloves garlic, minced
Juice of 1 large lemon, about 3 tablespoons
2/3 cup mayonnaise
Salt & pepper, to taste

Toss all ingredients for salad together and set aside.

For dressing, whisk all ingredients together and toss with salad. Serve immediately.

*Preheat the oven to 375 degrees. Spread a piece of aluminum foil across a baking sheet, and arrange chicken breasts in a single layer in the center. Sprinkle with salt and pepper. Fold the aluminum foil over the chicken breasts, and enclose them to form a "packet." Bake the chicken (on the baking sheet) 35-45 minutes, or until it is cooked through.

Pin It!

Friday, April 05, 2013

The Ultimate Stuffed Potato

The other day I caught an episode of Tyler's Ultimate and he was making The Ultimate Stuffed Potato, basically a baked potato topped with a cheese sauce mixed with bacon and broccoli. I was practically drooling watching him assemble these potatoes (which were a side dish to a steak dinner, if you can believe it). I figured the potato alone was filling enough for dinner.

stuffed potato

I made some modifications to the cheese sauce after seeing that it called for 1/2 stick of butter and only 1/2 cup of milk. I dropped the butter and flour to 2 tablespoons each and upped the milk to 1 cup to make a thinner sauce. I had to add a few splashes of milk to thin it when we were ready to eat since I made it ahead of time, so use your judgement. I also ended up mixing together the ends of a few different cheeses because I only had about 1 ounce of cheddar left in the fridge. American and a little Pecorino mixed in well and the resulting sauce was drinkably good.

I loved these potatoes and, once again, Baby Girl was stealing pieces of broccoli, bacon and cheese as we were cooking dinner. I baked her a tiny potato and she was a big fan. These are so, so good.

The Ultimate Stuffed Potato
Tyler Florence

4 large Idaho potatoes, scrubbed
Extra-virgin olive oil
Kosher salt
2 tablespoons butter
2 tablespoons flour
1 cup milk
About 1-2 cups shredded sharp white Cheddar
2 broccoli crowns cut into florets, blanched in salty water
1/2 pound bacon, medium dice, cooked until crisp
2 tablespoons chives, chopped (optional)
Freshly ground black pepper

Preheat oven to 400 degrees F.

Place potatoes onto a baking sheet. Pierce with a fork, drizzle with olive oil and season with salt. Place into preheated oven and bake for about 1 hour.

Melt the butter over medium heat and then whisking in the flour. Cook for 1 minute then add the milk. Allow to boil for 5 minutes, then off heat fold in the cheese and stir until melted. Once melted, add the cooked broccoli and bacon. Season with salt and freshly ground black pepper.

When the potatoes are done make a cut across the top and squeeze it from the bottom so a small pouch opens up and the bottom is squared off. Spoon the filling over the top of the potato and season with pepper, to taste.
Pin It!

Wednesday, April 03, 2013

Corned Beef and Cabbage with Herb Buttered Potatoes

You know what I hate - waiting to make a recipe because you have a preconceived notion of how it's going to taste (not good) only to find out you were 100% wrong. And then you kick yourself for not making it sooner and lament all those wasted meal opportunities. That's how I've felt about the meal most people associate with St. Patrick's Day - corned beef and cabbage. I love corned beef, I love cabbage, so why did I think the meal was going to be bland, boring and tasteless?

SP has hinted that he'd like corned beef and cabbage on March 17 for years, but I always balked at it. This year I finally decided to make him happy and asked for recommendations on my cooking board. This Sandra Lee recipe for Corned Beef and Cabbage with Herb Buttered Potatoes came highly recommended and sounded great.

corned beef

The only real change I made was to the cooking method. I've mentioned before that my slow-cooker and I don't get along, so I opted to make this in my trusty Dutch oven. I cooked it low and slow for 5 hours and when it came time to slice the meat was practically falling apart (in a good way). I snuck a taste off the cutting board for quality control and was floored by the amazing flavor.

Baby Girl asked for a taste of the raw cabbage and enjoyed it, so I was hopeful for the finished product. Result - she loved all of it, the corned beef, the cabbage, the potatoes and the carrots. My only complaint was the small size of the corned beef meant we had just enough for dinner and leftovers for lunch. Next time I'll buy double the size so we have enough for sandwiches.

The meat and vegetables were tender, the cabbage was flavorful and the whole thing (even the buttered potatoes) took next to no effort. I'll definitely be making this again next year - I'm a corned beef and cabbage convert for sure.

Corned Beef and Cabbage with Herb Buttered Potatoes
Slightly modified from Sandra Lee

Corned Beef:
3 pounds corned beef brisket with spice packet (larger if you want more leftovers)
4 carrots, cut into 2-inch pieces
2 medium onions, chopped
1 small head green cabbage, cored, roughly chopped
2 cups apple juice
1 cup water

Potatoes:
2 pounds baby red potatoes, sliced in 1/2
1/2 stick butter, softened
1 tablespoon chopped garlic
2 tablespoons chopped fresh parsley leaves
Salt and freshly ground black pepper

Preheat the oven to 275 degrees.

Put the carrots and onions on the bottom of a large Dutch oven, then put the corned beef on top. Arrange the chopped cabbage around the beef. Add the apple juice and water along with the contents of the spice packet. Cover and place in the oven. Cook 5 hours until the beef is tender. Remove the beef and vegetables to a platter and keep warm.

Add potatoes to a pot of salted water and bring to a boil. Cook until the potatoes are tender, about 12 to 15 minutes. Drain and return them to the pot. Add the butter, garlic, parsley, and salt, and pepper, to taste. Gently combine so that all the potatoes are evenly coated. Transfer to a serving bowl and serve with corn beef and vegetables.

Pin It!

Monday, April 01, 2013

March Re-Make Recap

Two of my favorite bloggers, Cassie from Cassie Craves and Stephanie from Stephanie Cooks, have started doing a recap at the end of the month of dishes from their blogs that they've remade that month. What a great idea - incentive for me to look back through my blog and remake some favorite recipes.


I can't remember why I got it into my head that I needed to make biscuits and sausage gravy for breakfast one weekend but I did and it was glorious. I love this recipe because of the addition of maple syrup - it brings the flavor over the top with just a little sweetness that's counterbalanced by the hot sauce. If only it wasn't so unhealthy I'd eat it more often.

Baked Chicken Burrito

These baked chicken burritos with sour cream poblano sauce are, hands down, my favorite burrito recipe. My favorite part is the sour cream poblano sauce, although the filling is also delicious. This time I made Baby Girl a little mini burrito by cutting a smaller circle out of the large tortilla. She was a big fan.

Oyster tofu

Oyster sauce tofu with bok choy is one of my favorite tofu recipes. The sauce is silky and rich and the flavors all come together beautifully. Plus it's chock-full of veggies. And the best part - Baby Girl really surprised me while we were preparing this for dinner. She's a good eater but lately she's been asking me if she can taste things when she's helping me cook, instead of me telling her she needs to try things. She sampled the raw mushrooms (I had to sub cremini for the shitake because our supermarket was out of the latter), the raw baby bok choy and the kid loves raw tofu for some bizarre reason. Then she cleaned her plate with no fuss.


Philly cheesesteak sloppy joes are, by far, the most popular recipe on my blog (thank you, Pinterest). It's been a long time since we had them so after two different blogger friends made and posted about them I figured it was time to make them again.


And every month until May when the weather gets too hot to turn my oven to 550 degrees we have homemade pizza with various toppings.


Pin It!

Friday, March 29, 2013

Recipe Swap: Chicken with Mushrooms in Balsamic Cream Sauce

Another Blogger's Choice Recipe Swap and I was lucky enough to receive Katie's blog again. I make a lot of dishes from her blog; in fact, I ended up making two different recipes. The second will post soon but I wanted to talk about this Chicken with Mushrooms in Balsamic Cream Sauce for the swap.

chickenmushrooms

When I chose this recipe I kept thinking I'd made something like it before. A quick search through my archives revealed that I did make something similar way back in 2007. That dish was served over orzo, which would be great here. I decided to do mashed potatoes and steamed broccoli since that's what Katie made, although I did add a few crushed garlic cloves to the potatoes for a mild garlic flavor.

I modified the recipe slightly, coating the chicken in seasoned flour, adding more chicken broth to increase the amount of sauce, swapping half and half for the heavy cream and leaving out the red pepper flakes since Baby Girl balks at spicy food. We all cleaned our plates.


Chicken with Mushrooms in Balsamic Cream Sauce
As seen on So Tasty So Yummy

2 boneless skinless chicken breasts
salt and pepper
2 tablespoons flour
1 tablespoon olive oil
2 tablespoons butter
1 small white onion, sliced
1 pound baby Bella Mushrooms, sliced
1 cup chicken broth
3 tablespoons balsamic vinegar
1/4 teaspoon red pepper flakes (optional)
1/4 cup half and half

Slice each chicken breast in half lengthwise. Add salt, pepper and flour to a plastic food storage bag. Add chicken and toss to coat the chicken in the seasoned flour.

Add the olive oil and butter to a large sautรฉ pan and heat over medium-high. Brown the chicken on both sides, remove to a plate. Reduce the heat to medium and add the onions and mushrooms; sautรฉ until caramelized, about five minutes.

Deglaze the pan with the chicken broth and vinegar; add the red pepper flakes, if using. Stir in the half and half. Return the chicken to the pan, cover and cook until chicken is cooked through, about 5 minutes.

Serve over rice or mashed potatoes.


Pin It!

Wednesday, March 27, 2013

Grasshopper Mint Brownie Bars

I love brownies, I love mint and I wanted to make something fun (and green) with Baby Girl for St. Patrick's Day, so I turned to this recipe for Grasshopper Mint Brownie Bars, which I had drooled over when I saw them in my Google Reader. I've been wanting to make something like this for awhile (the cream cheese layer and the frosting on top sounded utterly divine), so I was pleasantly surprised to see how easy it looked.

grasshopper brownies

These are insanely good and insanely rich. Baby Girl and I had a ton of fun making them, especially the green cream cheese layer, and she was a big fan of the finished product. I thought I was going to end up in a sugar coma after eating one bar, but man was it good. Like dream about it the next day good.

In the interest of our waistlines I sent most of the bars to work with SP where I'm told they were a BIG hit. One of his coworkers was rendered speechless and another referred to them as the baking equivalent of crack cocaine. If that isn't a stellar review I don't know what is. I froze about 3 1/2 bars and I'm hoping the cream cheese layer survives the freeze because I can't wait to have another one of these in a few weeks.

Grasshopper Mint Brownie Bars
As Seen on Stick a Fork In It, originally from Pillsbury
Yields: 24 bars

1 family size brownie mix
1/2 cup butter, softened
3 ounces cream cheese, softened
2 1/2 cups powdered sugar
1 teaspoon mint extract
Green food coloring (optional)
1 cup semisweet chocolate chips
1/3 cup butter

Prepare the brownies according to the package instructions, then cool completely.

Meanwhile, beat the 1/2 cup butter and cream cheese together in a medium bowl until light and fluffy. Add the powdered sugar, mint extract and green food coloring, if using. Spread evenly over the cooled brownies.

Place the 1 cup chocolate chips and 1/3 cup butter in a microwave safe bowl. Microwave on high for 30 seconds, stir, then microwave again for 10-15 seconds as needed until the chocolate is melted. Stir until smooth. Pour evenly over the filling, and gently spread to cover.

Refrigerate for at least 1 hour before cutting into bars. Store in the refrigerator.
Pin It!

Monday, March 25, 2013

Tex Mex Sloppy Joes

I love sandwiches for easy weeknight meals but I couldn't tell you the last time I had a Sloppy Joe. We didn't eat them growing up so they just aren't on my radar. But I had some ground beef in the freezer, a hankering for guacamole and I'd printed out Tara's recipe for Tex Mex Sloppy Joes awhile back so I decided to give them a try.

tex mex

Since I'm not a beer drinker I cut the amount of beer down to 6oz from a full 12oz bottle, which was a good call because there was plenty of beer flavor with just those 6oz.

This is a messy but yummy sandwich. A lot of my filling spilled out of the bun with my first bite. Baby Girl's sandwich had a lot less filling so she managed to eat hers without too much trouble.

This was a momentous meal for two reasons, the first being Baby Girl finally likes tomatoes and has rediscovered her love of avocados/guacamole. Avocado was one of her first foods, mashed up and fed to her with a spoon, so when she started turning up her nose at it I was sad. I absolutely love avocados and eat them plain with some salt and lemon juice frequently. I offer her new things or things she's previously disliked every time I make it - my rule is she has to try something but if she doesn't like it she doesn't have to eat it. Tomatoes have been something I've offered countless times over the years and she will dutifully take a bite, spit it back out and say "no thank you, mommy." The night I made these sandwiches I was chopping grape tomatoes for the guacamole and offered her a piece. She chewed, swallowed, asked for more and proceeded to eat most of the tomatoes I'd just finished cutting. And then later, when I'd mixed up the guacamole, she asked for a chip so I told her she needed to try the guac as well. She did, asked for more, and later asked for more with dinner. It was a banner night, I'm telling you.

Tex Mex Sloppy Joes
As seen on Smells Like Home

1 (14.5 oz) can tomato sauce
1 chipotle chile en adobo
2 teaspoons oregano
2 teaspoons ground cumin
1 teaspoon smoked paprika
1/4 teaspoon ground allspice
Pinch of cayenne
2 teaspoons Worcestershire sauce
1 1/4 lbs ground chicken, turkey, or beef
1 teaspoon canola oil
1/2 medium yellow onion, diced
2 cloves garlic, minced
6 oz beer, such as a light ale or lager
2 tablespoons ketchup
1/4 cup cilantro
1 tablespoon lime juice
Salt and black pepper to taste
4 warm hamburger buns
Guacamole
Chopped cilantro, diced onion, grated cheddar or Monterey jack

Add the tomato sauce, chipotle chile (or powder), oregano, ground cumin, smoked paprika, allspice, cayenne and Worcestershire sauce to a blender or food processor and puree until smooth.

Brown the ground meat in a large skillet over medium heat, stirring occasionally until browned, about 10 minutes. Drain off the fat. Warm the canola oil in the pan with the browned meat then add the onions and cook until soft, about 5 minutes. Add the garlic and cook for an additional 30 seconds. Pour the tomato mixture into the skillet along with the beer, ketchup and cilantro. Stir until well combined.

Bring to a low simmer over medium heat then reduce the heat to medium-low heat and cook uncovered for 15 minutes or until the mixture thickens. Stir in the lime juice. Season with salt and pepper to taste. Serve on warm buns with guacamole and other add-ons, if desired.
Pin It!

Friday, March 22, 2013

Potato Pancakes

It isn't often that I see a picture of something and need to make it immediately but sometimes that craving packs a powerful punch. Melissa posted these Potato Pancakes recently and the photo alone made me start salivating. I just happened to have some leftover baked potato in the fridge from the Cheesy Buffalo Chicken Stuffed Potatoes so I whipped these up for lunch.

potato pancake

Holy yum is all I have to say. I used the flesh of maybe one potato to make two pancakes and with a little sour cream and applesauce these truly hit the spot. Melissa's version with grated potato and onion is more like the latkes my grandmother makes but mine were still nice and crispy, just softer inside.

Potato Pancakes
Slightly adapted from I Was Born to Cook, originally from Allrecipes
Makes two pancakes

1 baking potato, cooked and peeled
1/2 small onion, grated
1 1/2 teaspoons cornstarch
salt and pepper
1 1/2 teaspoons flour
vegetable oil for frying
applesauce and sour cream, for serving

Mash the flesh of the potato with the grated onion in a bowl. Mix in the cornstarch, salt and pepper and flour.

Heat 1/4 inch of vegetable oil in a non-stick skillet over medium high heat. Divide potato mixture into two patties and add to the pan. Flatten with a spatula to make 1/2 inch thick pancakes. Fry until golden brown, turning once.

Transfer to a paper towel lined plate to drain. Serve with applesauce and sour cream.
Pin It!

Wednesday, March 20, 2013

Cheesy Buffalo Chicken Stuffed Potatoes

We love anything buffalo chicken and it had been awhile since I'd made anything with those flavors when Mary Ellen chose Ashley's recipe for Cheesy Buffalo Chicken Stuffed Potatoes for a recent recipe swap. A baked potato stuffed with creamy, cheesy buffalo chicken? Sold!

buffalo chicken3

This was a meal that almost didn't happen. I had it on the meal plan for a Monday so Sunday morning I went into the freezer looking for chicken breasts only to discover we were out of chicken. Ooops. Monday I went to the grocery store to pick up a rotisserie chicken, got home and realized we were out of Frank's hot sauce. Nothing to do at that point but sub another dinner from later in the week and push these back. Not a big deal, really, but frustrating when I'd been practically salivating over these potatoes all day.

buffalo chicken2

My baking potatoes were more medium-sized but I still managed to fill 4 of them and have leftover filling, so I froze it for another time. I'm glad my potatoes were on the small side - the filling is quite rich and I wasn't able to finish my potato.

To tie the theme together I made a quick salad of celery, shredded carrot, grape tomatoes, romaine and blue cheese crumbles with ranch dressing. It was the perfect accompaniment.

Cheesy Buffalo Chicken Stuffed Potatoes
As seen on Mary Ellen’s Cooking Creations, originally from Cheesecurd in Paradise

4 baking potatoes
2 chicken breasts, cooked and shredded
6 oz cream cheese
1/4 cup Frank's Red Hot
2 tablespoons ranch dressing
1/2 cup shredded mozzarella cheese
1/3 cup blue cheese crumbles
1/2 cup shredded cheddar cheese

Preheat your oven to 375 degrees.

Bake the potatoes or heat in the microwave until tender (mine took 25 minutes in 5 minute intervals since I was cooking four). When they are done, allow to cool slightly then cut off the top and gently scoop out the insides, saving the potato flesh for another time, to make a well for the filling.

Mix the shredded chicken, cream cheese, hot sauce, ranch dressing, mozzarella cheese and 1 tablespoon blue cheese.

Place the potatoes on a baking sheet lined with tin foil and spoon the chicken mixture into the potatoes. Top with the cheddar cheese and the remaining blue cheese crumbles.

Bake for about 20 minutes to melt the cheese.
Pin It!

Tuesday, March 19, 2013

GIVEAWAY: Land O Lakes® "Kitchen Simplifiers" (CLOSED)

This giveaway is now closed. The winner is Wendy. Please check your email to claim your prize.

It's time for a giveaway! Recently I was contacted by Land O Lakes® to sample their Butter with Canola Oil, which is made with only three ingredients: sweet cream, canola oil and salt and is spreadable straight from the fridge (which comes in handy when you're making grilled cheese).

3SI_BloggerLogo

I've used the butter on toast, for grilled cheese and in baking and I really appreciate knowing there are no artificial ingredients.

15_bwco

Land O Lakes® has offered one lucky reader the “Kitchen Simplifiers” Kit. This kit includes multi-purpose spreaders, an over-the-sink cutting board with colander, and multi-tier oven rack. This giveaway will run until Friday, March 22 at 12:00am. Winner will be announced by 11:00am on March 22.

3SI_BlogGiveaway_020613

a Rafflecopter giveaway


Disclosure: I received a product sample for Land O Lakes® Butter with Canola Oil for review purposes. All opinions are my own.
Pin It!

Monday, March 18, 2013

Broccoli Pesto Pasta

As soon as I saw Annie's recipe for Broccoli Pesto Pasta in Google Reader I knew I needed to make it ASAP. Broccoli is one of our favorite veggies and I loved the idea of pureeing it into a sauce rather than leaving it whole. I don't know about you but I get into a rut with veggies and how I prepare them so this was a refreshing twist.

broccoli pasta

Like almost every working parent I love easy weeknight meals and this fits the bill. Prepping the broccoli probably took the most amount of time and even though the ingredient list is short this packs a great flavor punch between the onion, garlic and red pepper flakes. Baby Girl kept sneaking pieces of the blanched broccoli before I added it to the sauce. Proud mama moment right there.

broccoli pasta1

Like Annie's kids, Baby Girl gobbled up her serving and asked for more. I cut down on the red pepper flakes because I didn't want it to be too spicy and 1/4 teaspoon was plenty for our tastes. SP wasn't sure how he felt about the pureed broccoli sauce so I think next time I might keep a few pieces of broccoli aside to toss in at the end to appease him.

broccoli pasta2

I wanted to give a quick shout-out to the end of daylight savings time. I was able to photograph dinner outside for the first time in months. Cue happy dance.

Broccoli Pesto Pasta
As seen on Annie’s Eats

1 lb. broccoli crowns
1 lb. pasta
2 tablespoons unsalted butter
2 tablespoons olive oil
1 small onion, finely chopped
3-4 cloves garlic, minced or pressed
1/4 teaspoon red pepper flakes
1 teaspoon salt
1/2 cup half-and-half
Freshly ground black pepper, to taste
Grated Parmesan, for serving

Bring a large pot of water to boil. Meanwhile, chop the broccoli crowns into florets. Use a vegetable peeler to remove the tough outer skins of the broccoli stems, and chop the stems into ½-inch discs. When the water is boiling, add the broccoli to the water to boil briefly just until fork-tender, about 3-4 minutes. Remove to a bowl, leaving the water in the pot. (Use a skimmer or strainer to remove the broccoli if you boiled it.)

Maintain the water at a boil. Add the pasta to the pot and cook according to the package directions until al dente. Reserve 1½ cups of the pasta water and then drain the pasta well. Set aside.

Return the pot to the heat. Add the butter and olive oil to the pot over medium-high heat, heating until the butter is melted. Add the onion to the pot and cook, stirring occasionally, until the onion is tender, about 5 minutes. Stir in the garlic, red pepper flakes and salt and cook 1-2 minutes more. Return the cooked broccoli to the pan and cook 1-2 minutes more to heat through. Season with pepper to taste.

Transfer the broccoli mixture to a food processor or blender. Pulse in short bursts, scraping down the sides as needed, until the mixture is finely chopped. Add in the cream and process until smooth. If needed, add the reserved pasta water a little bit at a time just until the sauce is smooth and creamy. (Don’t overdo it – you don’t want a watery sauce!) Season with freshly ground pepper to taste. In a large bowl (or in the pot), toss the pasta with the sauce. Serve with freshly grated Parmesan.


Pin It!

Friday, March 15, 2013

Recipe Swap: Easy Fudgey Brownies

I can't decide whether I like the themed recipe swaps or the Blogger's Choice swaps better. As nice as it is to pick whatever I feel like making from my assigned blog, the themed ones usually end up challenging me, which is a big part of the reason I enjoy the swaps.

Take this theme for instance - dessert. You all know I'm not a baker so this is usually a tough theme for me. I had a heck of a time finding something to submit but I was very excited to receive Dawn's recipe for Easy Fudgey Brownies. For some reason I've really been craving brownies lately so this was perfect.

brownies

I was excited to see how easy this recipe was to make. Mix ingredients, pour into baking dish, bake, serve. Easy peasy. And they were amazing, very fudgey and dense, with great chocolate flavor that made me wish I had some vanilla ice cream on hand.

My dad and stepmom were visiting when I made these so they both had a taste and my stepmom, a chocoholic, pronounced them perfect. She also gave me a tip about freezing the leftovers, which was great because now I have half the pan in my freezer in individual wrappers so I can take one out to enjoy whenever I want (which I already did...twice).


Easy Fudgey Brownies
As seen on Simple Gourmet Cooking

1/2 cup (1 stick) unsalted butter, plus more for pan
1 1/3 cups bittersweet chocolate, coarsely chopped (or semi sweet chocolate chips)
1 cup sugar
4 large eggs
1 teaspoon pure vanilla extract
3/4 cup all-purpose flour
1/4 teaspoon salt

Preheat oven to 350 degrees. Butter an 8-inch square baking pan or heatproof glass dish. Line pan with parchment paper, leaving a 1-inch overhang on 2 sides. Set aside.

Place butter and chocolate in a large heatproof bowl set over (but not touching) simmering water; stir frequently until chocolate and butter are melted, about 7 minutes. Alternatively, place butter and chocolate in a microwave safe bowl, and microwave in 30 second intervals, stirring in between, until chocolate and butter are melted.

Remove bowl from heat; let cool to room temperature, 10 to 15 minutes.

Stir sugar into cooled chocolate mixture until combined. Whisk in eggs one at a time, whisking until smooth after each addition. Whisk in vanilla. Gently fold in flour and salt.

Pour batter into prepared pan, and smooth top with an offset spatula. Bake until cake tester inserted in the center comes out with only a few moist crumbs attached, 40 to 45 minutes. Transfer pan to a wire rack to cool completely.

Run a knife or offset spatula around the edges of the pan. Using parchment, lift brownies out of pan and onto the rack. Transfer to a cutting board; cut into 2-inch squares.


Pin It!

Wednesday, March 13, 2013

Pasta with Sausage, Tomato and Corn

This is one of those dinners I threw together after realizing half the ingredients I was planning to use had gone bad. My original plan was to make Mary Ellen's Pasta with Chorizo, but the chorizo had reached a birthday and the red pepper was moldy. Luckily I had some grape tomatoes and Italian sausage in the freezer so I decided to wing it.

pasta with sausage

I seasoned the dish with some creole seasoning to try to mimic the flavors in the chorizo and thought I'd toss in some frozen corn. This ended up being a little too spicy for Baby Girl but SP and I really enjoyed it.

Pasta with Sausage, Tomato and Corn
A Taste of Home Cooking Original

8 ounces short cut pasta
Kosher salt
1 tablespoon extra-virgin olive oil
8 ounces Italian sausage, casings removed
2 scallions, thinly sliced
2 cloves garlic, thinly sliced
8 ounces mushrooms, sliced
Creole seasoning, to taste
2 cups cherry or grape tomatoes, halved
1/2 cup low-sodium chicken broth
1/2 cup grated Parmesan cheese, plus more for serving
Salt and pepper, to taste

Cook pasta according to package directions, reserving one cup of pasta cooking water once done. Drain and set aside.

Meanwhile, in a large skillet, heat the olive oil over medium heat. Add the sausage and cook for about three minutes, breaking the meat up with a wooden spoon, until it's starting to brown.

Add the scallions to the skillet, and cook for three minutes, until softened, stirring occasionally. Add the garlic, mushrooms and creole seasoning to taste. Cook another 3 minutes, until the mushrooms are soft and the sausage is cooked through.

Add the tomatoes to the skillet, and cook until starting to soften, about another 3 minutes. Add the chicken broth and heat for a minute. Stir in the pasta and the cheese, adding some of the reserved pasta cooking water if needed. Season with salt and pepper, if needed, then toss to combine.
Pin It!

Monday, March 11, 2013

Roasted Red Pepper Alfredo Pasta

SP had a work event recently, which meant he wouldn't be home for dinner. When I'm on my own I like to make things he doesn't like so I can enjoy them without feeling guilty that he's only tolerating his dinner. This Roasted Red Pepper Alfredo Pasta was right up my alley - creamy goat cheese, roasted red peppers and artichokes combine to make a luscious sauce for fettuccine.

roasted red pepper pasta

This did not disappoint and as an added bonus it was ready in mere minutes. The pasta water hadn't even come to a boil and the sauce was already done. I love easy weeknight meals like this - too bad SP wouldn't have been a fan. Baby Girl, on the other hand, yummed it up. Score one for the ladies in the house.

Roasted Red Pepper Alfredo Pasta
Marcus Samuelsson

1/2 lb pasta (I used fettuccine)
1 tablespoon olive oil
1 clove garlic, grated
1/2 cup half and half
4 oz goat cheese
1/4 cup Parmigiano Reggiano cheese, grated
3 roasted red bell peppers , coarsely chopped
salt and pepper, to taste
1 handful basil
8 oz artichoke hearts, cut into quarters

Cook the pasta according to package directions. Drain and reserve.

Heat the olive oil in a medium pot over medium heat. Add the garlic and cook until fragrant, about one minute.

Add the half and half, goat cheese, Parmesan and roasted red peppers and simmer until the cheese is melted. Remove from heat, season with salt and pepper and add the basil. Puree with an immersion blender or food processor. Add in the chopped artichoke hearts.

Toss the pasta with the sauce and serve immediately.

Pin It!

Friday, March 08, 2013

Cajun Ranch Chicken Sandwiches

I love a good chicken sandwich and I've had this recipe for Cassie's Cajun Ranch Chicken Sandwiches printed out for awhile. When cleaning out the pantry recently I found some Tony Chachere's seasoning that my friend Amy sent me awhile back, so I finally put these sandwiches on the menu.

cajunchicken

These had a great kick from the creole seasoning and you can't go wrong with bacon, cheddar and Ranch dressing. Simple and delicious.

Cajun Ranch Chicken Sandwiches
As seen on Cassie Craves

4 strips of bacon, halved
2 boneless skinless chicken breasts, halved and pounded thin
Cajun or creole seasoning
4 slices cheddar cheese
Ranch dressing
4 sandwich buns, split and toasted
Lettuce and tomato, for serving

Add the bacon to a large skillet and cook over medium heat to desired crispness. Remove to paper towels to drain.

Season chicken generously with Cajun seasoning. In the same skillet you used for the bacon, cook the chicken until browned and cooked through.

To serve, place chicken on the bottom half of a bun and top with a slice of cheese, two pieces of bacon, and a drizzle of ranch dressing. Top with lettuce and tomato and serve.
Pin It!

Wednesday, March 06, 2013

Mexican Eggs With Chorizo and Beans

I rarely make breakfast for dinner because we take leftovers for lunch and eggs don't reheat well. But when I saw this recipe for Mexican Eggs With Chorizo and Beans I wanted to try it, so I planned it for the night before SP had a working lunch.

mexican eggs2

This was a good dish that could be better with some tweaking. The texture of my eggs wasn't as creamy as the magazine's photo, which made me think there were too many chips in my eggs. I decreased the amount in the recipe below. SP couldn't find dried chorizo in our supermarket so I subbed regular chorizo. Unfortunately it got lost in the eggs, so I upped the amount to 2 links below. I also had to leave out the cilantro because I forgot to ask SP to buy a new bunch and the stuff in the fridge had gone bad.

I really did enjoy this dish, especially with the creamy avocado and sour cream mixed with the eggs. I added some diced tomato for color and freshness and it was great.

Mexican Eggs With Chorizo and Beans
Slightly modified from Food Network Magazine

2 links chorizo, diced
1 medium red bell pepper, chopped
1 jalapeno pepper, chopped (remove seeds for less heat)
1 14-ounce can no-salt-added pinto beans, drained and rinsed
3 scallions, sliced
6 large eggs plus 2 egg whites
Kosher salt and freshly ground pepper
1/2 cup crushed baked tortilla chips
3/4 cup shredded low-fat cheddar cheese (about 3 ounces)
2 tablespoons chopped fresh cilantro
1 avocado, pitted, peeled and sliced
2 tablespoons low-fat sour cream
1 small tomato, diced

Cook the chorizo in a large nonstick skillet over medium heat until it just begins to brown, about 3 minutes. Add the bell pepper and jalapeno and cook, stirring occasionally, until they begin to sizzle, about 5 minutes. Add the beans and half of the scallions and cook, stirring occasionally, until heated through, about 4 minutes.

Whisk the whole eggs and egg whites with 1/4 cup water and 1/8 teaspoon each salt and pepper in a bowl; add to the skillet and cook, stirring with a rubber spatula, until just beginning to set, about 2 minutes. Add the chips, cheese, half of the cilantro, and the remaining scallions and continue cooking, stirring, until the eggs are just set, about 3 more minutes.

Divide the eggs among plates and top with the avocado, sour cream, tomato, and remaining cilantro.
Pin It!

Monday, March 04, 2013

Pizza Friday: Fig-Prosciutto Pizza with Arugula

In the winter we usually have homemade pizza on Fridays. I buy the dough from a local Italian bakery and Baby Girl helps me roll it out and add the toppings. We usually stick with simple toppings like pepperoni, mushrooms, sausage or black olives (or some combination). It's a lot of fun to involve Baby Girl in the process - she always wants to sample everything and her favorite part is pressing down the dough to get out the air bubbles.

figpizza2

I had some fig jam leftover from the Baguette with Prosciutto, Gorgonzola and Fig Jam I made for New Year's Eve and no idea how to use it. Then I stumbled upon this recipe for Fig-Prosciutto Pizza with Arugula that combined a lot of my favorite ingredients into one pizza.

figpizza

Baby Girl loved the fig jam straight from the jar but wasn't a fan of the finished pizza. I was also unsure of how I felt about it, although SP loved it. The fig jam is super sweet, the prosciutto is gamey and the arugula tended to fall off as I was eating it. I think this would be good for a party where you're eating smaller pieces - a little goes a long way.

Fig-Prosciutto Pizza with Arugula
Ree Drummond (aka The Pioneer Woman)

1 ball pizza dough
2 tablespoons olive oil
Kosher salt
6 to 8 tablespoons fig spread or jam
12 ounces fresh mozzarella, sliced thin
Freshly ground black pepper
6 ounces thinly sliced prosciutto
1 bunch washed and rinsed arugula
1 cup shaved Parmesan

Preheat the oven to 500 degrees, with a pizza stone on the oven rack in the lowest position.

Roll out the pizza dough on a lightly floured surface. Drizzle lightly with the olive oil and sprinkle with salt. Spread the fig spread over the surface of the dough. Lay the slices of mozzarella on top of the jam. Sprinkle lightly with salt and pepper. Bake the pizza until the crust is golden and the cheese is bubbly, 12 to 15 minutes.

Remove from the oven and immediately drape the prosciutto slices over the hot pizza. Sprinkle generously with the arugula and Parmesan shavings. Cut into wedges or squares and serve immediately.
Pin It!

Friday, March 01, 2013

Recipe Swap: Gouda Bacon Cheeseburgers

I was given Nichole's blog, The Cookaholic Wife, for the latest round of the Blogger's Choice recipe swap. I star many of her posts in Google Reader so I knew I'd have a tough time picking something to make. I couldn't decide between these cannoli cupcakes, or the bacon jalapeno popper grilled cheese, or the tomato stack salad with corn and avocado (which I'll be making as soon as tomatoes are in season). I knew I needed to go back to my usual method for these swaps - picking an ingredient like ground beef and seeing what's on the blog.

Despite Nichole's claim to not make a lot of burgers I found a few that sounded incredible and ultimately let SP choose. He picked the Gouda Bacon Cheeseburgers.

gouda burger

I cooked the onions in the morning since they take the longest amount of time. The original recipe called for 3 tablespoons of steak sauce but I only used one - my onions cooked way down and more than 1 tablespoon seemed like too much and I didn't want the flavor to be overpowering.

bacon gouda burger

This is one huge, messy, delicious burger. This was my first time buying smoked Gouda and I loved the flavor. Baby Girl and I split a piece before topping the burgers. I could really taste the smokiness of the cheese and the sweetness of the onions.


Gouda Bacon Cheeseburgers
As seen on The Cookaholic Wife, adapted from Cassie Craves, inspired by Rachael Ray

1 1/2 lb. ground beef
1 teaspoon Worcestershire sauce
Salt and pepper
1 tablespoon butter
1 tablespoon olive oil
2 onions, thinly sliced
1 tablespoon brown sugar
1 tablespoon steak sauce
4 slices bacon, cooked
4 slices smoked gouda cheese
4 hamburger buns, toasted
Lettuce, tomato, mayonnaise, for serving

Combine the ground beef, Worcestershire sauce, salt and pepper and form into 4 patties. Refrigerate until ready to use.

Melt the butter and olive oil in a medium saucepan over medium-low heat. Add the onions and brown sugar and cook until lightly caramelized, about 20-25 minutes. Once the onions have caramelized, stir in the steak sauce until coated. Remove from the heat.

Preheat a grill or grill pan and, once hot, place the burgers on the grill and cook for 3-4 minutes per side, depending on their thickness. Place a slice of cheese on top of each burger and allow to melt.

Spread mayonnaise on both sides of each toasted roll. Place the burger on the bottom of the roll, top with lettuce and tomato, a slice of bacon cut in half and a generous topping of the smothered onions.

Click on the links below to see other recipes from the swap.


Pin It!