It's the end of February!! Woohoo!! Next weekend is daylight savings time. In three weeks we'll be celebrating the first day of spring. Yes, a big swath of the country is expecting continued cold temps and more snow over these next few weeks but I'm looking at the big picture - we're almost done with winter, at least officially. And after this brutal winter I'll take whatever I can get.
February was another delicious, if short, month in our house.
I don't remember the last time I made these Hawaiian chicken sandwiches but it's been too long. This is one of my all-time favorite sandwiches and I'm happy to report that Baby Girl loved them as well. In the past she hasn't liked the pineapple on top but this time she was a big fan.
We brought the rest of the eggplant rollatini to my parent's house for dinner one Sunday. I have to say, the dishes in the freezer were even better than the one I served the night I made it. And all we had to do was pop them in the oven to heat up and dinner was served.
I'm sure you all know by now that these citrus chicken burritos are my favorite Mexican dish to make at home. I just wish it wasn't so time-consuming to prep all the ingredients.
And, of course, you know I served the burritos with refried beans.
I was looking back through my archives for a ground beef recipe to change things up and remembered this skillet beef stroganoff. This is a family favorite and SP and Baby Girl were both happy to see it back on the meal plan.
Whenever I serve sandwiches these days I have to make these oven roasted potatoes. They're perfect every time.
I think these crispy fish sandwiches are my new favorite way to serve fish. The sauce is incredible and the crispy fish is delicious.
Another family favorite, this skillet spaghetti and meatballs is always a winner with SP and Baby Girl.
I wanted to make something different with a pork tenderloin I had in the freezer and remembered this orange and rosemary pork tenderloin. The sauce is what makes this recipe so incredible.
We all loved this broccoli cheddar risotto. I'm so glad SP decided he likes risotto after all.
I had more overripe bananas I needed to use up so, of course, I made another batch of these banana chocolate chip muffins.
Of course I made this Texas Roadhouse knockoff salad multiple times throughout the month. We brought it for my parent's house with the eggplant rollatini and my mom said it really is the best salad.
Another one from the archives, this chicken broccoli stir fry is a great way to enjoy Chinese food without getting takeout.
I made a double batch of the spicy pork and asparagus stir fry so I could freeze individual portions for lunches. I love serving it over angel hair when I don't have anything for lunch.
Asparagus was super cheap recently so I bought two bunches without having a plan for what to make. SP asked me to make this springtime pasta since it's a pantry staple. I forgot how much I love this dish and can't wait to make it again.
Friday, February 28, 2014
Wednesday, February 26, 2014
Triple Chocolate Cookies
SP is making an effort to get back into the kitchen, at least on weekends. During the week he gets home from work so late I have to have dinner already prepared. We take dinner to my parent's house every Sunday so that's usually a good opportunity for him to make something.
We usually shy away from desserts but he's been itching to make cookies after he came across this recipe for Triple Chocolate Cookies on an app he has on his phone.
He decided at 2pm that he wanted to make these so we had to soften the butter in the microwave. As a result, the first batch of cookies spread a bit. I told him to refrigerate the dough and he ended up baking the rest of them while I watched the Downton Abbey season finale (sob!!) I've modified the instructions to include chilling the dough as well as allowing the cookies to cool on the baking sheet for a few minutes before removing them to a cooling rack.
These are incredible. I'm actually a little annoyed that he made them because they're so good and we certainly don't need sweets sitting around the house tempting us. Since I don't like white chocolate he used 2 cups of regular chips, but I think a peanut butter or cinnamon chip (or even a mint chip, if they make those) would be great in these. Since Baby Girl is allergic to nuts peanut butter chips aren't an option for us, but I did spread some peanut butter on one of the cookies and it was delicious.
Triple Chocolate Cookies
As seen on All the Cooks
1 cup butter (2 sticks), softened
2 cups sugar
2 large eggs
2 teaspoons vanilla
1 teaspoon baking soda
1/2 teaspoon salt
1 1/2 cup flour
2/3 cup cocoa
1 cup milk chocolate chips
1 cup white chocolate chips
1/4 cup sugar, for topping
Preheat oven to 350°F.
In a large bowl, cream together the butter and sugar until fluffy using a hand mixer on medium speed. You could also do this in a stand mixer. Add the eggs, one at a time, and beat until evenly incorporated.
Add the vanilla, baking soda and salt. Beat on medium speed for 15 seconds.
Add the cocoa and stir by hand using a wooden spoon. Add the flour and mix to incorporate. Fold in the chocolate chips. Turn the dough out onto a piece of plastic wrap. Wrap tightly and refrigerate for 30 minutes. You can also leave it overnight.
Drop tablespoons of the dough onto an ungreased cookie sheet. Leave at least 2" between the cookies.
Place the 1/4 cup of sugar on a small plate. Dip the bottom of a drinking glass into the unused cookie dough to get it moist (you only need to do this once) then dip the bottom of glass in the plate of sugar. Lightly press the glass down on each mound of cookie dough to flatten it. Repeat for each cookie.
Bake the cookies for 8 minutes. Allow to cool on the baking sheet for 5 minutes before removing them to a wire rack to cool.
We usually shy away from desserts but he's been itching to make cookies after he came across this recipe for Triple Chocolate Cookies on an app he has on his phone.
He decided at 2pm that he wanted to make these so we had to soften the butter in the microwave. As a result, the first batch of cookies spread a bit. I told him to refrigerate the dough and he ended up baking the rest of them while I watched the Downton Abbey season finale (sob!!) I've modified the instructions to include chilling the dough as well as allowing the cookies to cool on the baking sheet for a few minutes before removing them to a cooling rack.
These are incredible. I'm actually a little annoyed that he made them because they're so good and we certainly don't need sweets sitting around the house tempting us. Since I don't like white chocolate he used 2 cups of regular chips, but I think a peanut butter or cinnamon chip (or even a mint chip, if they make those) would be great in these. Since Baby Girl is allergic to nuts peanut butter chips aren't an option for us, but I did spread some peanut butter on one of the cookies and it was delicious.
Triple Chocolate Cookies
As seen on All the Cooks
1 cup butter (2 sticks), softened
2 cups sugar
2 large eggs
2 teaspoons vanilla
1 teaspoon baking soda
1/2 teaspoon salt
1 1/2 cup flour
2/3 cup cocoa
1 cup milk chocolate chips
1 cup white chocolate chips
1/4 cup sugar, for topping
Preheat oven to 350°F.
In a large bowl, cream together the butter and sugar until fluffy using a hand mixer on medium speed. You could also do this in a stand mixer. Add the eggs, one at a time, and beat until evenly incorporated.
Add the vanilla, baking soda and salt. Beat on medium speed for 15 seconds.
Add the cocoa and stir by hand using a wooden spoon. Add the flour and mix to incorporate. Fold in the chocolate chips. Turn the dough out onto a piece of plastic wrap. Wrap tightly and refrigerate for 30 minutes. You can also leave it overnight.
Drop tablespoons of the dough onto an ungreased cookie sheet. Leave at least 2" between the cookies.
Place the 1/4 cup of sugar on a small plate. Dip the bottom of a drinking glass into the unused cookie dough to get it moist (you only need to do this once) then dip the bottom of glass in the plate of sugar. Lightly press the glass down on each mound of cookie dough to flatten it. Repeat for each cookie.
Bake the cookies for 8 minutes. Allow to cool on the baking sheet for 5 minutes before removing them to a wire rack to cool.
Monday, February 24, 2014
Hoisin Pork with Rice Noodles
A few weeks ago we restocked our freezer with frozen pizza dough and realized something very important - our freezer isn't very big. We have one of those French-door, freezer-on-the-bottom contraptions and there just isn't that much freezer space down there. I also tend to horde things like half-eaten loaves of bread, bananas and single servings of pasta sauce with the very good intention of using them up while really all I'm doing is taking up valuable freezer space that could be used for banana chocolate chip muffins, egg bake or breakfast burritos.
SP told me it was time to do a purge. He challenged me to only cook from the freezer until it became more manageable. I like a good challenge so off I went, searching through the freezer bags to see just what was in there that I could use to feed my family for the week. I found two lonely pork chops and immediately thought of this recipe for Hoisin Pork with Rice Noodles.
The original recipe calls for thinly sliced pork tenderloin but I just thinly sliced the chops and it worked out perfectly. This was such a simple dish I wasn't sure if we'd like it but we all loved it. Baby Girl was especially fond of it - the kid loves carrots, bless her - and any pasta dish is guaranteed to be a winner, even if they're rice noodles.
Hoisin Pork with Rice Noodles
As seen on So Tasty, So Yummy
1/3 cup low-sodium soy sauce
1/4 cup water
2 tablespoons olive oil
2 tablespoons sugar
1 teaspoon fish sauce
3 tablespoons rice vinegar
3 tablespoons hoisin sauce
juice of half a lime
2 cloves garlic, finely minced
1 teaspoon - 1 tablespoon Sriracha, to taste
1 lb pork tenderloin, cut into thin strips
10 oz dry rice noodles
2 carrots, peeled and grated
2 tablespoons minced cilantro
In a medium bowl, whisk together the soy sauce, water, oil, sugar, fish sauce, vinegar, hoisin, lime juice, garlic and Sriracha. Add pork and turn to coat pork pieces; cover and allow to marinate overnight in the fridge.
Heat a skillet over medium-high heat. Once hot, add the pork and the marinade. Cook until the pork until cooked through, about 6-8 minutes.
Meanwhile, prepare the noodles per the package instructions. Drain and toss the cooked noodles, carrots and cilantro with the cooked pork and sauce. Serve immediately.
SP told me it was time to do a purge. He challenged me to only cook from the freezer until it became more manageable. I like a good challenge so off I went, searching through the freezer bags to see just what was in there that I could use to feed my family for the week. I found two lonely pork chops and immediately thought of this recipe for Hoisin Pork with Rice Noodles.
The original recipe calls for thinly sliced pork tenderloin but I just thinly sliced the chops and it worked out perfectly. This was such a simple dish I wasn't sure if we'd like it but we all loved it. Baby Girl was especially fond of it - the kid loves carrots, bless her - and any pasta dish is guaranteed to be a winner, even if they're rice noodles.
Hoisin Pork with Rice Noodles
As seen on So Tasty, So Yummy
1/3 cup low-sodium soy sauce
1/4 cup water
2 tablespoons olive oil
2 tablespoons sugar
1 teaspoon fish sauce
3 tablespoons rice vinegar
3 tablespoons hoisin sauce
juice of half a lime
2 cloves garlic, finely minced
1 teaspoon - 1 tablespoon Sriracha, to taste
1 lb pork tenderloin, cut into thin strips
10 oz dry rice noodles
2 carrots, peeled and grated
2 tablespoons minced cilantro
In a medium bowl, whisk together the soy sauce, water, oil, sugar, fish sauce, vinegar, hoisin, lime juice, garlic and Sriracha. Add pork and turn to coat pork pieces; cover and allow to marinate overnight in the fridge.
Heat a skillet over medium-high heat. Once hot, add the pork and the marinade. Cook until the pork until cooked through, about 6-8 minutes.
Meanwhile, prepare the noodles per the package instructions. Drain and toss the cooked noodles, carrots and cilantro with the cooked pork and sauce. Serve immediately.
Labels:
asian,
carrots,
easy weeknight meal,
pork,
toddler-approved
Friday, February 21, 2014
Breakfast Risotto
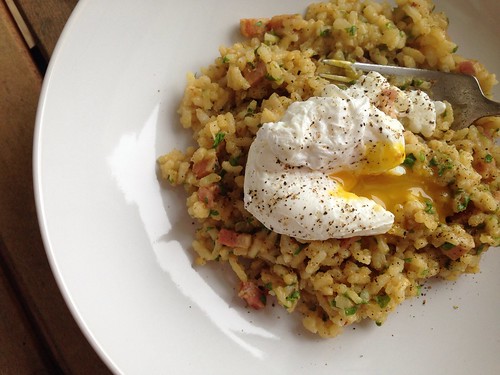
I've been on a major risotto kick lately so, naturally, as soon as Elly posted this drool-inducing Breakfast Risotto on our cooking board I immediately added it to the meal plan.
I'm a sucker for runny eggs so topping risotto with a runny egg is right up my alley. Initially I was going to use bacon in this recipe but I needed pancetta for the salad I was going to serve with it so I figured I'd give the pancetta a shot. In the future I'll probably stick with bacon since half a pound of pancetta was more expensive than a pound of bacon, plus I missed the smokiness.
Either way, this is a great recipe. We all loved it - Baby Girl was popping the crispy pancetta into her mouth like candy.
Breakfast Risotto
As Seen on Elly Says Opa!
4-6 cups chicken broth
2 tablespoons butter, divided
3 oz. pancetta, chopped
1 shallot, diced
1 clove garlic, minced
1 1/4 cups arborio rice
1/3 cup dry white wine
1/2 cup grated Pecorino Romano or Parmesan cheese
Fresh chopped parsley, minced (optional)
Poached eggs for serving
Pour the broth into a saucepan and bring it to a boil over medium-high heat. Reduce the heat so the broth is at a simmer.
In a heavy-bottomed skillet, melt 1 tablespoon of the butter. Add the pancetta and cook until it has crisped and rendered its fat. Remove with a slotted spoon and set aside.
Melt the remaining butter into the pan, and then add the shallot. Cook until tender, then stir in the garlic just until fragrant, about 30 seconds. Stir in the rice, coating with the butter and toasting the kernels until they are translucent, about 2 minutes.
Add the wine to the pan. Scrape up any browned bits and allow nearly all of the wine to be absorbed by the risotto. Add a ladle-full of warm chicken broth to the rice. Stir frequently and do not add another ladle of broth until the first is almost completely absorbed. Continue to stir frequently, adding broth by the ladle, until the rice is creamy and has just a slight bite in the center when you try it. This will take about 25 minutes.
Off the heat, stir in the cheese and pancetta. Season to taste with salt and pepper and serve immediately with poached eggs on top.
I'm a sucker for runny eggs so topping risotto with a runny egg is right up my alley. Initially I was going to use bacon in this recipe but I needed pancetta for the salad I was going to serve with it so I figured I'd give the pancetta a shot. In the future I'll probably stick with bacon since half a pound of pancetta was more expensive than a pound of bacon, plus I missed the smokiness.
Either way, this is a great recipe. We all loved it - Baby Girl was popping the crispy pancetta into her mouth like candy.
Breakfast Risotto
As Seen on Elly Says Opa!
4-6 cups chicken broth
2 tablespoons butter, divided
3 oz. pancetta, chopped
1 shallot, diced
1 clove garlic, minced
1 1/4 cups arborio rice
1/3 cup dry white wine
1/2 cup grated Pecorino Romano or Parmesan cheese
Fresh chopped parsley, minced (optional)
Poached eggs for serving
Pour the broth into a saucepan and bring it to a boil over medium-high heat. Reduce the heat so the broth is at a simmer.
In a heavy-bottomed skillet, melt 1 tablespoon of the butter. Add the pancetta and cook until it has crisped and rendered its fat. Remove with a slotted spoon and set aside.
Melt the remaining butter into the pan, and then add the shallot. Cook until tender, then stir in the garlic just until fragrant, about 30 seconds. Stir in the rice, coating with the butter and toasting the kernels until they are translucent, about 2 minutes.
Add the wine to the pan. Scrape up any browned bits and allow nearly all of the wine to be absorbed by the risotto. Add a ladle-full of warm chicken broth to the rice. Stir frequently and do not add another ladle of broth until the first is almost completely absorbed. Continue to stir frequently, adding broth by the ladle, until the rice is creamy and has just a slight bite in the center when you try it. This will take about 25 minutes.
Off the heat, stir in the cheese and pancetta. Season to taste with salt and pepper and serve immediately with poached eggs on top.
Monday, February 17, 2014
Penne with Sausage and Mushroom Ragu
Amy recently posted this recipe for Penne with Sausage and Mushroom Ragu that I knew would be right up our alley. Pasta is definitely my go-to for easy weeknight meals, SP loves mushrooms and Baby Girl loves sausage. Win-win.
This was a simple, delicious, hearty dinner that we all happily gobbled up.
Penne with Sausage and Mushroom Ragu
As seen on Very Culinary
1 pound penne pasta
1 tablespoon olive oil
1 small sweet onion, diced small
3 garlic cloves, minced
8 ounces baby bella mushrooms, sliced
salt and pepper
1/4 teaspoon red pepper flakes
1 pound Italian sausage
1/3 cup white wine
1 can (28 ounce) diced tomatoes
4 cups baby spinach
1/2 cup freshly grated Parmesan cheese
Bring a large pot of salted water to boil. Cook the pasta according to package directions.
In the meantime, heat the olive oil in a large nonstick pan over medium-high heat. Add the onion and cook until soft and translucent, about 3 minutes. Add in garlic and cook for about 20 seconds. Add in mushrooms and cook until softened, about 3 more minutes. Season with salt and pepper and the red pepper flakes. Add in sausage and cook, breaking up into small pieces until no pink remains, about 3 more minutes. Raise heat to high and pour in the wine; cook until evaporated. Add in tomatoes, along with their juice, and bring to a simmer.
Drain the pasta and add to the sauce, along with the spinach. Toss to coat and allow the leaves to wilt. Add in the Parmesan, taste, and season with salt and pepper if necessary.
This was a simple, delicious, hearty dinner that we all happily gobbled up.
Penne with Sausage and Mushroom Ragu
As seen on Very Culinary
1 pound penne pasta
1 tablespoon olive oil
1 small sweet onion, diced small
3 garlic cloves, minced
8 ounces baby bella mushrooms, sliced
salt and pepper
1/4 teaspoon red pepper flakes
1 pound Italian sausage
1/3 cup white wine
1 can (28 ounce) diced tomatoes
4 cups baby spinach
1/2 cup freshly grated Parmesan cheese
Bring a large pot of salted water to boil. Cook the pasta according to package directions.
In the meantime, heat the olive oil in a large nonstick pan over medium-high heat. Add the onion and cook until soft and translucent, about 3 minutes. Add in garlic and cook for about 20 seconds. Add in mushrooms and cook until softened, about 3 more minutes. Season with salt and pepper and the red pepper flakes. Add in sausage and cook, breaking up into small pieces until no pink remains, about 3 more minutes. Raise heat to high and pour in the wine; cook until evaporated. Add in tomatoes, along with their juice, and bring to a simmer.
Drain the pasta and add to the sauce, along with the spinach. Toss to coat and allow the leaves to wilt. Add in the Parmesan, taste, and season with salt and pepper if necessary.
Labels:
easy weeknight meal,
Italian,
mushrooms,
pasta,
sausage,
spinach,
toddler-approved
Friday, February 07, 2014
Recipe Swap: Bang Bang Cauliflower
Time for another Recipe Swap! This month's theme was Super Bowl snacks/appetizers. I had a hard time narrowing down my choices from my friend Mary Ellen's blog. She has a ton of great appetizers and dips that I wanted to make, but since I didn't host a Super Bowl party I didn't want to make something that would yield too many leftovers. I finally settled on Bang Bang Cauliflower because (1) I'm on a cauliflower kick lately and (2) I love anything made in the Bang Bang style a la Bonefish Grill.
This was addictively good. I made it as a snack on Super Bowl Sunday and we had to stop ourselves from eating a whole (small) head of cauliflower in one sitting. This was incredibly easy to make, although I wish I'd made a double batch of the Bang Bang sauce. I thought using a small head of cauliflower I'd be OK with one batch but there wasn't enough of the sauce (for my tastes) to go around. This is best served piping out from the fryer so only make as much as you think you'll eat. I attempted to reheat leftovers and it was a big, fat fail.
SP told me if I was going to make this for a party he'd recommend cutting the cauliflower pieces into even smaller florets, just to make it easier for people to eat. I'm already thinking this would be a great dinner entree - you could batter and fry some other veggies like zucchini, onion, parboiled potatoes or sweet potatoes, or carrots to make it more of a complete meal.
The only change I made was to sub the Bang Bang sauce recipe I used for these Bang Bang chicken skewers since I had all the ingredients on hand (and knew we liked the flavor). This was a definite winner. Thanks for an awesome dish, Mary Ellen!
Bang Bang Cauliflower
As seen on Mary Ellen’s Cooking Creations
Batter
2 egg yolks
1 1/2 cup cold water
1 3/4 cup flour, sifted
Bang-Bang Sauce
1/2 cup mayonnaise
1/2 cup Thai sweet chili sauce
2-4 teaspoons sriracha, or more to taste
1 small head cauliflower or half a regular head, cut into florets
vegetable or canola oil
2 scallions, chopped
Place the egg yolks in a large bowl. Add cold water gradually and blend well. Add the flour all at once and stir briefly so it's all mixed, but still has lumps and clumps. Make the batter as soon as you are ready to start cooking - you don't want it sitting around.
Whisk the sauce ingredients together in a large bowl big enough to toss all the cauliflower with it later.
Heat oil in a large pan about 1/4 inch deep. Dip cauliflower into the batter, and then drop it into very hot oil. Cook a few minutes per side until crispy and golden brown. Transfer to a cooling rack or paper towel-lined plate to drain. Toss with the sauce and top with the scallions.
To see what other Super Bowl snacks/appetizers were made for the swap click on the links below.
This was addictively good. I made it as a snack on Super Bowl Sunday and we had to stop ourselves from eating a whole (small) head of cauliflower in one sitting. This was incredibly easy to make, although I wish I'd made a double batch of the Bang Bang sauce. I thought using a small head of cauliflower I'd be OK with one batch but there wasn't enough of the sauce (for my tastes) to go around. This is best served piping out from the fryer so only make as much as you think you'll eat. I attempted to reheat leftovers and it was a big, fat fail.
SP told me if I was going to make this for a party he'd recommend cutting the cauliflower pieces into even smaller florets, just to make it easier for people to eat. I'm already thinking this would be a great dinner entree - you could batter and fry some other veggies like zucchini, onion, parboiled potatoes or sweet potatoes, or carrots to make it more of a complete meal.
The only change I made was to sub the Bang Bang sauce recipe I used for these Bang Bang chicken skewers since I had all the ingredients on hand (and knew we liked the flavor). This was a definite winner. Thanks for an awesome dish, Mary Ellen!
Bang Bang Cauliflower
As seen on Mary Ellen’s Cooking Creations
Batter
2 egg yolks
1 1/2 cup cold water
1 3/4 cup flour, sifted
Bang-Bang Sauce
1/2 cup mayonnaise
1/2 cup Thai sweet chili sauce
2-4 teaspoons sriracha, or more to taste
1 small head cauliflower or half a regular head, cut into florets
vegetable or canola oil
2 scallions, chopped
Place the egg yolks in a large bowl. Add cold water gradually and blend well. Add the flour all at once and stir briefly so it's all mixed, but still has lumps and clumps. Make the batter as soon as you are ready to start cooking - you don't want it sitting around.
Whisk the sauce ingredients together in a large bowl big enough to toss all the cauliflower with it later.
Heat oil in a large pan about 1/4 inch deep. Dip cauliflower into the batter, and then drop it into very hot oil. Cook a few minutes per side until crispy and golden brown. Transfer to a cooling rack or paper towel-lined plate to drain. Toss with the sauce and top with the scallions.
To see what other Super Bowl snacks/appetizers were made for the swap click on the links below.
Wednesday, February 05, 2014
Portobello Pizza Burgers
This recipe for Portobello Pizzas started life as a low-carb dish. So what did I do? I slapped it between two buns and made it...not low carb. Oops.
The first night we ate these with a knife and fork and we were just meh about them. They weren't horrible but they just didn't do it for us. Not wanting to waste food, the next day I thought "how can I make these better" and instantly thought of a hamburger bun. The mushroom was the perfect size for the bun and after a quick spin in the mircowave and some new pepperoni slices (still getting the hang of my new broiler), lunch was served. And it was DELICIOUS. These were so awesome as a burger.
I wonder if I can get my family to give them another try. I'll definitely keep these in mind the next time I need a quick lunch. And the best part is you can make them completely vegetarian by leaving off the pepperoni or you could add other toppings. Olives would be great. I was also thinking about Italian sausage. Finely chopped sauteed peppers and onions would be good as well.
Portobello Pizza Burgers
Adapted from Lauren's Latest
4 portobello mushroom caps
salt and pepper
pizza sauce
1 cup grated mozzarella cheese
pepperoni slices
4 hamburger buns, toasted
Preheat indoor grill pan to medium heat and preheat the oven to 400 degrees.
Remove mushroom stems and wipe off mushroom caps with a damp cloth to remove any dirt. Lightly spray each mushroom cap with nonstick cooking spray and sprinkle with salt and pepper.
Grill each mushroom for a few minutes per side until cooked through. Liquid will come out of the mushroom so be sure to pour it off before continuing with the next step. Remove the mushrooms to a baking sheet lined with foil.
Spoon 2 tablespoons of pizza sauce into each grilled mushroom cap. Top with cheese and pepperoni. Transfer to the oven and cook until the cheese melts. Place one mushroom on the bottom of each roll, add the tops and serve immediately.
The first night we ate these with a knife and fork and we were just meh about them. They weren't horrible but they just didn't do it for us. Not wanting to waste food, the next day I thought "how can I make these better" and instantly thought of a hamburger bun. The mushroom was the perfect size for the bun and after a quick spin in the mircowave and some new pepperoni slices (still getting the hang of my new broiler), lunch was served. And it was DELICIOUS. These were so awesome as a burger.
I wonder if I can get my family to give them another try. I'll definitely keep these in mind the next time I need a quick lunch. And the best part is you can make them completely vegetarian by leaving off the pepperoni or you could add other toppings. Olives would be great. I was also thinking about Italian sausage. Finely chopped sauteed peppers and onions would be good as well.
Portobello Pizza Burgers
Adapted from Lauren's Latest
4 portobello mushroom caps
salt and pepper
pizza sauce
1 cup grated mozzarella cheese
pepperoni slices
4 hamburger buns, toasted
Preheat indoor grill pan to medium heat and preheat the oven to 400 degrees.
Remove mushroom stems and wipe off mushroom caps with a damp cloth to remove any dirt. Lightly spray each mushroom cap with nonstick cooking spray and sprinkle with salt and pepper.
Grill each mushroom for a few minutes per side until cooked through. Liquid will come out of the mushroom so be sure to pour it off before continuing with the next step. Remove the mushrooms to a baking sheet lined with foil.
Spoon 2 tablespoons of pizza sauce into each grilled mushroom cap. Top with cheese and pepperoni. Transfer to the oven and cook until the cheese melts. Place one mushroom on the bottom of each roll, add the tops and serve immediately.
Labels:
easy weeknight meal,
mushrooms,
sandwiches
Monday, February 03, 2014
Garlic Herb Pork
I was looking for a new recipe for pork tenderloin when Nichole posted this recipe for Garlic Herb Pork.

The fresh herbs and garlic made a nice paste to rub over the pork. I think next time I might let the rub sit on the pork for a few hours so the flavors could infuse into the meat a bit.

Garlic Herb Pork
As seen on The Cookaholic Wife, from Once a Month Mom
2 tablespoons olive oil, divided
2 cloves garlic, minced
1 tablespoon fresh sage, chopped
1 tablespoon fresh rosemary, chopped
1 tablespoon fresh thyme, chopped
1 teaspoon sea salt
1/2 teaspoon pepper
2 lbs. pork tenderloin, trimmed
In a small bowl, combine 1 tablespoon of the olive oil with the garlic, fresh herbs, salt and pepper. Rub over the pork.
Preheat the oven to 400 degrees. Heat the remaining tablespoon of olive oil in an oven-safe skillet over medium-high heat,
Add the pork to the skillet and brown on all sides, then place in the oven for 20-25 minutes, turning the pork over every 5 minutes.
Remove the pork from the oven and allow to rest, tented with foil for 5 minutes before slicing.
The fresh herbs and garlic made a nice paste to rub over the pork. I think next time I might let the rub sit on the pork for a few hours so the flavors could infuse into the meat a bit.
Garlic Herb Pork
As seen on The Cookaholic Wife, from Once a Month Mom
2 tablespoons olive oil, divided
2 cloves garlic, minced
1 tablespoon fresh sage, chopped
1 tablespoon fresh rosemary, chopped
1 tablespoon fresh thyme, chopped
1 teaspoon sea salt
1/2 teaspoon pepper
2 lbs. pork tenderloin, trimmed
In a small bowl, combine 1 tablespoon of the olive oil with the garlic, fresh herbs, salt and pepper. Rub over the pork.
Preheat the oven to 400 degrees. Heat the remaining tablespoon of olive oil in an oven-safe skillet over medium-high heat,
Add the pork to the skillet and brown on all sides, then place in the oven for 20-25 minutes, turning the pork over every 5 minutes.
Remove the pork from the oven and allow to rest, tented with foil for 5 minutes before slicing.
Labels:
easy weeknight meal,
pork,
toddler-approved
Friday, January 31, 2014
January Re-Make Recap
Anyone else over winter? Between the Polar Vortex and the snow I'm ready for spring. Truth be told, I've never been a fan of winter, but this year has been particularly brutal. For the first time since I started these monthly recaps I won't be saying "can you believe it's already the end of XXX month" because I'm actually happy January is almost over. That means we're 1/3 of the way through winter and spring is coming!
We did eat very well this month, though. I certainly had plenty of time to cook with all the snow days.
I love making a big batch of eggplant rollatini to keep in the freezer. This made three pans - one we ate that night and the other two are tucked away in the freezer for another time. It's going to be so awesome just popping them in the oven one night when I don't feel like cooking.
I'm not sure if I should keep including the Texas Roadhouse salads in this recap because it's the only side salad I make anymore. It's simple to make, tastes great and is Baby Girl's favorite salad. She knows all the ingredients that go into making it and will remind me if I forget anything.
I'm getting back into big dinner salads and this chopped chicken taco salad with cheese quesadilla strips was such a hit a few months ago that I thought we should have it again. My favorite part of this salad is the quesadilla pieces. There's just something about a gooey, cheesy quesadilla.
It might not be grilling weather but I had a craving for a Shake Shack burger that couldn't be ignored. The sauce really makes these burgers special.
This is now my go-to recipe for roasted potatoes. They come out perfect every single time and we all love them. I haven't been adding the cheese lately and they're still awesome.
I dug way back in my archives for the ever-popular Philly cheesesteak sloppy Joe's this month after wanting something different to make with ground beef. Always a winner.
We rarely do breakfast for dinner but I saw these bacon and egg quesadillas on my blog while searching for something else and needed to make them ASAP.
I served the quesadillas with refried beans, of course. It was a great Saturday night meal.
This grilled chicken and potatoes with roasted garlic-oregano vinaigrette was another dish I saw on my blog while looking for something else and had to make it ASAP. It was just as delicious as we remembered.
This is another one of our favorite dinner salads - the CPK BBQ chicken chopped salad. All the different components that go into this salad are what makes it so incredible.
I had to restock our freezer stash or chorizo and egg burritos because SP kept eating them when he was home due to the snow. I still need to try making my own chorizo. I was thwarted a few weeks ago when my supermarket was out of ground pork.
I also needed to make more sausage and spinach egg bake. This is still my favorite weekday breakfast with a little mayo mixed with hot sauce.
I made these banana chocolate chip muffins twice this month. The first time we had 6 bananas that needed to be used so I made a double batch of the muffins for the freezer. A few weeks later we had 3 ripe bananas so since we already had so many of these in the freezer I thought I'd make them for Baby Girl to share with her school friends. I used my new mini muffin tin and they were the perfect size for the kiddos (plus we got three regular size muffins with the extra batter that didn't fit in the mini pan).
This taco rice is one of my favorite recipes to make with ground beef. It's so satisfying and comforting.
These crispy fish sandwiches are my new favorite sandwich and my new favorite way to eat fish. I love the crispy coating so much and the fish is so flaky and moist.
I made this cauliflower bacon mac and cheese, which originally called for broccoli, again this month and I think I definitely prefer it with cauliflower. Bonus is Baby Girl loves cauliflower both raw and cooked.
We did eat very well this month, though. I certainly had plenty of time to cook with all the snow days.
I love making a big batch of eggplant rollatini to keep in the freezer. This made three pans - one we ate that night and the other two are tucked away in the freezer for another time. It's going to be so awesome just popping them in the oven one night when I don't feel like cooking.
I'm not sure if I should keep including the Texas Roadhouse salads in this recap because it's the only side salad I make anymore. It's simple to make, tastes great and is Baby Girl's favorite salad. She knows all the ingredients that go into making it and will remind me if I forget anything.
I'm getting back into big dinner salads and this chopped chicken taco salad with cheese quesadilla strips was such a hit a few months ago that I thought we should have it again. My favorite part of this salad is the quesadilla pieces. There's just something about a gooey, cheesy quesadilla.
It might not be grilling weather but I had a craving for a Shake Shack burger that couldn't be ignored. The sauce really makes these burgers special.
This is now my go-to recipe for roasted potatoes. They come out perfect every single time and we all love them. I haven't been adding the cheese lately and they're still awesome.
I dug way back in my archives for the ever-popular Philly cheesesteak sloppy Joe's this month after wanting something different to make with ground beef. Always a winner.
We rarely do breakfast for dinner but I saw these bacon and egg quesadillas on my blog while searching for something else and needed to make them ASAP.
I served the quesadillas with refried beans, of course. It was a great Saturday night meal.
This grilled chicken and potatoes with roasted garlic-oregano vinaigrette was another dish I saw on my blog while looking for something else and had to make it ASAP. It was just as delicious as we remembered.
This is another one of our favorite dinner salads - the CPK BBQ chicken chopped salad. All the different components that go into this salad are what makes it so incredible.
I had to restock our freezer stash or chorizo and egg burritos because SP kept eating them when he was home due to the snow. I still need to try making my own chorizo. I was thwarted a few weeks ago when my supermarket was out of ground pork.
I also needed to make more sausage and spinach egg bake. This is still my favorite weekday breakfast with a little mayo mixed with hot sauce.
I made these banana chocolate chip muffins twice this month. The first time we had 6 bananas that needed to be used so I made a double batch of the muffins for the freezer. A few weeks later we had 3 ripe bananas so since we already had so many of these in the freezer I thought I'd make them for Baby Girl to share with her school friends. I used my new mini muffin tin and they were the perfect size for the kiddos (plus we got three regular size muffins with the extra batter that didn't fit in the mini pan).
This taco rice is one of my favorite recipes to make with ground beef. It's so satisfying and comforting.
These crispy fish sandwiches are my new favorite sandwich and my new favorite way to eat fish. I love the crispy coating so much and the fish is so flaky and moist.
I made this cauliflower bacon mac and cheese, which originally called for broccoli, again this month and I think I definitely prefer it with cauliflower. Bonus is Baby Girl loves cauliflower both raw and cooked.
Wednesday, January 29, 2014
Broccoli Cheddar Risotto
I'm on a serious risotto kick these days. When one of the ladies on my cooking board sang the praises of this Broccoli-Cheddar Oven Risotto I couldn't wait to try it.

While I'm sure the oven method is easier, I prefer to cook risotto on the stove top because I have more control. The cooking method is the only change I made to the recipe.

We all loved this, even if I ended up with more broccoli than rice. The flavor was great and the rice was nice and creamy. I also like that this was an all-in-one starch and veggie side dish.
Broccoli Cheddar Risotto
Adapted from Food Network Magazine
4-6 cups low-sodium chicken broth
2 tablespoon extra-virgin olive oil, divided
2 broccoli crowns, cut into small florets
Kosher salt and freshly ground pepper
3 tablespoons unsalted butter, divided
1 small onion, finely chopped
1 1/4 cups arborio rice
1/4 cup dry white wine
1 cup grated sharp cheddar cheese (about 4 ounces)
Bring the chicken broth to a low simmer in a saucepan. Heat 1 tablespoon of the olive oil in a large skillet over medium-high heat. Add the broccoli and season with salt and pepper. Cook, stirring every so often, until the broccoli is tender and browning in spots, about 15 minutes. Remove the broccoli from the skillet.
Melt 1 tablespoon oil and 1 tablespoon butter in the now-empty skillet over medium-high heat. Add the onion and cook, stirring occasionally, until slightly softened, about 2 minutes. Add the rice and stir to coat. Pour in the wine and cook until evaporated, about 1 minute.
Start adding the chicken broth one ladle-full at a time, letting it fully absorb before adding more. This process takes anywhere from 17-25 minutes.
Before you add the final ladle of broth, add the broccoli back in. Add the final ladle of broth and once it's absorbed, taste some of the rice to make sure it's cooked through. Turn off the heat and add the grated cheese and 2 tablespoons of butter. Adjust seasoning, if necessary.
While I'm sure the oven method is easier, I prefer to cook risotto on the stove top because I have more control. The cooking method is the only change I made to the recipe.
We all loved this, even if I ended up with more broccoli than rice. The flavor was great and the rice was nice and creamy. I also like that this was an all-in-one starch and veggie side dish.
Broccoli Cheddar Risotto
Adapted from Food Network Magazine
4-6 cups low-sodium chicken broth
2 tablespoon extra-virgin olive oil, divided
2 broccoli crowns, cut into small florets
Kosher salt and freshly ground pepper
3 tablespoons unsalted butter, divided
1 small onion, finely chopped
1 1/4 cups arborio rice
1/4 cup dry white wine
1 cup grated sharp cheddar cheese (about 4 ounces)
Bring the chicken broth to a low simmer in a saucepan. Heat 1 tablespoon of the olive oil in a large skillet over medium-high heat. Add the broccoli and season with salt and pepper. Cook, stirring every so often, until the broccoli is tender and browning in spots, about 15 minutes. Remove the broccoli from the skillet.
Melt 1 tablespoon oil and 1 tablespoon butter in the now-empty skillet over medium-high heat. Add the onion and cook, stirring occasionally, until slightly softened, about 2 minutes. Add the rice and stir to coat. Pour in the wine and cook until evaporated, about 1 minute.
Start adding the chicken broth one ladle-full at a time, letting it fully absorb before adding more. This process takes anywhere from 17-25 minutes.
Before you add the final ladle of broth, add the broccoli back in. Add the final ladle of broth and once it's absorbed, taste some of the rice to make sure it's cooked through. Turn off the heat and add the grated cheese and 2 tablespoons of butter. Adjust seasoning, if necessary.
Labels:
broccoli,
cheese,
risotto,
side dish,
toddler-approved
Monday, January 27, 2014
Cheddar, Broccoli and Chicken Pasta Skillet
I love one-pot dishes, don't you? It's so nice to cook pasta with other ingredients, not just because it saves time and dirties less dishes, but because the flavorful cooking liquid infuses the pasta. My friends Cassie and Stephanie both raved about this Cheddar, Broccoli and Chicken Pasta Skillet and I couldn't wait to try it.
One thing we both loved about this was the chicken. It was perfectly cooked, very tender and juicy. SP asked me what I did differently and I told him that, unlike other one-pot recipes, you cook the chicken and then remove it from the pan, only adding it back in at the very end so it doesn't overcook. Sometimes I've questioned leaving chicken in the pan too long when I've made other recipes but I didn't think to make that change myself. I will from now on.
Baby Girl ate a huge bowl of this and proclaimed it super yummy. I found that my broccoli didn't cook through in only 5 minutes, so I've increased the time in the recipe below. I also misjudged the amount of cheddar I had on hand so I didn't have quite enough to actually taste it. But not to worry, this will definitely be made again and again so I've got time to get it right.
Cheddar, Broccoli and Chicken Pasta Skillet
As seen on Stephanie Cooks, originally from Center Cut Cook
1 pound chicken breasts, cut into 1 inch chunks
salt and pepper
2 tablespoons olive oil, divided
1 small onion, finely chopped
2 garlic cloves, chopped
1/2 teaspoon dried oregano
1/2 teaspoon red pepper flakes
8oz short-cut pasta
1 and 2/3 cup chicken stock
2 and 3/4 cups water, divided
8oz broccoli florets, chopped into small pieces
1/2 cup light cream
8oz cheddar cheese, shredded
1/2 teaspoon salt
1/2 teaspoon black pepper
Heat 1 tablespoon of oil in a very large skillet. Add the chicken chunks and cook until the chicken is browned on both sides, and almost entirely cooked through. Remove the chicken from the pan and set aside.
Add another tablespoon of olive oil to the pan. Cook the onions for several minutes, until they start to turn translucent. Add in the garlic and cook for another minute or two. Sprinkle in the oregano and red pepper flake.
Add the 1 and 2/3 cups chicken stock and 2 cups water. Stir in the pasta and bring to a boil. Cook for 10-13 minutes until most of the liquid is absorbed into the pasta.
Add the broccoli and 3/4 cups water; cover. Reduce the heat and simmer for about 10 minutes, or until the broccoli is tender.
Add in the cooked chicken, 1/2 cup light cream and cheddar cheese. Increase the heat to medium high. Continue stirring until the cheese melts and the sauce thickens, about 5-10 minutes. Season with salt and pepper, to taste.
The sauce will thicken as it stands.
One thing we both loved about this was the chicken. It was perfectly cooked, very tender and juicy. SP asked me what I did differently and I told him that, unlike other one-pot recipes, you cook the chicken and then remove it from the pan, only adding it back in at the very end so it doesn't overcook. Sometimes I've questioned leaving chicken in the pan too long when I've made other recipes but I didn't think to make that change myself. I will from now on.
Baby Girl ate a huge bowl of this and proclaimed it super yummy. I found that my broccoli didn't cook through in only 5 minutes, so I've increased the time in the recipe below. I also misjudged the amount of cheddar I had on hand so I didn't have quite enough to actually taste it. But not to worry, this will definitely be made again and again so I've got time to get it right.
Cheddar, Broccoli and Chicken Pasta Skillet
As seen on Stephanie Cooks, originally from Center Cut Cook
1 pound chicken breasts, cut into 1 inch chunks
salt and pepper
2 tablespoons olive oil, divided
1 small onion, finely chopped
2 garlic cloves, chopped
1/2 teaspoon dried oregano
1/2 teaspoon red pepper flakes
8oz short-cut pasta
1 and 2/3 cup chicken stock
2 and 3/4 cups water, divided
8oz broccoli florets, chopped into small pieces
1/2 cup light cream
8oz cheddar cheese, shredded
1/2 teaspoon salt
1/2 teaspoon black pepper
Heat 1 tablespoon of oil in a very large skillet. Add the chicken chunks and cook until the chicken is browned on both sides, and almost entirely cooked through. Remove the chicken from the pan and set aside.
Add another tablespoon of olive oil to the pan. Cook the onions for several minutes, until they start to turn translucent. Add in the garlic and cook for another minute or two. Sprinkle in the oregano and red pepper flake.
Add the 1 and 2/3 cups chicken stock and 2 cups water. Stir in the pasta and bring to a boil. Cook for 10-13 minutes until most of the liquid is absorbed into the pasta.
Add the broccoli and 3/4 cups water; cover. Reduce the heat and simmer for about 10 minutes, or until the broccoli is tender.
Add in the cooked chicken, 1/2 cup light cream and cheddar cheese. Increase the heat to medium high. Continue stirring until the cheese melts and the sauce thickens, about 5-10 minutes. Season with salt and pepper, to taste.
The sauce will thicken as it stands.
Labels:
broccoli,
chicken,
easy weeknight meal,
one-pot,
toddler-approved
Friday, January 24, 2014
Artichoke and Brie Dip
I wanted to have a few things out to snack on when our guests arrived on Christmas Day. I'd had my eye on this Artichoke and Brie Dip for awhile and couldn't wait to make it.
This made a ton of dip - definitely good for a large party - so next time I'd cut the recipe in half. We all loved it. Rich, creamy and cheesy, what's not to like? I served it with toasted bread slices and Triscuits on Christmas Day but the next day we had it with Ritz crackers and I think we all preferred them.
Artichoke and Brie Dip
The Kilkenny House
12 oz artichokes, drained and chopped
1 cup mayonnaise
1/2 cup sour cream
1 teaspoon Worcestershire sauce
8oz Brie cheese
1 cup grated Parmesan cheese
1 cup shredded mozzarella cheese
1/2 teaspoon salt
1/2 teaspoon pepper
Preheat the oven to 450 degrees.
Combine artichokes, mayonnaise, sour cream and Worcestershire sauce together until well blended. Add the Brie, Parmesan and mozzarella and blend. Season with salt and pepper.
Place the mixture in a round 1.5-quart baking dish and bake for 15-20 minutes. Serve warm with toasted bread, crackers or veggies.
This made a ton of dip - definitely good for a large party - so next time I'd cut the recipe in half. We all loved it. Rich, creamy and cheesy, what's not to like? I served it with toasted bread slices and Triscuits on Christmas Day but the next day we had it with Ritz crackers and I think we all preferred them.
Artichoke and Brie Dip
The Kilkenny House
12 oz artichokes, drained and chopped
1 cup mayonnaise
1/2 cup sour cream
1 teaspoon Worcestershire sauce
8oz Brie cheese
1 cup grated Parmesan cheese
1 cup shredded mozzarella cheese
1/2 teaspoon salt
1/2 teaspoon pepper
Preheat the oven to 450 degrees.
Combine artichokes, mayonnaise, sour cream and Worcestershire sauce together until well blended. Add the Brie, Parmesan and mozzarella and blend. Season with salt and pepper.
Place the mixture in a round 1.5-quart baking dish and bake for 15-20 minutes. Serve warm with toasted bread, crackers or veggies.
Wednesday, January 22, 2014
Recipe Remake: Christmas Morning Strata
One Christmas when I was growing up my mom found this recipe for Christmas Morning strata and decided to make it for breakfast. We all loved it and it became our standard Christmas morning breakfast. She still makes it every Christmas for her and my stepdad. I tried to get SP and Baby Girl on board, but so far they just aren't fans. For SP it's a texture thing - he doesn't like the soggy bread - but I think it's possible Baby Girl will like it in the future.
After not making it for a few years and having to beg a piece from my mom, I decided to just make my own batch this year and eat the leftovers the rest of the week. When I was looking back at blog posts I realized it had been awhile since I made this and the photo definitely needed to be updated.
I really love this strata. It's simple and there aren't any crazy ingredients, but it's just so, so good. Hopefully Baby Girl will be won over and this can retake its rightful place on our Christmas morning table.
Christmas Morning Strata
Source Unknown
1 pound pork sausage
2 teaspoons yellow mustard
Butter
8 slices white sandwich bread, crusts removed
8-12 ounces Swiss cheese, shredded
1 1/2 cups milk
3 large eggs, lightly beaten
1/2 teaspoon Worcestershire sauce
1/8 teaspoon salt
1/8 teaspoon ground nutmeg
1/8 teaspoon pepper
Brown the sausage in a skillet over medium heat, stirring until it crumbles. Stir in the mustard.
Grease an oval 2.5-quart baking dish with butter. Fit the bread in the dish, tearing the pieces as needed to cover the bottom and sides of the dish with bread. Add the sausage mixture and top with the cheese.
Combine the milk and remaining ingredients, then pour over the sausage mixture. Cover and refrigerate for at least 8 hours, preferably overnight.
Preheat the oven to 350 degrees. Bake, uncovered, for 50 minutes or until golden brown. Allow to rest for 5-10 minutes before cutting and serving.
After not making it for a few years and having to beg a piece from my mom, I decided to just make my own batch this year and eat the leftovers the rest of the week. When I was looking back at blog posts I realized it had been awhile since I made this and the photo definitely needed to be updated.
I really love this strata. It's simple and there aren't any crazy ingredients, but it's just so, so good. Hopefully Baby Girl will be won over and this can retake its rightful place on our Christmas morning table.
Christmas Morning Strata
Source Unknown
1 pound pork sausage
2 teaspoons yellow mustard
Butter
8 slices white sandwich bread, crusts removed
8-12 ounces Swiss cheese, shredded
1 1/2 cups milk
3 large eggs, lightly beaten
1/2 teaspoon Worcestershire sauce
1/8 teaspoon salt
1/8 teaspoon ground nutmeg
1/8 teaspoon pepper
Brown the sausage in a skillet over medium heat, stirring until it crumbles. Stir in the mustard.
Grease an oval 2.5-quart baking dish with butter. Fit the bread in the dish, tearing the pieces as needed to cover the bottom and sides of the dish with bread. Add the sausage mixture and top with the cheese.
Combine the milk and remaining ingredients, then pour over the sausage mixture. Cover and refrigerate for at least 8 hours, preferably overnight.
Preheat the oven to 350 degrees. Bake, uncovered, for 50 minutes or until golden brown. Allow to rest for 5-10 minutes before cutting and serving.
Monday, January 20, 2014
Loaded Baked Potato Dip {Giveaway}
Have I got a giveaway for you guys!
But first, let's talk about this Loaded Baked Potato Dip. It has all the flavors of a loaded baked potato in dip form. Brilliant. I halved the recipe since I was only serving 4 people and it was plenty. We all agreed this would be a great dip for the Super Bowl.
Which brings me to the giveaway. Just in time for the Super Bowl, Cape Cod is offering a great prize pack to four of my readers (yes, you read that right). Four of you will each receive a package containing 3 bags of Cape Cod Waffle Cut chips and 3 bags of Cape Cod 40% Reduced Fat Original chips. We used the Waffle Cut for this dip and they really stood up well to the task.
Simply enter using the Rafflecopter link below. This giveaway will run until Thursday, February 23 at 12:00am. Winner will be announced by 11:00am ET on February 23 so Cape Cod will have a chance to ship the packages in time for Super Bowl Sunday. Good luck!
a Rafflecopter giveaway
Loaded Baked Potato Dip
As seen on Mary Ellen’s Cooking Creations, originally from The Barbee Housewife
16 oz sour cream
16 slices bacon, cooked and crumbled
8 oz shredded cheddar cheese
3 green onions, chopped
Mix the sour cream, most of the bacon, most of the cheese, and most of the green onions together. Chill for a few hours (at least one hour).
When ready to serve, stir and then top with the remaining bacon, cheddar and green onions.
Serve with potato chips.
Disclosure: I received the same number and variety of chips for review purposes. All opinions are my own.
But first, let's talk about this Loaded Baked Potato Dip. It has all the flavors of a loaded baked potato in dip form. Brilliant. I halved the recipe since I was only serving 4 people and it was plenty. We all agreed this would be a great dip for the Super Bowl.
Which brings me to the giveaway. Just in time for the Super Bowl, Cape Cod is offering a great prize pack to four of my readers (yes, you read that right). Four of you will each receive a package containing 3 bags of Cape Cod Waffle Cut chips and 3 bags of Cape Cod 40% Reduced Fat Original chips. We used the Waffle Cut for this dip and they really stood up well to the task.
Simply enter using the Rafflecopter link below. This giveaway will run until Thursday, February 23 at 12:00am. Winner will be announced by 11:00am ET on February 23 so Cape Cod will have a chance to ship the packages in time for Super Bowl Sunday. Good luck!
a Rafflecopter giveaway
Loaded Baked Potato Dip
As seen on Mary Ellen’s Cooking Creations, originally from The Barbee Housewife
16 oz sour cream
16 slices bacon, cooked and crumbled
8 oz shredded cheddar cheese
3 green onions, chopped
Mix the sour cream, most of the bacon, most of the cheese, and most of the green onions together. Chill for a few hours (at least one hour).
When ready to serve, stir and then top with the remaining bacon, cheddar and green onions.
Serve with potato chips.
Disclosure: I received the same number and variety of chips for review purposes. All opinions are my own.
Subscribe to:
Posts (Atom)